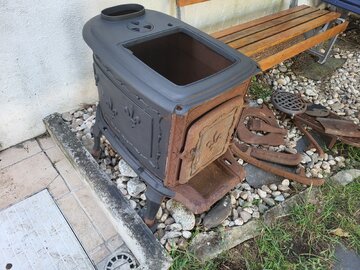
I would like to have an ID in this wood stove, please

  • Active since 1995, Hearth.com is THE place on the internet for free information and advice about wood stoves, pellet stoves and other energy saving equipment.

    We strive to provide opinions, articles, discussions and history related to Hearth Products and in a more general sense, energy issues.

    We promote the EFFICIENT, RESPONSIBLE, CLEAN and SAFE use of all fuels, whether renewable or fossil.
Will investigate the flue damper.
I was just now looking for the adaptor you mention, and was worried that could not find online. Surely I am using the wrong keywords. Must be delivered from the European Union, otherwise the coctum taxes will be impossible (stupid I know).
You can normally ovalize the single wall pipe. Keep the seam to the rear, crushing into an oval shape at bottom.

For wood, the pipe should go inside the stove collar. Each piece of pipe is installed with the bottom going inside the pipe below it.

For wood, a manual flue damper is used to slow the velocity of rising gases in the chimney. It is a chimney control that decreases draft by slowing the velocity of rising gases. Older stoves without door gasket material can allow more oxygen than necessary into firebox becoming uncontrollable with too much air. So the flue damper is used to slow the air leaking in. *Not all countries allow their use* since you can easily slow the draft too much forming creosote.

Newer stoves use chimney height and pipe configuration to supply the correct draft required to keep the stove within emission testing limits. So newer stoves only use a flue damper to slow an over drafting chimney. You will get conflicting information on flue damper use depending on the stove being used.

The main thing is realizing it is a chimney control that affects the stove. Not to be used as a stove control unless necessary to prevent overfiring.
 
  • Like
Reactions: Paramonte
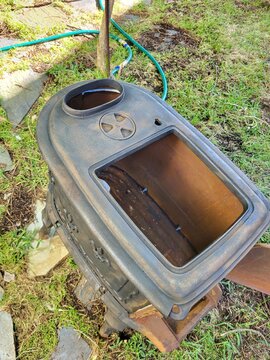
It looks like the stove was recently taken apart and the lid sealed. What is the light grey material that was used? Is it sheet like a gasket or are we seeing an ooze from a stove cement? I'm wondering why the bottom and rear seam were not also sealed.

A baffle will be a bit of a challenge to fashion that matches the rear radius of the stove body. I would make a good fitting template out of cardboard and then take it to a metal shop with a plasma cutter and have it cut out of thick steel as stoveliker suggested. Then there is the question of how to support it.

The stove clearly needs a major wirebrushing to knock off as much rust as possible. Unfortunately the base looks soaked in oil. This is going to have to be dealt with before refinishing. It could be burned off before repainting with a proper high-temp stove paint.
 
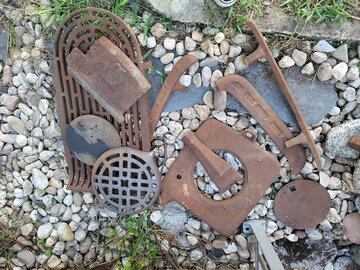
you have pics of all the extra pieces?
 
You can normally ovalize the single wall pipe. Keep the seam to the rear, crushing into an oval shape at bottom.

For wood, the pipe should go inside the stove collar. Each piece of pipe is installed with the bottom going inside the pipe below it.

For wood, a manual flue damper is used to slow the velocity of rising gases in the chimney. It is a chimney control that decreases draft by slowing the velocity of rising gases. Older stoves without door gasket material can allow more oxygen than necessary into firebox becoming uncontrollable with too much air. So the flue damper is used to slow the air leaking in. *Not all countries allow their use* since you can easily slow the draft too much forming creosote.

Newer stoves use chimney height and pipe configuration to supply the correct draft required to keep the stove within emission testing limits. So newer stoves only use a flue damper to slow an over drafting chimney. You will get conflicting information on flue damper use depending on the stove being used.

The main thing is realizing it is a chimney control that affects the stove. Not to be used as a stove control unless necessary to prevent overfiring.
That idea about ovalizing the wall pipe seems nice. Will let you know about it
 
Last edited:
It looks like the stove was recently taken apart and the lid sealed. What is the light grey material that was used? Is it sheet like a gasket or are we seeing an ooze from a stove cement? I'm wondering why the bottom and rear seam were not also sealed.

A baffle will be a bit of a challenge to fashion that matches the rear radius of the stove body. I would make a good fitting template out of cardboard and then take it to a metal shop with a plasma cutter and have it cut out of thick steel as stoveliker suggested. Then there is the question of how to support it.

The stove clearly needs a major wirebrushing to knock off as much rust as possible. Unfortunately the base looks soaked in oil. This is going to have to be dealt with before refinishing. It could be burned off before repainting with a proper high-temp stove paint.
Correct. the seller told me that his father had "assembled" the stove. I did not investigate further, as he was offering to get the stove in his own car to my place. Clearly the the lid and the bottom have been cemented and, stangely, the cement also seems to contain a sort of a plastic rap that is not burned. So my guess is that this stove was never used after the " assembling", and this matches the seller saying the stove was "never used". Also note the screws on the bottom (they are also in the top) that seem to be newer than the rest of the stove. So, potentially the stove was bought dismantled, and the buyer (the father of the seller) assembled it and by caution used screws to assure fastening of the panels, I believe he had to drill the screw holes. Moreover he might have also sealed the panels (probably not necessary) as a cautionary measure. So far I have water pressure the whole thing, and I am applying graphite paste for the outside only
 
you have pics of all the extra pieces?
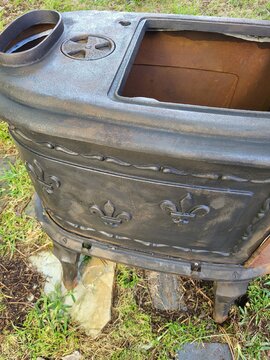
Two photos, one of the pieces not yet mounted. Note that there is an extra leg and an extra solid circular plate. The other picture is of the application of the graphite paste half way through. I know I should have sanded the all thing. I only jet washed it with water. Ok, next time will do it properly.

I would like to have an ID in this wood stove, please I would like to have an ID in this wood stove, please
 
I have not heard about graphite paste as a finish (and suspect it might smudge a lot). If it contains oil ("paste"), it might smoke/smell when you get it hot the first few times. Maybe to the point that your smoke alarm goes off. Surely open the windows.

But man does that look great!

I hope you can get it working with the flue. Do put in a damper as low as possible in the circular flue (i.e. right above a transition piece).

(Also, do have smoke alarms and CO alarms properly functioning!)
 
  • Like
Reactions: Paramonte
I have not heard about graphite paste as a finish (and suspect it might smudge a lot). If it contains oil ("paste"), it might smoke/smell when you get it hot the first few times. Maybe to the point that your smoke alarm goes off. Surely open the windows.

But man does that look great!

I hope you can get it working with the flue. Do put in a damper as low as possible in the circular flue (i.e. right above a transition piece).

(Also, do have smoke alarms and CO alarms properly functioning!)
I have applied graphite paste to my indoor fireplace. It works well but the smell will be intense in the first 3 ou 4 uses. And here in the house everybody dislikes these chemical smells. Otherwise very nice. This stove will not be in the house itself, at the moment is outside
 
  • Like
Reactions: stoveliker
You can add 2 meters of pipe to it and have the first few burns outside to get rid of most of the smell.
 
Hi all!
Just to report back, a bit.
As you may remember I jet washed the stove and applied graphite paste.
After that, I was checking out some youtube videos about cleaning and bringing to life old cast iron stoves and realized how lazy I was to use just the jet wash.
So I went about using a drill as a metallic round sander, and to much of my surprise the coat that I had applied of graphite paste would hardly come off, and I did this under a light stream of water. So, this graphite stuff adheres to the metal very strongly and does not dilute under water. I have sanded the whole outside stove and the next step is to apply again the graphite paste. You can see by the photos the result of hard sanding the metal that was previously coated with graphite.

I would like to have an ID in this wood stove, please I would like to have an ID in this wood stove, please
 
Last edited:
I will look for that. The seller told me it has been sitting in his place for 30 years
It is without question going to need to be broken down and all of the joints re cemented. Do you actually have all of the parts?
 
  • Like
Reactions: Paramonte
It is without question going to need to be broken down and all of the joints re cemented. Do you actually have all of the parts?
I was wondering if this was already done recently. That's why I asked earlier. The large amount of oil and new bolts seems to indicate a recent refitting.
 
  • Like
Reactions: Paramonte
I was wondering if this was already done recently. That's why I asked earlier. The large amount of oil and new bolts seems to indicate a recent refitting.
Certainly possible
 
  • Like
Reactions: Paramonte
It is without question going to need to be broken down and all of the joints re cemented. Do you actually have all of the parts?
I have all the parts but the chiminea flue adapter from oval to round that I am having a lot of trouble to get.
It is beyond my skills to take it apart. Anyway are all stoves supposed to have cemented joints.? I have two French fireplaces (Invicta and Chazelles) that do not seem to have cemented joints. Thanks
 
I have all the parts but the chiminea flue adapter from oval to round that I am having a lot of trouble to get.
It is beyond my skills to take is appart. Anyway are all stoves supposed to have cemented joints.? I have two French fireplaces (Invicta and Chazelles) that do not seem to have cemented joints. Thanks
Can you take some 150mm stove pipe and ovalize one end to fit?
 
Cast iron stove joints need to be sealed. Unsealed joints allow air in at odd places and can make a fire harder to control.
 
Cast iron stove joints need to be sealed. Unsealed joints allow air in at odd places and can make a fire harder to control.
It looks like work was very recently done. Maybe asked the seller what was used for sealing.

I would like to have an ID in this wood stove, please