My progress in building a wood fired boiler based on the design by Richard C. Hill

  • Active since 1995, Hearth.com is THE place on the internet for free information and advice about wood stoves, pellet stoves and other energy saving equipment.

    We strive to provide opinions, articles, discussions and history related to Hearth Products and in a more general sense, energy issues.

    We promote the EFFICIENT, RESPONSIBLE, CLEAN and SAFE use of all fuels, whether renewable or fossil.
Status
Not open for further replies.
I continue to learn as I use my wood fired boiler as there are so many things to observe. I have previously posted information on this forum that I would like to comment on further.

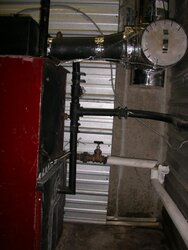
Stack temperatures. I previously stated it was in the region of 400 C. (750 F) It does exceed this figure on occasions but of late it has been running at about 240 C (464 F) The stack temperature can vary quite markedly. However, I am happy to see it on the high side rather than on the cool side.

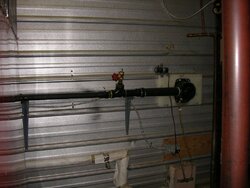
Fly ash in the heat exchanger I previously stated I was having a problem with fly ash carrying through the heat exchanger. This problem only occurred when the inlet air filter became blocked and the fire was not burning with it's full intensity. After replacing the filter the problem with the fly ash is no longer present. I can only presume that with a hot fire the ash is almost fully consumed. I have taken note of Hobbyheater's suggestion to remove the ash from the burn chamber on a regular basis which doesn't take long using a tin on the end of a stick followed by vacuum cleaning.

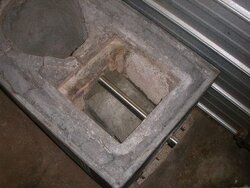
I finally got around to encasing the burn chamber with a mixture of vermiculite and portland cement. This has made a significant difference to the efficiency of the boiler as heat is retained in the burn chamber for a much longer period of time which makes starting a new burn much easier.

Comments about wood to be burnt. I do not buy timber to burn and scrounge around to find anything I can burn. In this regard timber that others leave behind such as tree stumps and gnarled remnants burn fine in my boiler. Whilst sticks burn with the greatest intensity I have found I can burn very large single pieces of wood if they are loaded when the fire is at fully established and running hot.

Temperature of water. For efficient heating with panel radiators I have found the water needs to be at least 70C (160 F) or hotter. Yesterday I heated the water to 98 C and the heating was magnificent. However, I consider that degree of heat too high for safety.
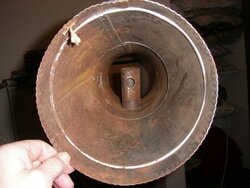
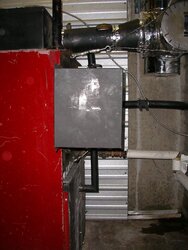

Air filter.jpg
The new air filter

Rough timber.jpg
Rough pieces of timber that I can burn

Burn chamber encased.jpg
The burn chamber encased with insulating cement

Too hot!.jpg
Too hot for safety!
 
Thanks again for sharing your results!
I'm curious about your air supply; it looks a bit fearsome, more of a high volume compressor than a fan.
What is the intake air volume, and what [if you know] is the operating [burn chamber] pressure of your boiler? This would be really useful info from an engineering point of view, for design calculations of the burn chamber as well as the machinery.
I have a leftover 1/2hp squirrel cage blower I was thinking of using. It's a high pressure blower, but nothing like yours.
I was also considering using an oil burner I have [25kw]; it could start the wood fire, then I could cut the oil flow and only use it's blower. It might even work as a backup heat source. But after seeing your blower / compressor, I don't thing the little one in the oil burner could do a thing for me.
 
Hi Mark,

In Professor Hill's paper he recommended using an R1 series Gast Regenair blower which is rated at 1/8 hp. When I was looking on Ebay in USA for a used unit I could only find an R2 series which is rated at 1/5 hp .
The price was right so I decided the extra capacity would not hurt and that has proved correct.

Currently there are some R1 series blowers for sale on Ebay.
http://www.ebay.com/sch/i.html?_kw=GAST REGENAIR BLOWER R1102

This is the specifications for the R2 pump which should provide the information you are seeking.

Gast Regenair.PNG
 
The morning after..jpg

This is a picture looking into the burn chamber taken after a burn was completed. All that is left of several large logs and odd pieces of gum trees is a few handfuls of fine grey ash. If the planet heats up as a result of global warming I guess I could always go into the cremation business.
 
I actually built a one-use crematoria last week; wife wanted to keep the ashes of our dog.
Just an oil barrel with fiberglass on the outside , a grating halfway up, and a half lid.
Burned at 550-600C powered by an oil burner through a hole near the bottom, temporarily pulled from our heating system for the job.
I had the burner turned down to minimum, about 12kw, to avoid meltdown; but higher temp would have been better for breaking down the bones.
 
In my instance I didn't experiment with different fans as I wanted to closely follow the original design of Professor Richard Hill. If you read his paper he certainly tried many options and settled on the Gast Regenair R1 Series for input air and the Djernlund Draft Inducer Model DJ-3 for the exhaust. Quite frankly I had my hands full in building the heater and following the Professor's advice gave me the best chance of a positive outcome. The two stage motor in the Jetstream certainly seems to have high performance but I don't know whether it is still available and I don't know the details of the manifold that it feeds into.
 
It's true, all the numbers are clearly laid out in the original paper. Dr. Hill wrote his burner ran at 3" [not 30] water pressure [excuse me, but I find this a slightly archaic form of pressure measurement], and only around 24cfm of air volume. He says that includes lots of excess air to ensure complete combustion too.
I don't much like the induced draft flue fan; if heat extraction is very good, there would be little convection to pull out the exhaust, and the fan will survive. But if my home made heat exchanger isn't so great, the hot exhaust would likely kill the fan. And it wouldn't need it either.
I would like to use stuff I have left over and lying around; but all my stuff is either too big or too small...
 
I don't know the details of the manifold that it feeds into.


On the Jetstream, one vacuum motor does double duty as both draft inducer and forced draft. As shown in the last picture, the motor was originally mounted on the back of the boiler. In this configuration, the motors were short lived; they just ingested too much dust from the boiler. The first picture shows the vacuum motor mounted on the boiler room wall where it gets clean outside air from a duct in the basement wall. Second picture shows the air being divided between the draft inducer and the forced draft. Third picture is the draft inducer port in the chimney. The fourth shows the air is preheated as it passes through settling chamber above the tunnel and into the burn chamber.
Building your own boiler that works is impressive! Hope this info can be of some use.
The vacuum motor is still available.
 

Attachments

  • IMGP3615.JPG
    IMGP3615.JPG
    143.9 KB · Views: 603
  • IMGP3613.JPG
    IMGP3613.JPG
    74.6 KB · Views: 596
  • IMGP3620.JPG
    IMGP3620.JPG
    118.2 KB · Views: 2,763
  • webIMGP3334.JPG
    webIMGP3334.JPG
    30.3 KB · Views: 611
  • IMGP3414.JPG
    IMGP3414.JPG
    120.7 KB · Views: 625
Thats the kind of draft inducer I like! One that is pnumatic, and not a motor with impeller in the exhaust, putting the motor close to the heat, or with a really long shaft. Use the venturi effect to "pull" the smoke out.

I just read Dr. Hill's full report (his name is still famous in Maine) very interesting stuff. HH: what do you think of the Madawaska version? There is a thread of one for sale. Must weigh several tons like your Jetstream.

TS
 
HH, thanks for uploading the pictures. A Venturi draft inducer seems a better idea to me; Professor hill said he found them to be too inefficient.
But I have a leftover 1/2hp scroll fan that has a fairly high pressure output; a bit of creative ducting and it should do everything.

Those industrial vacuum motors are nice, but I have to work with a very small budget. Cash is thin on the ground out here, and stuff like that costs double in Europe what it does in the US.

We pay $5.70 a US gallon for heating fuel, $6.84 for road diesel, and $7.93 for gasoline. skilled labor is worth $10 per hour, or would be if there was any work.
And just for good measure, we're in severe drought!
The weather is nice though.


And I thought it was getting bad here.
 
I'd move back to the US [been away for 30 years] if I could sell; but the banks won't / can't finance, and there are no buyers for now.
So to keep myself amused I'll try to build the boiler, if I can do it on a shoestring.
Every buck I invest here raises my property value by 25 cents, if I work for free.


OUCH! <>
 
We pay $5.70 a US gallon for heating fuel, $6.84 for road diesel, and $7.93 for gasoline. skilled labor is worth $10 per hour, or would be if there was any work.
And just for good measure, we're in severe drought!
The weather is nice though.

it is not so bad in Portugal, fuel prices are the same
I only work for half the price of an hour
 
Hi Jebatty,

I have read your posts about installing chain turbulators in a Tarm.

I am considering installing turbulators in my home built boiler. My boiler has twelve fire tubes running horizontally which are about one meter long with an internal diameter of approximately 38mm (1.5 inches)

One option is to use chain about four mm smaller than the internal diameter of the fire tubes. I have thought about whether an accumulation of fire ash may make it difficult to withdraw the chains to enable cleaning. My experience up to now is that the ash in the tubes has been fine and soft and thus easy to remove.

I note that you used chain of a much smaller diameter that the fire tubes in the Tarm but you were able to centralize the chains by the method you used to suspend them. If I use a smaller diameter chain it will lay in the bottom of the tubes with a large gap at the top which would probably defeat their intended purpose.

I would be interested in your opinion in this matter given your experience with turbulators.

JEBATTY's RESPONSE

Horizontal tubes present an issue. With vertical fire tubes some boilers (Froling, for example) use a helical coil turbulator mounted to a frame which allows the turbulator to slide slide back and forth by a manual lever to shake the ash from it and to clean the fire tube. The coil is in contact with the sides of the fire tube.​
A similar chain device might be used, perhaps with a rod to hold the chain rigid, or perhaps welding the links of the chain to make the chain rigid, along with a shaker assembly. The weight of the chain might cause the chain to sag, especially under heat, and make this impractical though.​
My general thought is that any device which turbulates the hot gases in the fire tubes, and not be too restrictive on gas flow, will achieve a beneficial result. When I talked to Tarm about the chain idea, I was told that their commercial turbulators resulted in about a 100F drop in stack temperature. The chain turbulators also achieved this outcome, so I guess they worked about as well as the commercial ones.​

Thanks Jebatty for your quick and considered response.

I had thought of buying twelve meters of chain but it might be prudent for me to buy only one meter and experiment with it to find out a practical way to install it. Welding the links is certainly an option for me.​
 
I now have turbulators installed in my heater. Each turbulator is one meter long and made from heavy mild steel chain. All the links are welded together so the chain is straight and rigid. The chain is easily pushed into the boiler tubes as the width of the chain is about one quarter of an inch narrower than the boiler tube.

Preliminary testing has shown a dramatic reduction in stack temperatures which are about half of what they were. Long term testing will be needed to gauge the worth of having the turbulators installed but as summer is fast approaching in this part of the world that may have to wait until next season.
 

Attachments

  • Turbulators.jpg
    Turbulators.jpg
    204.4 KB · Views: 1,155
  • End of heat Exchanger.jpg
    End of heat Exchanger.jpg
    287.1 KB · Views: 891
Hi Hobbyheater and other members.

Now that summer is approaching I am planning on rebuilding the fire chamber of my heater which is crumbling and may soon collapse completely.

When I built the chamber I used high temperature refractory but did not follow the manufacturer's instructions on curing by progressively baking the casting at a range of temperatures.

I have read where people use stainless steel needles for reinforcing refractory. Have you any knowledge about this, or other tips which may help me to complete the task?

Thanks

Hello Hobartian,

I too am building a wood boiler, but I am using refractory brick and a different approach, i'll post it as soon as I get it up and running, here's a pic from the early stages:

IMAGE_471.jpg


My advice is to use firebrick for the burn chamber, insulated, you can repair/replace it easily, and it keeps the burn temperature very high. Good luck.
 
Hi Demachado,

I have considered using firebrick but I would like to have another go at casting the chamber using a much better technique that will allow the proper baking of the components before they are put into service. In the first instance I did not follow the manufacturer's instructions and thus have only myself to blame.

I would certainly like to see more pictures of your heater and hear about it's performance. Where did you get the design? Is it fan assisted? Is it a gasifier?
 
Hello,

I hope it performs well, as soon as I get it running! I got the ideas from rocket mass heaters and also from masonry heaters, then I fitted a water jacket in there...

It will be fan assisted (low cfm) to keep the burn rate efficiency high, it's a firebox with a stainless steel exchanger under the refractory floor, and a water jacket with "turbulators" on the flue side... I'll use the top down burn to get the most out of the wood and no smoke burns so the neighbours are never disturbed by the smoke.

As soon as I create my own post I'll you know about it.

You have an excellent work there, by the way.

Regards.
 
I installed a large thermal oixidizer many years ago used as a backup disposal device fora hazardous gas stream. It would sit off line at room temp and then have to go up to 1600 deg F in 20 minutes. The refractory in the burner really didnt like it. We found that if we followed the initial cure instructions when we replaced the refractory, we would get longer life, but it was real easy to skip steps and if they were skipped the refractory didnt last as long. I have seen the use of stainless steel needles, it tends to keep the casting together when it starts to fail but I didnt see any signficiant life extension. It was PITA to take out refractory that has it in it. The majority of the unit was lined with ceramic blanket, that worked very well, we had several years on it and it was in fine shape.
 
There are different grades of firebrick; hard brick doesn't insulate, and insulating brick is quite soft and can easily get crumbly.
If building this type of high temperature burner using brick, the best is to line the burn chamber with hard fire brick, then put a layer of insulating brick around that, then an external cladding.

I built a ceramic kiln that ran on kerosene, it fired at 1050C and sounded like a 747 taking off.

Thanks for the update on the turbulators; that's useful information!
 
Status
Not open for further replies.