
Just keep the cold beers a-comin'
- Thread starter mywaynow
- Start date
-
Active since 1995, Hearth.com is THE place on the internet for free information and advice about wood stoves, pellet stoves and other energy saving equipment.
We strive to provide opinions, articles, discussions and history related to Hearth Products and in a more general sense, energy issues.
We promote the EFFICIENT, RESPONSIBLE, CLEAN and SAFE use of all fuels, whether renewable or fossil.
You are using an out of date browser. It may not display this or other websites correctly.
You should upgrade or use an alternative browser.
You should upgrade or use an alternative browser.
- Status
- Not open for further replies.
") Rick
Rick
firebroad
Minister of Fire
I wish I could do that. I have a bunch of flat sandstone type pieces that serve as a couple of inches of flower bed border, and I keep knocking them down when I mow and stuff.
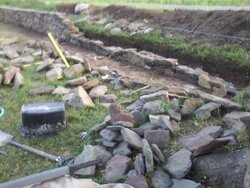
It is running me about 1- 1.5 hours per running foot to place them. I will need to back fill and top with more soil later in the fall when the planting is done. The stone source is now is a 1/4 mile from me. Most of the stuff comes from wooded lots. The big trees, mostly poplars, push up tons of this stuff. They are like clams too, find one and find a bunch! I am running into roots now, from the Maple. Makes the digging tough. Headin' out there now, beer in hand. Dog in trail. Good stuff!
Flatbedford
Minister of Fire
That looks great! Really nice work. I have done some stone work over the years and hope to do more soon. I like when you get on a roll and the stones almost start to tell you where to put them. Keep up the good work and post more pictures too.
PapaDave
Minister of Fire
Lets be honest Dex, your house is encompassed by firewood stacks.Agreed...
Also agree with the Yeunglings. I like them all but the Lite. Black and Tans are delicious
Looks awesome. I am a huge fan of rocks. I have 2 large islands and my house is encompassed by rock.
Keep up the good work.
")
The stonework......oh, the patience.

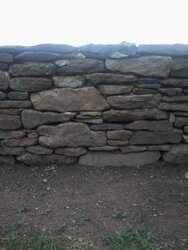
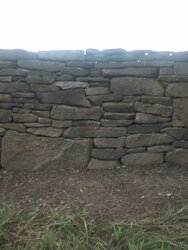
Well I made it to the tree that was the my target for the summer. Somewhere around 75 linear feet of wall. Only issue I have is the workmanship, or style evolved a bit over the last 10 feet. I must have been to picky with the stone I picked, and/or took too much time mating the stones. Either way, I think I will be taking a cold chisel to this portion to open up some seams and gaps. See the difference:
Attachments

It is running me about 1- 1.5 hours per running foot to place them. I will need to back fill and top with more soil later in the fall when the planting is done. The stone source is now is a 1/4 mile from me. Most of the stuff comes from wooded lots. The big trees, mostly poplars, push up tons of this stuff. They are like clams too, find one and find a bunch! I am running into roots now, from the Maple. Makes the digging tough. Headin' out there now, beer in hand. Dog in trail. Good stuff!
It's beautiful work mw and a lost art form. I've decided I like you a whole lot better stoned. LOL Really, your stone work is great. How much chiseling of the rock do you do to get it to fit right?
Not much at all B and thanks for the compliment. The extra time selecting stone helps, as does slowing the laying process to a crawl I would typically spend 45 minutes in the morning putting some mortar in behind and under the rear of the stones, done in a way to tie the rear support stones to the face stones but limited to not show in the front. The mortar cures while I am working and then if the energy and climate allow, I will pick the next course out for an hour or so at night. A course is roughly 12 feet wide, maybe 20 stones. The only cutting is done with a hammer to form the edges. I cut high spots down when needed with a cordless 4.5 inch grinder with a diamond wheel. Maybe chisel off some odd spots too. I would say one in ten stones gets a trimming of one sort or another. Every 2-3 courses I will load up the back side with bad stones and sackrete for stability. There will be lateral pressure on the wall so I am maintaining a thickness of 15 inches through most of the hieght. Is the difference as easy to spot as I contend (pic 1 vs 3)?It's beautiful work mw and a lost art form. I've decided I like you a whole lot better stoned. LOL Really, your stone work is great. How much chiseling of the rock do you do to get it to fit right?
Eatonpcat
Minister of Fire
...Is the difference as easy to spot as I contend (pic 1 vs 3)?
Not to my eye in those pics. I know what it's like to have my nose buried in the details of a project and really sweat the small stuff. Later on, after I've been finished for a time, I look back on it and can't see what difference it made. Before I went after it with a bunch of chiseling, I think I'd just get 'er done, back away from it, live with it for a while and then see if it even still bugs you. Lookin' real good to me. Rick
Shadow&Flame
Minister of Fire
Thistle
Minister of Fire
infinitymike
Minister of Fire
firefighterjake
Minister of Fire
Adios Pantalones
Minister of Fire
Well I made it to the tree that was the my target for the summer. Somewhere around 75 linear feet of wall. Only issue I have is the workmanship, or style evolved a bit over the last 10 feet. I must have been to picky with the stone I picked, and/or took too much time mating the stones. Either way, I think I will be taking a cold chisel to this portion to open up some seams and gaps. See the difference:
You know- I think you should leave it! This wall will live a looong time, and the change in style/skill is really a great story written right in there. Imagine 2-3 generations from now people looking at it and telling the story of the guy that learned as he went.I love stuff like that
By the way, the early stuff STILL looks great.
edit: I have a few projects where the same thing happened. I recently made an evolutionary series" of skulls, and because I haven't sculpted in a while, they got better as I went. I went back and made replacements for the ones I started on- I can appreciate the pride you're showing in the work.
Flatbedford
Minister of Fire
midwestcoast
Minister of Fire
I see the difference from one pic to the next, but willing to bet that if I saw the whole wall in person I'd see a gradual change in the fit that would not look out of place at all.
I'm with AP. I like the evolution. Reminds me of touring Inca sites in Peru, seeing the stonework evolve from the early style which was merely excellent to the later which was stunning.
I too have gone nose-down into projects & sweated details too much. Your eyes are seeing small differences as glaring and maybe seeing small things that no-one else will ever notice. Seriously, you're worried that the later part is too good! Why not just view it as your masterpiece?
woodchip
Minister of Fire
That's very neat dry stone walling there. We have a lot round here where we live, but I didn't realise that there was much done in the USA.
Making dry stone walls and laying hedges are both arts which have been in danger of dying out here, fortunately there are enough enthusiasts to keep the old traditions alive.
Making dry stone walls and laying hedges are both arts which have been in danger of dying out here, fortunately there are enough enthusiasts to keep the old traditions alive.
S
ScotO
Guest
Looks fantastic, MWN. I personally feel stonework (either stacked, mortarted, or veneered) has the warmest qualities of any building material. That wall looks great as-is, I wouldn't change a thing. I did natural stone veneer in my kitchen, on my foundation, on the front of my porch and garage, the fireplace chase and on the woodstove wall.......picking every single stone off of the mountains surrounding our hometown. I learned as I went. I can see the difference from the garage facade (where I started) to the fireplace chase (last I did, to date), but no-one else can tell. That stone wall you built will be admired long after we are all dust in the ground........many many eons from now.
Flatbedford
Minister of Fire
super nice work myway, 2 thumbs up and a high 5! sure you're not Incan? Mayan? Egyptian? They could prolly use your skillset trying to figure out some fancy megalithic stonework at Gobekli Tepe in Turkey......if you get bored or run out of rocks.
Take a look at some pics of a place called Puma Punku if you like to see stoneworkers showing off.
Take a look at some pics of a place called Puma Punku if you like to see stoneworkers showing off.
S
ScotO
Guest
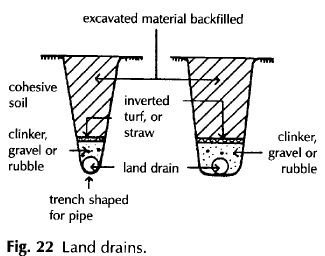
MWN, I would consider putting down a slotted drain pipe in a bed of shale at the bottom or up a third of the way on the backside of that wall. Put down a shale base, lay the slotted pipe down, put some more shale on that, put down some good landscape fabric, top cover with straw and dirt. Slope the pipe around 1/4" per 4' or so. That would go a long way in helping that wall last even longer......

- Status
- Not open for further replies.
Similar threads
- Replies
- 36
- Views
- 3K
- Replies
- 0
- Views
- 2K
- Replies
- 12
- Views
- 2K
- Replies
- 66
- Views
- 6K