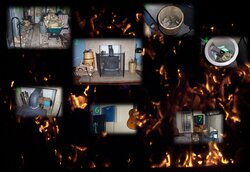
If you are new to wood burning, or just thinking about getting into it, here are a few tips and list items (some mandatory) that you may enjoy. We have been burning wood since 1998. We are *seasoned* pros. If you missed that pun maybe you should just turn up the thermostat and be done with it. I used pictures to help me remember all the functional items and ideas we use to make our wood heat experience enjoyable and safe.
Not included here are some very basic code requirements, like a chimney liner, hearth, etc. that you will already have if your installation was done by a qualified workman. I also am not going into chimney cleaning, because that's not something everyone does on their own. You can pick up the phone for that. By the way, we do our own cleaning. Maybe I will post on that process another time. I do have a few useful suggestions for that as well.
We hope our methods provide value, and may you have a wonderful, safe, warm winter and holiday season this 2012-2013.
================================ Comments on #1 ==============================
Your firewood, in addition to being split, dred, and cut to length , should be accessible. Wood heat on a daily basis requires more than the rustic looking carrier and sling (don't forget the sling!) next to the stove will hold. You will need multiple cords, stacked and drying away from your home, from which you replenish a CONVENIENCE supply outside your door. This is STAGING. If you have money and want to simplify, your process may be
1. firewood delivered
2. you stack (and maybe cover)
3. uncover, stage closer, re-cover
4. Bring small amounts inside
Then repeat steps 3 and 4 throughout the heating season. (I have 9 steps on my list.)
Firewood is staged right outside our den, where the stove is. The closer the better, right? This wood is inside a screened-in porch with a slab floor - very nice. Before this house we used plastic garbage pails with holes for ventilation, outside the back door. (Lots of them, maybe 6.) You need a locking lid if exposed.
HINT = If you use barrels, tilt as you fill them. Lay the wood in longways, shake to settle, add more. You can get it jammed in there really good, and then start the second tier if the can is tall enough. The Intrepid is a small stove so that works for us.
The WOOD CADDY you see in the picture can be fashioned from hardware ordered online, and some local lumber. It makes stacking easier, as the sides hold things together. I still stack properly, mostly out of habit.
KINDLING barrels. Not just for starting fires, but also for nursing them back to strength. A handful of dry sticks on top of weak embers before you reload can mean the difference between a creosote-building smolder fest and a good hot start where everything becomes fully involved. Kindling is important to have around, for sure.
WHEELBARROWS and ROPE are great for carrying wood or dragging sticks. Rope is also handy for dragging multiple garbage cans around without them toppling.
The CHOPSAW is an over-the-top convenience that rocks the Casbah. If my wood fuel is not cut to length, I can take care of it day or night, quickly.
==================================Comments on #2============================
A FIRESCREEN for kids. Large and sturdy, effectively surrounding the whole heater.
TOOLS for fire. I made room in the tool rack to hang the poker-slicer (or is it slicer-poker?) because it's set back and away. The Intrepid gets hot in reburner mode! If I hang tools on the stove's built-in shelf, they burn me when I pick 'em up, and they burn my arm when I adjust the reburner. There's also a bellows you can't see - really neccessary as well.
TWO PAIRS OF GLOVES handy. Leather work gloves for normal loading and stove operation, and Shelby Firewall hi-temp gloves to change the ash pan. With this particular stove the professional gloves are needed.
Wood CARRIER with SLING. The leather sling slips right off and can be carried outside, filled, then carried back and slipped on the rack again. We had an old carrier that fell apart, but I saved the canvas sling. I have a simple technique whereby I empty the one sling into the other. In one motion I can fill the whole carrier.
KINDLING inside. I don't have to go out in the cold when I need to nurse a fire back.
A woven BASKET next to the kindling for junk mail. Anything sensitive, instead of shredding, we use to start fires.
A VACCUUM in the background to keep stove and hearth tidy. This is a convenience, but one I use often. A build-up of ashes on the ash lip of the Intrepid causes dust to rise into the air, especially when the stove is operating - convection. Keep the ash lip and tile clean, and keep your air clean. But
 BE CAREFUL
DO NOT vaccuum up hot embers. Hot embers in a vaccuum are BAD.
====================================Comments on #3==========================
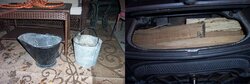
The barrel is not only nice looking, it's functional, with two sections to store things. The crumpled up brown paper was packing in a mail-order. It's kind of shiny but burns well. It's not like glossy magazine or gloss newspaper print, which we don't burn because of pollution. Think you can get one at Crate and Barrel? Think again! If I could remember the name of the vendor I would tell you. We've had the barrels for 10 yrs. They came in a single light color and we stained them so they would look honey with dark bands.
====================================Comments on #4==========================
Inside the top compartment of the barrel are long matches, which are great sometimes, and a box cutter to make fast work of the cardboard. We store extra gloves in there, and there's a piece of wood cut to size for lifting ashes out of the stove's bellypan.
====================================Comments on #5==========================
Cardboard is your friend. It gets the kindling involved first time, everytime. (You have roll, then fold or rip in half. Flat, it doesn't get enough air.) Keeping it behind the stove - well, that won't last. As soon as my wife notices it's gonna go back in the garage.
The dust pan and brush is mandatory. I'd like a metal one. If your stove has front doors, open them when you use the dust pan. The draft sucks in the dust and keeps your air cleaner.
====================================Comments on #6==========================
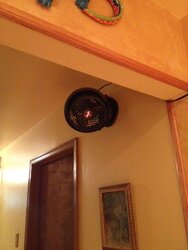
The HEPA mounted on the wall. I left the guitar and mic in the pic so you get a sense of scale. The Allen HEPA is not a small thing. But it catches a lot of soot, and you can vaccuum the filter and keep re-using it if you are careful and use a soft brush.
========================== =========Comments on #7===========================
OPEN the door BEFORE you STRIKE THE MATCH! I posted on these forums about starting a smokeless fire, as have many. You don't need to get your house all smoky. These sliding doors are why it's easy for us to let enough air in to reverse any nonsense going on in the stack. As long as you use a quick burning firestarter, like crumpled newspaper or that shipping paper in the barrel, and LOTS OF IT, any reverse draft threatening to smoke you out will instantly be fixed when you 1) open the door, then 2)light the paper.
Not included here are some very basic code requirements, like a chimney liner, hearth, etc. that you will already have if your installation was done by a qualified workman. I also am not going into chimney cleaning, because that's not something everyone does on their own. You can pick up the phone for that. By the way, we do our own cleaning. Maybe I will post on that process another time. I do have a few useful suggestions for that as well.
We hope our methods provide value, and may you have a wonderful, safe, warm winter and holiday season this 2012-2013.
================================ Comments on #1 ==============================
Your firewood, in addition to being split, dred, and cut to length , should be accessible. Wood heat on a daily basis requires more than the rustic looking carrier and sling (don't forget the sling!) next to the stove will hold. You will need multiple cords, stacked and drying away from your home, from which you replenish a CONVENIENCE supply outside your door. This is STAGING. If you have money and want to simplify, your process may be
1. firewood delivered
2. you stack (and maybe cover)
3. uncover, stage closer, re-cover
4. Bring small amounts inside
Then repeat steps 3 and 4 throughout the heating season. (I have 9 steps on my list.)
Firewood is staged right outside our den, where the stove is. The closer the better, right? This wood is inside a screened-in porch with a slab floor - very nice. Before this house we used plastic garbage pails with holes for ventilation, outside the back door. (Lots of them, maybe 6.) You need a locking lid if exposed.
HINT = If you use barrels, tilt as you fill them. Lay the wood in longways, shake to settle, add more. You can get it jammed in there really good, and then start the second tier if the can is tall enough. The Intrepid is a small stove so that works for us.
The WOOD CADDY you see in the picture can be fashioned from hardware ordered online, and some local lumber. It makes stacking easier, as the sides hold things together. I still stack properly, mostly out of habit.
KINDLING barrels. Not just for starting fires, but also for nursing them back to strength. A handful of dry sticks on top of weak embers before you reload can mean the difference between a creosote-building smolder fest and a good hot start where everything becomes fully involved. Kindling is important to have around, for sure.
WHEELBARROWS and ROPE are great for carrying wood or dragging sticks. Rope is also handy for dragging multiple garbage cans around without them toppling.
The CHOPSAW is an over-the-top convenience that rocks the Casbah. If my wood fuel is not cut to length, I can take care of it day or night, quickly.
==================================Comments on #2============================
A FIRESCREEN for kids. Large and sturdy, effectively surrounding the whole heater.
TOOLS for fire. I made room in the tool rack to hang the poker-slicer (or is it slicer-poker?) because it's set back and away. The Intrepid gets hot in reburner mode! If I hang tools on the stove's built-in shelf, they burn me when I pick 'em up, and they burn my arm when I adjust the reburner. There's also a bellows you can't see - really neccessary as well.
TWO PAIRS OF GLOVES handy. Leather work gloves for normal loading and stove operation, and Shelby Firewall hi-temp gloves to change the ash pan. With this particular stove the professional gloves are needed.
Wood CARRIER with SLING. The leather sling slips right off and can be carried outside, filled, then carried back and slipped on the rack again. We had an old carrier that fell apart, but I saved the canvas sling. I have a simple technique whereby I empty the one sling into the other. In one motion I can fill the whole carrier.
KINDLING inside. I don't have to go out in the cold when I need to nurse a fire back.
A woven BASKET next to the kindling for junk mail. Anything sensitive, instead of shredding, we use to start fires.
A VACCUUM in the background to keep stove and hearth tidy. This is a convenience, but one I use often. A build-up of ashes on the ash lip of the Intrepid causes dust to rise into the air, especially when the stove is operating - convection. Keep the ash lip and tile clean, and keep your air clean. But
BE CAREFULDO NOT vaccuum up hot embers. Hot embers in a vaccuum are BAD.
====================================Comments on #3==========================
The barrel is not only nice looking, it's functional, with two sections to store things. The crumpled up brown paper was packing in a mail-order. It's kind of shiny but burns well. It's not like glossy magazine or gloss newspaper print, which we don't burn because of pollution. Think you can get one at Crate and Barrel? Think again! If I could remember the name of the vendor I would tell you. We've had the barrels for 10 yrs. They came in a single light color and we stained them so they would look honey with dark bands.
====================================Comments on #4==========================
Inside the top compartment of the barrel are long matches, which are great sometimes, and a box cutter to make fast work of the cardboard. We store extra gloves in there, and there's a piece of wood cut to size for lifting ashes out of the stove's bellypan.
====================================Comments on #5==========================
Cardboard is your friend. It gets the kindling involved first time, everytime. (You have roll, then fold or rip in half. Flat, it doesn't get enough air.) Keeping it behind the stove - well, that won't last. As soon as my wife notices it's gonna go back in the garage.
The dust pan and brush is mandatory. I'd like a metal one. If your stove has front doors, open them when you use the dust pan. The draft sucks in the dust and keeps your air cleaner.
====================================Comments on #6==========================
The HEPA mounted on the wall. I left the guitar and mic in the pic so you get a sense of scale. The Allen HEPA is not a small thing. But it catches a lot of soot, and you can vaccuum the filter and keep re-using it if you are careful and use a soft brush.
========================== =========Comments on #7===========================
OPEN the door BEFORE you STRIKE THE MATCH! I posted on these forums about starting a smokeless fire, as have many. You don't need to get your house all smoky. These sliding doors are why it's easy for us to let enough air in to reverse any nonsense going on in the stack. As long as you use a quick burning firestarter, like crumpled newspaper or that shipping paper in the barrel, and LOTS OF IT, any reverse draft threatening to smoke you out will instantly be fixed when you 1) open the door, then 2)light the paper.

")