Fixed my install issues today

  • Active since 1995, Hearth.com is THE place on the internet for free information and advice about wood stoves, pellet stoves and other energy saving equipment.

    We strive to provide opinions, articles, discussions and history related to Hearth Products and in a more general sense, energy issues.

    We promote the EFFICIENT, RESPONSIBLE, CLEAN and SAFE use of all fuels, whether renewable or fossil.
Status
Not open for further replies.

IowaMaineiac

New Member
Nov 5, 2012
19
Des Moines, IA
Here's the original thread: https://www.hearth.com/talk/threads/strong-smoke-smell-filling-the-room-bad-install.93750/

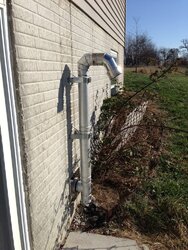
Yes, I plan to trim the shrubbery around the exhaust later today. ;)

We discovered that the smoke was coming from the pipe inside the wall where it connected to the exhaust cap. They made that connection inside the thimble so we couldn't see it until we took it apart today. There was soot all over the seams where the 2 pipe sections came together. It was either defective or wasn't snapped together properly.

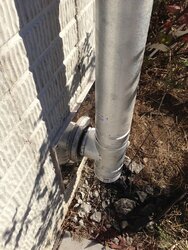
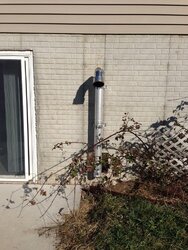
All the old vent pipe was removed and replaced. Now coming from the back of the stove we have a 3" to 4" adapter, 12" pipe through the wall (I have a ridiculously thick basement wall), connected to a T, 4' vertical rise, 90 deg elbow, and the exhaust cap.

The door was also adjusted to seal more tight and we double checked every vent pipe connection to make sure they were sealed.

Now I'm just waiting for the silicone to cure so I can start burning!
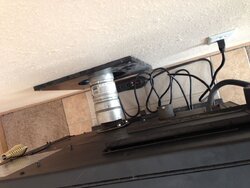
photo(10).JPGphoto(11).JPGphoto(12).JPGphoto(13).JPG
 
I believe that Dexter mentioned there was a joint inside the thimble.

Let us know how it turns out.

It really doesn't matter what was wrong with that joint in the thimble, because it never should have been there to start with. No joints in thimbles ever.
 
I hate to rain on your parade, but you still have a joint in the thimble. You need to be able to visually inspect every seam that could leak carbon monoxide into your house. It might be good today, but leak tomorrow, or next year. A kid could bounce a soccer ball off the pipe, you could back your lawn tractor into it. A thousand things could happen that can break the seal.
 
I'm in an odd position because I have 12" inch thick walls and those exterior brackets require the vent pipe to be a certain distance from the wall which limits what I can do.

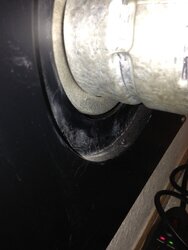
I've attached a picture of where the stove adapter meets the interior thimble. Should I seal that gap with thermal tape or some silicone?
photo(14).JPG
 
Also need a surge protector ;em

Sorry... Not to Bust B#lls. We only want to make sure that the installs are safe, sound, and up to code. There are far more stories than you would care to read, about faulty pellet/wood stove installs.

Everyone here wants to make sure that everyone is as safe as a burner as they can be. Period.

The vent should have a longer horizontal piece. I dont know if they make an 18" , but a 24" would still be acceptable for 4" venting. Making sure to keep the 1/4" rise per foot.

Glad you got the 4" and got that vent out of the weeds.

he has one. see the pic above
 
Nice catch!

No doubt. I looked right at the wall outlet.

But now, looking at that "Strip", I would still question the maker? Joules rating? ? And clamping speed?

Most strips are junk. Most... Not all. His may be a good model. But $9 unit from Wally World is about as much help as cord wood is for a pellet stove ;)

One last thing. The Damper setting? Looks as if its almost closed (all the way)? That would explain the Black.on your term cap and on the ground (where is exhaust hit).

Open the damper a little. You want a very active and lively flame. Not a slow, lazy, and black burn.
 
The power strip is a GE branded strip rated for more joules than the stove can handle. Computers are my RL business and hobby so I know the value of good electronic protection. ;)

I opened the damper quite a bit before I burned it last night and slowly closed it until I got to the sweet spot. Burned it for 5 hours and got no black on the glass or firebrick which was a first. It was only a grey film in one spot so I'm thinking I might have the airflow right. I wish I could clean some of that crap off the firebrick from before but that's another story.

I used a flashlight to look for leaks on startup and did notice a small puff of smoke from the adapter still so I'm going to wrap that connection with some 3M flue tape rated for 600 degrees. Hopefully that will catch what I missed with the caulk.

Does anyone have any advice for that gap on the interior wall thimble? Should that gap around the vent pipe be sealed with caulk like it is on the outside?
 
Snip ....

But $9 unit from Wally World is about as much help as cord wood is for a pellet stove ;)


... snip

That explains those stacks at your place, you haven't been able to figure out how to burn that cord wood in your pellet eaters.

There isn't supposed to be any sealant around the vent on the inside surface of the thimble.
 
Get a good CO2 detector. I have them in both rooms that have pellet stoves. Peace of mind......
 
Glad to see/hear all is finally working out for you!

Now about that installer...did you get a refund on the $$
 
I do have a CO detector in that room right now along with a smoke alarm and fire extinguisher.

All the replacement vent and labor to fix the issues was free. I paid for the new vent to convert my direct vent to a 4' vertical rise. I had only paid for a direct vent originally so all I paid this time was the difference in materials.
 
Only way to fix the joint in the thimble is...
A. Get a 24" horizontal piece and maybe pull the stove out from the wall more, so its easier to work on (if your Hearth allows for the slight move out/ember protection)
B. Push the stove back to the wall with the same piece. But then you have less room to work on it (thats if the rear clearances allow for it to get any closer to wall)

Personally, I would get a 24" (or maybe they make an 18"?) And be done with it. The mounts outside can easily be modified. So that wouldn't stop me.

Your stove, your call. Its already much better than before. But... That joint is still an area of concern. IMHO.

Good call on the Surge protection :)
 
Status
Not open for further replies.