Simple Baffle Solution for your old FISHER ! More Heat Less Smoke under $25

  • Active since 1995, Hearth.com is THE place on the internet for free information and advice about wood stoves, pellet stoves and other energy saving equipment.

    We strive to provide opinions, articles, discussions and history related to Hearth Products and in a more general sense, energy issues.

    We promote the EFFICIENT, RESPONSIBLE, CLEAN and SAFE use of all fuels, whether renewable or fossil.
Thanks for the info on the Baby Bear fitment.
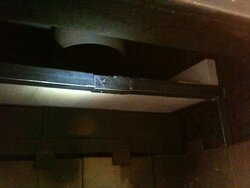
When there is nothing on the sides to support the plate, I've found it very easy cutting firebrick on an angle with a masonry blade in a circular saw. If you need to adjust your plate higher, (steeper angle) firebrick pieces cut in strips shim the plate higher to experiment with the plate angle too.

That's the theory of my post (#12) here;
https://www.hearth.com/talk/threads/fisher-insert-with-upper-air-wash.83066/

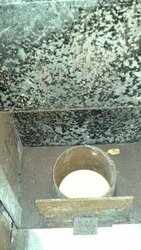
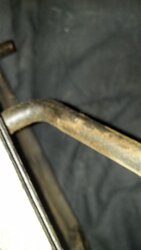
The air intake nut and bolt is perfect for hanging a divertor on. It will sometimes bump a log too close to the door, but you want to keep the log ends away from blocking the air inlet anyway.
 
This 5 minute baffle plate install is the easiest way I've found to reduce smoke and prevent intense heating of the rear outlet elbow or pipe. (20 years late, but better late than never) And possibly the best solution for anyone who can't afford to upgrade to a new stove; Approximate cost under $25.

This pertains to a rear vent, but can be altered for a top vent as well. Simply measure across the inside of your stove width. Obtain a piece of steel plate 5/16 thick from a local steel fabricator or supplier 1/2 inch shorter than this measurement. I made mine (15 long X 8 inches wide for a Mama Bear. Mine cost 1.42 / lb. weighing 11 lbs. Cost $15.62) The only other materials required are 2 firebricks available at mason supply or stove retailer. (the type that line your stove 4 1/2 X 9 X 1 1/4 thick) Papa is the same height stove for brick supports, just a little longer plate to reach across the stove.

1). Simply set the firebrick on edge against the side walls on top of the first course a couple inches from the rear wall. Upright for a Mama or Papa works great, sideways for Baby.
2). Insert the plate through the door, tilt it sideways and rotate until it is between the side walls.
Raise it to the top, and set it on top of the firebrick.
3). By sliding it rearward, you can let it tip down in the back until it's at about a 45* angle in front of the rear vent. Many rear vented stoves have a short shelf under the outlet pipe to set it on as well.
4). Make sure the opening above the plate to stove top is an acceptable size opening.
This can be adjusted by moving the bricks fore and aft to change the angle and opening if required.

The only technical measurement is the opening above the baffle plate. This must be at least as large as the square inch area of your outlet. (6 inch round formula is pi X r squared or 3.14 X 9 =28.26" square inch opening. An 8 inch Grandma or Grandpa would be 3.14 X 16 or 50.24 square inch opening) This is about 2 inches from the top, all the way across any model Fisher Stove. You can adjust it to your exact size, but I find it doesn't make much difference making the opening exact.

I found once in place, this is quite solid and doesn't want to move. It also doesn't noticeably decrease firebox size.

The intense heat that normally would heat the rear outlet elbow now goes up the plate and burns the unburned smoke particles before they get to the outlet. This also directs the heat to the stove top instead of in the direction of the exhaust. (rearward) Huge reduction in smoke. (about 90% reduction as calculated in EPA testing with and without baffle) Nothing permanent is added to the stove. This would also be the perfect area to add a secondary burn tube to admit oxygen at this hottest area.


I was going to fabricate an angle iron frame to support a baffle plate, and realized I had some old firebrick laying around that the plate could set on instead. Much cheaper than angle iron, and some Papa Bears use this second course of brick above the first at the rear anyway. I positioned the new baffle plate that cost a total of $16 and 2 bricks in the stove in less than 5 minutes. I expected to need to cut the corners of the bricks on angles, but the plate sat right on the full bricks in the Mama Bear shown below. Extremely simple !
Hello Coaly, Getting started on a baffle plate for my parents Mama Bear and the dimensions you stated are 15 x 8 then take half off of length so it would actually be 14 1/2 x 8 right. Just want to make sure so I order it the right size cause I don't have a way to cut it. Did you have to make it smaller to get it to fit correctly or does the 15 x 8 fit good. Thanks
 
8 X 15 fit my Mama Bear well. I ordered A-56 steel plate 5/16" thick. It was 11 lbs. at 1.42 per pound. Total $15.62.

I would measure across the inside of any stove I was ordering one for, since any fabricator could have made something a little smaller or larger. It's not like these stoves all came from the same factory and were machine cut. That's why I didn't give an exact size for any model.
 
  • Like
Reactions: mark cline
Folks, I tried to put a small baffle plate inside the air inlet of my Baby Bear stove, hoping to direct more air to the burn zone. In short, the experiment was a a failure. Without the baffle plate, the stove produced virtually no smoke after the stove and chimney was hot. After putting the baffle over the air inlet, no matter how I adjusted the air inlet, the chimney would smoke, indicating, to me, very incomplete burning.

My baffle plate was a 4 by 6 inch, 1/4 inch plate, mounted with the long dimension vertically, about a half inch inside the door. The typical "whoosh", or "whup whup" sound of air rushing in the air inlet from the outside was not present. The outside air temp was about 30 degrees, usually plenty cold enough for a solid draw in this particular chimney.

My conclusion is that the best situation is the most air, coming in at the highest velocity, to the burn area creates the least smoke. If anything, like my baffle, slows down or diminishes the intake air, we get poorer combustion.

From now on, I will continue my practice of opening the air inlet fully and controlling the burn intensity with my damper in the chimney. That seemed to work especially well with the baffle.

Does anybody have any insight, or experience that may be useful. Does anything think a smaller baffle might be worthwhile?


Thanks, Dave Howell, western Maryland
 
Thanks for letting us know how it reacted with that size of a plate at the intake.

With the Mama Bear I used the exhaust damper as a throttle as well, but when up to temp I had to close down the air intakes from between 1 turn open (coldest nights) to just cracked open, depending on the heat needed.

It may have taken away the air from the hottest part of the fire allowing it to smolder, or like you say, the turbulence coming in was reduced. Either way, it wasn't getting air where it needed it.

This is the size I'd try; Timberline Insert 6.jpgTimberline Insert 7.jpg
It was used on Timberline Inserts, no idea how well it worked.
 
I have a Grandpa bear stove with
Less creosote due to burning off more smoke / more creosote due to lower flue temp allowing more condensation. However, I found a drastic reduction in smoke, therefore having less unburned particles to form the creosote I believe outweighs the reduction in temperature. Since where it begins to form would be 250*, you'll know how much temperature reduction you get in the flue by seeing the build up lower in the flue than you have it now. Is this an uninsulated exterior chimney? Insulated Flue liner? That would be the fix to keep temps above condensating.

Fisher experimented with a "Draft Box" as well during EPA testing. For a rear venting 8 inch Fireplace Series, it was a 1/4" plate steel box 9 1/4" square welded on the stove inside back, over the exhaust outlet. The box had 3 sides, closed on the bottom and sides, open on the top. The idea was to evacuate the flue gasses, allow the heat to rise into stove top, and be forced by the draft downward in the box and out the pipe. This box is found on some Grandma and Grandpas and helps retain heat, but does nothing for creating turbulence and rolling the smoke towards the fire. That's why the baffle became the best solution for the new EPA standards being introduced.

To calculate baffle size, the angle of the plate changes the opening as well as plate size. The constant is where the plate contacts the rear wall. You need the front edge of baffle in front of the outlet hole, and 3 inches below the top plate. 3" X 18" wide air space is the approximate square inch area to maintain the same as outlet area. If you lay in there with chalk, you can mark the side 3 inches down from the top, to a point in front of the exhaust hole where you want the baffle edge. You want the heat to go up the baffle and hit the stove top, not the outlet hole. 1 1/2 or 2 is fine. Draw a line from this point towards the back on the angle comfortable for loading and easy to support the plate. Having a couple bricks to set on the ledge will show you what to rest the back end of the plate on. The length of the angled line will be the length of your plate. It doesn't have to be exact, when you position the plate on the side bricks, changing the angle adjusts the air space. I made the plate for the Mama Bear 8 inches, and it could have been 9 with a little less angle and worked.
The flat top Insert is not going to create the turbulence the step top does in the stoves, so you'll be the first to know how much smoke reduction you get with an Insert.

Coaly,
Thanks for all the info. I'm new to the forum and have a question.

I have a top vented Grandpa Bear that seems to have Draft box in the rear. The interesting thing is that it has a weighted door that opens and closes to pull in air if needed. Have you seen this and is this an effective set up?

Thanks, Anthony
 
One mystery solved. The weighted door, I just found out, is called a "Barometric Draft Control". Any experience with this? Apparently it's supposed to automatically regulate the chimney temperature for the Grandmas and Grandpas. But my Grandpa does have what looks like your description of the draft box in the inside rear. I'm wondering if it's still feasible to make a baffle for it...


Update - Ok, I searched the forum and got what I was looking for. :)

Last questions: Will a baffle in this design still work and do you have any suggestions on the layout given the baro box on a grandpa?

Thanks!
 
Welcome to the forum;

The damper flapper opens when the exhaust flow is increased, so an open flap is like a closed manual damper. A closed flap is like an open manual damper allowing all the heat up to increase the draft. Allowing colder air into the flue, cools the rising gasses, reducing draft. It's called barometric since it uses barometric air pressure to rush in to fill the vacuum created by the rising gasses. It reacts to atmospheric pressure that changes with weather on any given day. Opening the air intake, or stove door affects it, as well as opening a door or window to the outside. They are required on most coal stoves to keep the draft through the fire more constant than you could manually. The weight is usually adjustable as well to set the strength of draft as well as altitude that affects the minute operating pressures.

The baffle above the fire rolls the unburned smoke particles back into the flames, and creates a wall of rising heat at the baffle edge where products of combustion can be burned off before entering the flue. It also directs the heat to the stove top instead of radiating towards the back and loosing it up the flue. The damper slows down the exiting gasses as well as reducing the flow of air being pulled through the intake. So the baffle and damper have different duties and both should be used.

Many prefer a manual damper on a wood stove in case of a chimney fire. The barometric damper flap would open in the case of high flow from the creosote burning in the chimney, giving it an air source that couldn't be controlled without putting something across the opening to starve the chimney fire of oxygen.
 
Thanks. Looks like I'll give putting a baffle in a shot. I'll have to cut out the section of the baffle where the inside box is and angle it up towards the front where the top curve is.
 
Here's the baffle I cut for my Grandpa bear to make room for the barometric draft control. Measured and had the shop cut it for me. It fits perfectly. They didn't have have 5/16", only 1/4" and 3/8". Figured 3/8" was overkill so I went with the 1/4". Kinda looking forward to firing it up in a few months...We're up in the mountains in CO. Thanks Coaly.
baffle.jpg
 
In post #1 this thread, point #3 you comment on the shelf below outlet on many rear vent fishers.
In my baby bear, that ~ 5" x 10" shelf is <5/16" above brick clip and touching bottom of the outlet.

With the baffle plate on brick clip of larger models, about how far is it from outlet bottom?

I will have to notch baffle, and that edge would be touching bottom of the outlet if left as is.
I'm worried this to close, and could choke stove.
I have 10' single wall to 7' of duravent chimney above cathedral ceiling.
I've cut a cboard template that has a notch like the one in the prev post, and it was pretty tough getting a flexible piece of paper over and around pipe and shelf. If I z-bend the plate about 60-65°, the tabs will close the gaps at the side of existing plate, the edge of the notch will sit at the front of that plate , and the front lip of baffle will point at the step a little better and add a little more clearance for wood.

I guess my ? is - how 'original' is the existing 'baffle' ? Would I be better off to remove it?
I haven't found a shop with lg brake yet, so I'm thinking easier in and out- less work fabbing- still close.
2012-09-10_19-01-16_970.jpg
 
In post #1 this thread, point #3 you comment on the shelf below outlet on many rear vent fishers.
In my baby bear, that ~ 5" x 10" shelf is <5/16" above brick clip and touching bottom of the outlet.

With the baffle plate on brick clip of larger models, about how far is it from outlet bottom?

I will have to notch baffle, and that edge would be touching bottom of the outlet if left as is.
I'm worried this to close, and could choke stove.
I have 10' single wall to 7' of duravent chimney above cathedral ceiling.
I've cut a cboard template that has a notch like the one in the prev post, and it was pretty tough getting a flexible piece of paper over and around pipe and shelf. If I z-bend the plate about 60-65°, the tabs will close the gaps at the side of existing plate, the edge of the notch will sit at the front of that plate , and the front lip of baffle will point at the step a little better and add a little more clearance for wood.

I guess my ? is - how 'original' is the existing 'baffle' ? Would I be better off to remove it?
I haven't found a shop with lg brake yet, so I'm thinking easier in and out- less work fabbing- still close.
View attachment 75476

My baby bear has the same small factory installed shelf under the rear flue. I bought a 5/6" thick piece of steel plate that measured 13" x 8" and it fits real good in my stove. There is a small gap on the back and sides but it doesn't seem to allow enough heat or smoke to sneak through those gaps. I have the front of the plate resting on half a firebrick on each side of the stove (the firebrick is turned sideways), which creates that 2-3" gap above the baffle plate.
 
Your baffle plate looks like an original one. Revised drawings later than the sets I have would have the measurments. Until later prints surface, (after 1978) we can only compare the size that is in any ones stove. If more than a few match, we can guess what size plate was used.

Most stoves only have the small tab under the outlet remaining. That would be the "shelf part" I was referring to in #3 of the first post of this thread. That is all most people see on the back of the stove. A larger plate all the way across the stove, set on pieces of firebrick at the front edge sets on this same "tab or support shelf". The angled baffle in front of the outlet doesn't seem to affect the opening like a damper in the pipe would.

Putting a bend across the plate would make it fit on top of the support tab better, but most don't have a way to bend this thick and wide of a steel plate. Also cutting the corners off the upper edge allows flame to go straight up at the plate corners and hit the upper stove top next to the stove sides. Baffle plates by the mid 80's were shaped like this;
Smoke Shelf Baffle 1984 Goldilocks.JPG (shown on a top outlet stove, 1984 model)

I would replace the original with the larger angled style like used in later stoves. This later design reduced the smoke for the stricter regulations.
 
Thanks Todd67 - is that the yr u we're born or maybe ur age? Gonna keepitsimple, and do the plate like urs and go from there.

Thanks Coaly! If I decided to mod the baffle like Fisher, I could cut the front corner and weld it on the back.

The story on this stove - I watched local cl off&on most of this yr for wood stove & building materials. After seeing searchtempest mentioned on this site, I saw a post from cl memphis that had since expired. Just to take a chance on something so near I called and the seller said he decided to hold it for someone that had done a job for him. He also told me his grandfather had put it in their hunting cabin in the 70's but didn't think it had over 10 fires on it. With a grain of salt I looked it over and noticed only a small scratch on the lock side of handle and no wear on the wedge side of lock. The outlet, brick clips and smoke shelf still had crisp edges. The door was very clean as was inside of stove. Bottom bricks missing but all others in place and solid but no markings. Ball feet on long angle legs.

Only flaws were a bad bottom weld on a rear leg, and hinge mounts are misaligned. Hinge pins tight on door, but appears that the hinge mounts may be sleeved.
Do you think that drilling them out might produce a slight ridge around the hole looking like a sleeve and not used enough to wear? When I remove the pins I"ll mic. them. What is original size?
 
  • Like
Reactions: ozarkrichard
2012-10-02_11-52-20_520.jpg 2012-10-02_11-52-05_467.jpg
 

Attachments

  • 2012-09-12_16-19-48_610.jpg
    2012-09-12_16-19-48_610.jpg
    121.5 KB · Views: 1,190
  • 2012-09-10_19-16-29_303.jpg
    2012-09-10_19-16-29_303.jpg
    47.1 KB · Views: 1,179
3/8 round head rivet.

I'd say you have a "new" stove. Doesn't look like an insert, and there would be no reason to press a bushing into a hinge with no wear. You can get that lip with a dull drill bit. If you touch it with a 1/2 inch countersink, or slightly larger drill bit than 3/8, you'll be able to tell if there is a second piece pressed in the hinge.

So how did you get the guy to sell it to you instead of giving it to the guy he was saving it for? How much?
 
Thanks Todd67 - is that the yr u we're born or maybe ur age? Gonna keepitsimple, and do the plate like urs and go from there.

Thanks Coaly! If I decided to mod the baffle like Fisher, I could cut the front corner and weld it on the back.

The story on this stove - I watched local cl off&on most of this yr for wood stove & building materials. After seeing searchtempest mentioned on this site, I saw a post from cl memphis that had since expired. Just to take a chance on something so near I called and the seller said he decided to hold it for someone that had done a job for him. He also told me his grandfather had put it in their hunting cabin in the 70's but didn't think it had over 10 fires on it. With a grain of salt I looked it over and noticed only a small scratch on the lock side of handle and no wear on the wedge side of lock. The outlet, brick clips and smoke shelf still had crisp edges. The door was very clean as was inside of stove. Bottom bricks missing but all others in place and solid but no markings. Ball feet on long angle legs.

Only flaws were a bad bottom weld on a rear leg, and hinge mounts are misaligned. Hinge pins tight on door, but appears that the hinge mounts may be sleeved.
Do you think that drilling them out might produce a slight ridge around the hole looking like a sleeve and not used enough to wear? When I remove the pins I"ll mic. them. What is original size?

It's the year I was born. I'm going to start a new thread for the mama bear that I restored and installed last month.
 
Thanks to encouragement from Coaly and others here I decided to build and try a baffle inside my Fisher GrandPa!

The first step was that welded up this one piece angle iron frame (that would eventually hold a shelf of firebricks) to rest the back of on the upper course of 3 lengthwise firebricks that rest in an angle iron channel that came from the factory in my Concord NH built 1978 GrandPa:
Frame 1.JPG
 
In case you've never seen the upper course of firebricks I'm referring to, here's a picture showing them:

Upper Course.JPG
 
OK, the 1-piece all welded frame wouldn't quite fit inside my GrandPa despite a lot of wiggling and trying different angles of attack, so I cut it in half and welded on some tabs, and drilled/tapped for some flathead #3 Philips bolts that wouldn't interfere with the firebrick. Here is the 2-piece frame:
Frame 2.JPG

It will hold a shelf of firebricks and the short legs will sit on the existing side firebricks, while the whole rear of the shelf will sit on that upper course of firebricks on the rear wall of my GrandPa.
 

Attachments

  • Fisher Baffle Installed.JPG
    Fisher Baffle Installed.JPG
    121.1 KB · Views: 3,715
  • Fisher Baffle Installed.JPG
    Fisher Baffle Installed.JPG
    121.1 KB · Views: 2,321
Here is what it looks like fully installed:
Fisher Baffle Installed.JPG
 
After the first fire with the baffle installed (I am comparing to 7 winters of experience running this GrandPa without any baffle) I can report that it does seem like less smoke comes out of the chimney. Also, the chimney temperature thermometer reads lower - so it seems that less heat is going up and out the chimney. The stovetop also seems hotter from how much more rapidly the water in my steamer was boiling. This all looks good!
 
After a couple more fire I would confirm everything I said above, and add that the stove-pipe temperature has become more stable. It is now far less critical to stand-by ready to choke the input air as the stove-pipe temperature gets too high. The lower stove-pipe temperature does not try to "run away" like it did from flames blasting up the flue. The stove just runs better with the baffle installed! Here's where the temperature gauge is on the stove-pipe:
Stove Pipe.JPG
 
  • Like
Reactions: jjs777_fzr
So this year i finally took some time and built a baffle. Unfortunately I neglected to take pictures as i built the baffle only of the installed unit.
2 pieces of .25" plate 26.5"x8". Overlapped them by about an inch and welded some angle to the one so i could slip fit them together once they were in the fire box. Final plate worked out to be around 26.5"x15". I installed a 2nd row of firebrick in the back of the box to act as a shelf as seen in some other people's setups. Then I took my diamond wheel and cut 2 more bricks on an angle to allow the baffle to prop up inside the box. This leaves the ~2" spacing for proper exhaust venting for the 8" flue.

baffle01.jpgbaffle02.jpgbaffle03.jpg

Seems to really do the trick!!

baffle04.jpgbaffle05.jpg

Lots of heat pouring from the stove and LESS going up the flue!
So glad I took the time to build one this season!
 
Hello all, new member here, just joined today. What a fantastic Forum! I have had my Fisher stove for 31 years and recently decided that I would like to decrease the amount of wood cutting/splitting that I do so wanted to increase my stoves efficiency. I thought about the new baffled stoves and sketched up a baffle for my stove, decided to Google it and low and behold I find this Forum and the wonderful posts herein, with tons of info on baffles! Looks like brilliant minds think alike (cough, cough) ;)

I am overwhelmed by the amount of information on this forum. I found that the dimensions of my stove don't match stoves listed (or I am not looking correctly) so I am wondering which model I have. I have always called it a Momma Bear but I see that it is likely a Grandma Bear (?) Mine is a two square door model, that I bought used in 1981. It measures 25 1/2" across the top plate, 26 1/2" deep including the ash tray and 33 1/2" tall at the back, 27 1/2" in the front. It has angle iron legs (with the feet :) and I have the screen for the front doors when open) top 8" vent. I have a damper installed in the stove pipe about 20" above the stove. I have some 3/8" steel plate so I will use that for a baffle, maybe do that tomorrow. I like the round baffle suspended below the pipe opening as well but I imagine that the plate baffle would be more efficient, just a guess.

Thanks to all who have contributed to this forum, I am happy to belong.

Tom L.
Hingham, MA