
Pellet install issues.
- Thread starter MommyOf4
- Start date
-
Active since 1995, Hearth.com is THE place on the internet for free information and advice about wood stoves, pellet stoves and other energy saving equipment.
We strive to provide opinions, articles, discussions and history related to Hearth Products and in a more general sense, energy issues.
We promote the EFFICIENT, RESPONSIBLE, CLEAN and SAFE use of all fuels, whether renewable or fossil.
You are using an out of date browser. It may not display this or other websites correctly.
You should upgrade or use an alternative browser.
You should upgrade or use an alternative browser.
- Status
- Not open for further replies.

Last night it was flush against the wall. If we drill it in I'm afraid the pipe might bend a bit.
I
imacman
Guest
Looks like the pipe wasn't in the correct location to begin with, and finally pulled the screws out. Can't really see, but did they even use drywall anchors??? I hope they didn't just screw into the drywall and say that's good.....
Since the pipe pulled the screws out, the stove might need to be pushed back toward the wall another 3/4".
BTW, can you take some pics of the whole interior pipe set-up and post it? You may not even need that bracket.
Since the pipe pulled the screws out, the stove might need to be pushed back toward the wall another 3/4".
BTW, can you take some pics of the whole interior pipe set-up and post it? You may not even need that bracket.
 No anchors into the drywall.
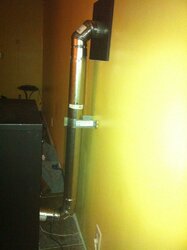
jtakeman
Minister of Fire
Looks like they just used Drywall or sheet metal screws(had to use the magnifier bear sent me). You will need to get some type of wall anchor to fix it propperly! Molleys or Toggle will do.
I doubt you'll break the pipe, But you could break one of the silicon seals on the joints(more like create a leak) So have some goop handy JIC it does leak. Smear some goop(hi temp sealer) over the seam and you should be good to go!
I doubt you'll break the pipe, But you could break one of the silicon seals on the joints(more like create a leak) So have some goop handy JIC it does leak. Smear some goop(hi temp sealer) over the seam and you should be good to go!
I
imacman
Guest
If you don't smell any smoke, you should be OK. IMO, you don't need that bracket anyway.
One more question....did the installers use an appliance adapter on the back of the stove? If you don't know or aren't sure, take a close-up pic of the area where the pipe connects to the back of the stove.
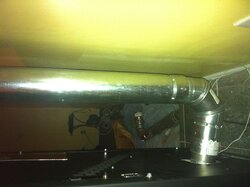
Also, since there isn't any clean-out T that I can see, how do you clean the pipe?
I also noticed that you don't have any surge protector on that wall plug....not good, unless you have a "whole house" unit.
One more question....did the installers use an appliance adapter on the back of the stove? If you don't know or aren't sure, take a close-up pic of the area where the pipe connects to the back of the stove.
Also, since there isn't any clean-out T that I can see, how do you clean the pipe?
I also noticed that you don't have any surge protector on that wall plug....not good, unless you have a "whole house" unit.
UMainah
Member
You shouldn't need that bracket. They're typically used outside when a length of pipe isn't supported. In this case both ends of pipe have support (stove & wall). You'll probably want to replace that lower 90° with a cleanout tee also.
I
imacman
Guest
Those things that you buy to plug computers and things into aren't good. You should get something like this:
http://www.amazon.com/Tripp-Lite-ULTRABLOK-Protector-Suppressor/dp/B00006B81D/ref=sr_1_1?ie=UTF8&qid=1353777949&sr=8-1&keywords=tripplite ultrablok
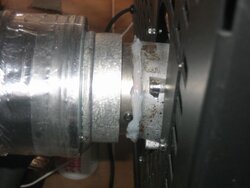
Also, looking at the last pic, I do NOT see an appliance adapter on the back of the stove....that is NOT correct, and could lead to a leak. Hopefully, other members will chime in if i'm correct on that.
This is what it is supposed to look like:
http://www.amazon.com/Tripp-Lite-ULTRABLOK-Protector-Suppressor/dp/B00006B81D/ref=sr_1_1?ie=UTF8&qid=1353777949&sr=8-1&keywords=tripplite ultrablok
Also, looking at the last pic, I do NOT see an appliance adapter on the back of the stove....that is NOT correct, and could lead to a leak. Hopefully, other members will chime in if i'm correct on that.
This is what it is supposed to look like:
Attachments
boosted3g
Feeling the Heat
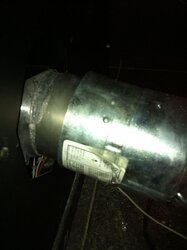
I dont kow if its an optical illusion or just the pic but does it look like the pipe is going downhill right at the appliance adapter? To me the vertical pipe just dont like plumb either.

I
imacman
Guest
Since I can see the label on the pipe, take a close look....does it say "Appliance Adapter" on it? The part number should be something like "3PVP-AD".
I
imacman
Guest
I thought the same thing....might be optical illusion as you said.I dont kow if its an optical illusion or just the pic but does it look like the pipe is going downhill right at the appliance adapter? To me the vertical pipe just dont like plumb either.
I
imacman
Guest
Well, it's a little tough to see, but that might be an appliance adapter. Still isn't 100% right....needs screws to properly secure it (see my pic above....see black screw next to extra silicone I added around adapter). There should be 3 screws positioned around the adapter.
As Umainah mentions above, that first 90 degree elbow need to be replaced with a clean-out T...otherwise you'll have ash build-up and no easy way to clean it out.
As Umainah mentions above, that first 90 degree elbow need to be replaced with a clean-out T...otherwise you'll have ash build-up and no easy way to clean it out.
Woody1911a1
Feeling the Heat
to me from the picture it looks like they used plastic drywall anchors and they melted and the screws pulled . Mommy can you confirm that those screws screw into small plastic pieces in the wall or not ?
I
imacman
Guest
Usually self-tapping screws will do, but regular sheet metal will work too.Are there specific screws that you drill into it or just any screw will do?
I
imacman
Guest
No anchors....see post #4..... Mommy can you confirm that those screws screw into small plastic pieces in the wall or not ?
to me from the picture it looks like they used plastic drywall anchors and they melted and the screws pulled . Mommy can you confirm that those screws screw into small plastic pieces in the wall or not ?
There are no anchors, just the screws.
So let me get this correct...
1) adapter goes on the pellet hook up thing
2) Clean out tee
3) Venting pipe up to the thimble
Right?
What's next?
Sorry I've been watching our new guys re-install this and things keep coming up. I just want to know, I feel like I should install it myself! <----coming from a clueless person
1) adapter goes on the pellet hook up thing
2) Clean out tee
3) Venting pipe up to the thimble
Right?
What's next?
Sorry I've been watching our new guys re-install this and things keep coming up. I just want to know, I feel like I should install it myself! <----coming from a clueless person
- Status
- Not open for further replies.
Similar threads
- Replies
- 2
- Views
- 275
- Replies
- 0
- Views
- 157
- Replies
- 4
- Views
- 434
- Replies
- 0
- Views
- 420