Leaking Exhaust pipe, clinkers, smokey smell

  • Active since 1995, Hearth.com is THE place on the internet for free information and advice about wood stoves, pellet stoves and other energy saving equipment.

    We strive to provide opinions, articles, discussions and history related to Hearth Products and in a more general sense, energy issues.

    We promote the EFFICIENT, RESPONSIBLE, CLEAN and SAFE use of all fuels, whether renewable or fossil.
Status
Not open for further replies.

kenstogie

Feeling the Heat
Oct 2, 2012
463
Albany (ish)
So I installed my pellet stove (25PDVC) with the typical Duravent system, taped with 3m aluminum flue tape and all was well for a couple of weeks or soo. Then I started getting a E1 code sometimes an E2 then an E1 or maybe vice versa.

So I pull the vent t pipe, clean, re-install with more aluminum tape, check all the vacuum hoses, electrical connections, clean out the burn pot and while I am at it I clean the bottom auger chute and realign it.

Sooo the bottom line....as the title suggests I have one each of the following....
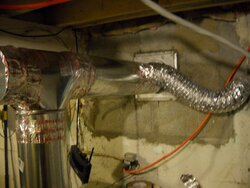
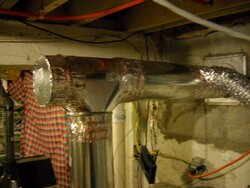
  • small puddle of brown tarrish water dripping from top horizontal piece of my exhaust​
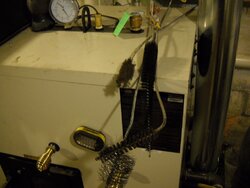
  • a pot full of clinkers (not fully burning)​
  • a smokey smell in the house with a slight haze in my basement​
  • appears to have no more E-1 code issue.​
ARRRGH!​
 
If you have that bad of a leak where you can see the smoke, time to shut that stove off and re-do the exhaust....there's something you're missing.

Are all the interior joints siliconed together too? Don't rely just on the tape on joints that never need to be taken apart again.

Clinkers indicate lack of burn air (dirty stove) or poor, hi silica pellets....did you change brands recently?
 
I know I read in a past post you or someone had taped the joints. Not sure that's a great idea nor required if everyting is connected properly. They recommend using caulking in the joints in addition to the built in ring already applied from the factory. Something just doesn't sound right with all the issues. I hope you can work them out as you have the same stove as I do and it should be a workhorse. I searched past posts and you had asked about the bottom three buttons - did you verify what your settings are and have you tried adjusting them ? What about the OAK ? Do you have one connected to the outside ?
On this stove the gasket should make a good seal for the top load door - otherwise air tends to effect the flame (it does on mine) and the therefore the overall burn.
Did you ever post pics of the install via another thread ?

I never did verify the bottom 3 buttons but it was for a while burning fine so I assumed it was aok.
For venting I have the 3 inch dura vent kit and I believe a 1 or 2 inch outside air intake (at work)
I did not post pics but will, tonight.

The more I think about it.... I think its possible that when I reinstalled the clean out t cap it didn't take.... causing condensation somehow. Considering the timing the two are most likely related.

I have no idea why the pellets are not burning completely but I will figure it out.
 
If you have that bad of a leak where you can see the smoke, time to shut that stove off and re-do the exhaust....there's something you're missing.

Are all the interior joints siliconed together too? Don't rely just on the tape on joints that never need to be taken apart again.

Clinkers indicate lack of burn air (dirty stove) or poor, hi silica pellets....did you change brands recently?


I can't see smoke but can sure smell it and if it burns for more than an hour it gets somewhat hazy. I do clean my stove's burn pot, heat exchanger, and even removed the clean out t to get at the exhaust vent.

I have not changed brands still using the HD specials, the North American if I am not mistaken.

The joints are just taped with the 3M high temp aluminum flue tape but I suppose they could be sealed with silicone. It was my understanding that they shouldn't even need tape but hey I could be wrong.
 
the tape is a PITA. I suggest just ripping it off and using the 800* high temp RTV.
 
Did you get that tee cap on and sealed, that is the place I'd use tape if I was going to use tape.

The build up issue is due to lack of air, too much fuel being delivered, the lack of air is the probable cause and is likely due to ash in the works some where (it could be other things but this is the case about 95% of the time).

Basically your fuel/air ratio is out of balance.
 
I would check the stove adapter and every vent joint. Check on start up before flame is present.

Do so with the lights off and a bright flashlight.

As for the settings. Post what the bottom 3 are set at.
 
I just got back from a work conference, (lake placid , it was nice :) I even had a balcony )

IMG_20121206_160928.jpg


So I checked my settings and they were 5-4-1 and the leak was at the dura-leak clean out T.


Soooo I replaced it. Figuring that will fix it.
20121210_135027.jpg


Unfortunately the new Clean Out T is leaking like a collander from the bottom portion of the cap (the gap that is shown below) .

I tried 2 different caps on the new cleanout T and still it leaks in the same area!! It has a rope gasket in there similiar to the ones on the Door/Hopper.

How the $%&#@* do I seal that up?


THE GAP THAT SMOKE IS COMING OUT OF \/ \/ \/ (BOTTOM VIEW)

.
20121210_135153.jpg


TOP VIEW OF THE CAP
20121210_135043.jpg
 
Put a good bead of high temp silicone inside the cap (that outer ring in your second to last pic).

Fill that gap and any other little leaky spots.
 
Looks like it is out of round and perhaps has a few nicks, and breaks from screws in the works. Kind of hard to tell from the pictures.

A suggestion get some 3M high temp foil flue tape and put it together and tape it up. The tape can be cut with a blade to remove the cap and then after cleaning re-taped.
 
so i figured out the issues.........
-i put a screen in the exhaust pipe to keep out critters thinking i was doing a good thing but it actually clogged with black soot and significantly impeded the airflow
- i cleaned the exhaust from the clean out t to the out doors, i did check this but not as much as i should have. i brushed it all AND hooked up the leaf blower
- the plugged exhaust caused a back up and smoke was by my guesstimation forced out any where it woukd go.... including the "sealed" joints.
- i adjusted the hopper door for a better seal, i dont know if this had much effect but was good to do for safety reasons ( i am putting on a new gasket tomorrow also).
-i also painted the silver/galvenized oak and exhaust with black high temp paint. no it doesnt run better because of this but it looks better :))
 
That will do it every time!!

Use some chicken wire for the screen. Larger holes dont plug as easy and still keep most critters out.
 
for me in this situation the plugged exhaust also caused litterally a puddle of h2o in the clean out T cap and moisture through out the exhaust....... what a fricken mess, yuck.
 
...... but its all better now :) :) :)
 
woke up to nice 72 degree house in the basement upstairswas 64, nice! today i replace my hopper gasket which SEEMS reallly straight forward but you know how fixing stuff goes. ;)
 
My cap leaked too. I tried to seal it with tape but on rainy days (not sure what that has to do with it) it seemed so bother with a slight smell upstairs. I solved the problem when I installed a fresh air kit....I put a 6 inch pipe over my entire 4 inch vent pipe and channeled the outside air around between the pipes to preheat the outside air. now anything that leaks is drawn into the stove. pictures to follow
 
Here are some pictures and pictures of the boiler brushes i use
 

Attachments

  • OAK 001.JPG
    OAK 001.JPG
    113.3 KB · Views: 187
  • OAK 002.JPG
    OAK 002.JPG
    83.6 KB · Views: 190
  • OAK 003.JPG
    OAK 003.JPG
    119.4 KB · Views: 185
  • OAK 004.JPG
    OAK 004.JPG
    80.7 KB · Views: 182
  • Like
Reactions: vinny11950
Status
Not open for further replies.