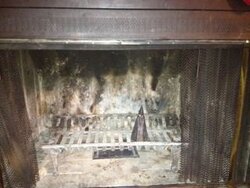
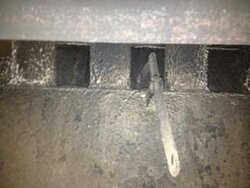
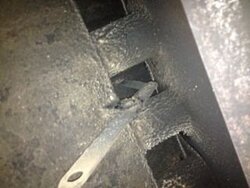
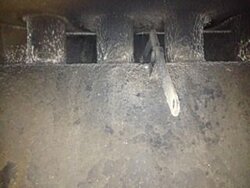
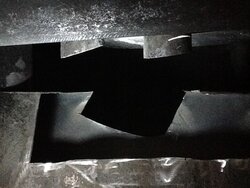
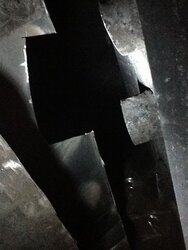
So I had my stove installed in the basement because there was already a liner installed. I am not getting the heat I want upstairs and want to move it to the main level. I will have to drop a liner and cut out the existing fireplace flue. The fireplace was built in 1975. Any advice from those that have done this? Will I need a plasma cutter? How do I cut the steel?
How hard is it to install an insert?
- Thread starter claybe
- Start date
-
Active since 1995, Hearth.com is THE place on the internet for free information and advice about wood stoves, pellet stoves and other energy saving equipment.
We strive to provide opinions, articles, discussions and history related to Hearth Products and in a more general sense, energy issues.
We promote the EFFICIENT, RESPONSIBLE, CLEAN and SAFE use of all fuels, whether renewable or fossil.
You are using an out of date browser. It may not display this or other websites correctly.
You should upgrade or use an alternative browser.
You should upgrade or use an alternative browser.
- Status
- Not open for further replies.
Hogwildz
Minister of Fire
When you say cutting out the existing flue, do you mean the damper area? What is the interior size of the existing chimney?
Many of us have done our own installs. If your mechanically handy, its doable. Preparation is the key.
I cut my damper area out with both a sawzaw & an angle grinder. PITS, bigtime! But done and now its toasty in here.
Many of us have done our own installs. If your mechanically handy, its doable. Preparation is the key.
I cut my damper area out with both a sawzaw & an angle grinder. PITS, bigtime! But done and now its toasty in here.
mellow
Resident Stove Connoisseur
Not very hard if you are handy and don't mind heights. Get the new flue cleaned and examined first by a pro just to be sure before installing. As hog mentioned cutting out the damper can be a pain and getting the liner into the stove can be a pain if it is a tight fit, the other stuff is "usually" pretty smooth going.
I cut my damper out with a blow torch, sucked having the hot pieces fall on you.
I cut my damper out with a blow torch, sucked having the hot pieces fall on you.
When you say cutting out the existing flue, do you mean the damper area? What is the interior size of the existing chimney?
Many of us have done our own installs. If your mechanically handy, its doable. Preparation is the key.
I cut my damper area out with both a sawzaw & an angle grinder. PITS, bigtime! But done and now its toasty in here.
Yes, sorry damper area is what I meant. The chimney is plenty big and rectangular in shape.
mellow
Resident Stove Connoisseur
It looks like you have a BK princess (https://www.hearth.com/talk/threads...read-everything-bk.93182/page-18#post-1311869) so you will have to run a 6" stainless steel liner, I would insulate it for kicks and giggles since the cats run at a lower flue temp.
Something like this: http://www.rockfordchimneysupply.com/chimney-liner-kit.php
Something like this: http://www.rockfordchimneysupply.com/chimney-liner-kit.php
PLAYS WITH FIRE
Minister of Fire
The damper area is very simple with an angle grinder and cutting disk. Mine and my friends took about an hour combined. I am no professional installer by no means and all installations are, I suspect, different. I started on mine with a sawzall and it shook every bit of dust lose from everywhere on me, so I changed to the angle grinder and cutting disk and it was a breeze. The cutting disk is the key, but good planning is first. Post the best pix of the area and the pros will help!
As for the liner get a liner and insulation kit. Generally consists of appliance adapter, liner, top plate cap, insulation wrap, and the liner cap. Some great deals on them on ebay. Also look up a block off plate.
http://www.ebay.com/itm/6-x25-Flex-...251?pt=LH_DefaultDomain_0&hash=item53f25e272b
Or
http://stores.ebay.com/Fireside-Chimney-Supply/Chimney-Insert-w-Insulation-/_i.html?_fsub=1904618017
Beetle-Kill
Minister of Fire
Is that pipe a heat exchanger, or there for support?
If you have to cut that out, you'll need a sawzall along with the grinder/ cutting discs. It doesn't look like fun.
If you have to cut that out, you'll need a sawzall along with the grinder/ cutting discs. It doesn't look like fun.
PLAYS WITH FIRE
Minister of Fire
I am no expert so I would yield to the experts on this. You can cut and make anything work but is it safe? Folks here have many years of experience with codes and installations, they will chime in! From the looks of it a plasma cutter would be your best friend if there are no issues prohibiting you!
Beetle-Kill
Minister of Fire
I'm assuming we're looking "up" in the pictures.It is a heat exchange. There is a fan in the hearth to circulate the heat.
Unless you know what's behind the steel, I'd be very leery of using a plasma or oxy-acetylene torch. Just too violent a spray without knowing what the slag is hitting.
Grinder and cut-off wheels, go slow and cut a bigger area out than you think you need. You can patch it back up after the liner is fit.
You'll still need a sawzall to seperate the tubes, a wheel won't reach a full cut.
Be patient, you only have to do this once.
It looks like you have a BK princess (https://www.hearth.com/talk/threads...read-everything-bk.93182/page-18#post-1311869) so you will have to run a 6" stainless steel liner, I would insulate it for kicks and giggles since the cats run at a lower flue temp.
Something like this: http://www.rockfordchimneysupply.com/chimney-liner-kit.php
Do you recommend the super wrap blanket or the pour down mixture?
Eaglecraft
Member
So I had my stove installed in the basement because there was already a liner installed. I am not getting the heat I want upstairs and want to move it to the main level. I will have to drop a liner and cut out the existing fireplace flue. The fireplace was built in 1975. Any advice from those that have done this? Will I need a plasma cutter? How do I cut the steel?
Claybe:
While I wouldn't bet my ranch on it, the photos of your damper and heat transfer pipes led me to believe you may have a Superior HeatForm manufactured fireplace. Does the fire box have ribs that protrude about 3/8 of an inch? If so, all the more evidence that it's a HeatForm. In any case, even if it is not a HeatForm, I think that you will have to cut away two of the heat transfer pipes.
We installed an insulated 6 inch SS liner down a 14 inch by 14 inch terra cotta flue. But in order to get the liner down and connected to the insert, we had to cut out the damper and then cut away two of the four heat exchange pipes on our own HeatForm fireplace. We also had to cut away some of the HeatForm steel right around the area of the heat pipes.
As I was thinking about how hard it might be to cut away that steel - the HeatForm is constructed of 1/4 inch boiler plate steel - I decided against using either a reciprocating saw or a right angle grinder. So I brought in a welder who used a plasma torch to cut out the damper, two heat tubes and the steel necessary so that the SS liner would clear. As it turned out, I had to bring him back a second time to take out additional steel as "flexible" liners are not as flexible as we might want them to be.
It was Dirty Harry (Clint Eastwood) who said "A man needs to know his limitations." It's true. I was not confident that I could cut this steel with my tools - and I did not want to use a plasma torch as a do-it-yourself project. So I brought in a pro. He did a great job and he also welded my block-off plate in place as well. I have never regretted using a professional welder to help me with the hardest part of the Hearthstone Clydesdale installation.
See also for details about the construction of the HeatForm: http://ia600702.us.archive.org/29/items/HeatrormFireplaces/HeatformFireplaces.pdf
Good luck with your installation project.
etiger2007
Minister of Fire
I cut out my Superior heat form pipes and damper with a circle grinder. Took some time but worked.
Eaglecraft
Member
I cut out my Superior heat form pipes and damper with a circle grinder. Took some time but worked.
etiger:
Sure, there is more than one way to "skin a cat," as they say. Every person has to decide what's best for them. In my own case, having used both a right angle grinder and reciprocating saws on previous steel projects, I wasn't sure how quickly and safety I could cut out those heat transfer tubes. As it turned out, my welder took less than one hour to cut out the damper, cut out the tubes and weld the block-off plate in place.
I'm not saying that the job can't be done with either a 1) a reciprocating saw, or 2) a right angle grinder, all I am saying is that in my case, I chose to have the work done by a pro - who did it quickly and safely.
Thanks for your additional input on the subject of "How to get the liner past the heat tubes." By the way, I'd be interested to learn how much time is "Took some time" to get the job done?
etiger2007
Minister of Fire
etiger:
Sure, there is more than one way to "skin a cat," as they say. Every person has to decide what's best for them. In my own case, having used both a right angle grinder and reciprocating saws on previous steel projects, I wasn't sure how quickly and safety I could cut out those heat transfer tubes. As it turned out, my welder took less than one hour to cut out the damper, cut out the tubes and weld the block-off plate in place.
I'm not saying that the job can't be done with either a 1) a reciprocating saw, or 2) a right angle grinder, all I am saying is that in my case, I chose to have the work done by a pro - who did it quickly and safely.
Thanks for your additional input on the subject of "How to get the liner past the heat tubes." By the way, I'd be interested to learn how much time is "Took some time" to get the job done?
Craft: Did I miss something? I wasn't saying your way was wrong or labor intensive, I simply added this because I too have a heat form fire place, you did a fine job. My post was intended for the original poster not to combat your way of doing things. By the way the cutting part took about an hour then we dropped the liner in.
Hogwildz
Minister of Fire
Cut away and slide a nice 6" or 8" liner down there depending on what your planning on installing.
I chose Duarvent double wall insulated rigid liner and am very happy I did. I do have 5' of flex liner from the first flue tile down to the insert outlet.
A sawzaw & angle grinder will do it for you, but be prepared to get very dirty, and have very tired arms from laying in there reaching over your head to cut that out.
Research, preparation, and patience will be needed while doing this.
Claybe:
While I wouldn't bet my ranch on it, the photos of your damper and heat transfer pipes led me to believe you may have a Superior HeatForm manufactured fireplace. Does the fire box have ribs that protrude about 3/8 of an inch? If so, all the more evidence that it's a HeatForm. In any case, even if it is not a HeatForm, I think that you will have to cut away two of the heat transfer pipes.
We installed an insulated 6 inch SS liner down a 14 inch by 14 inch terra cotta flue. But in order to get the liner down and connected to the insert, we had to cut out the damper and then cut away two of the four heat exchange pipes on our own HeatForm fireplace. We also had to cut away some of the HeatForm steel right around the area of the heat pipes.
As I was thinking about how hard it might be to cut away that steel - the HeatForm is constructed of 1/4 inch boiler plate steel - I decided against using either a reciprocating saw or a right angle grinder. So I brought in a welder who used a plasma torch to cut out the damper, two heat tubes and the steel necessary so that the SS liner would clear. As it turned out, I had to bring him back a second time to take out additional steel as "flexible" liners are not as flexible as we might want them to be.
It was Dirty Harry (Clint Eastwood) who said "A man needs to know his limitations." It's true. I was not confident that I could cut this steel with my tools - and I did not want to use a plasma torch as a do-it-yourself project. So I brought in a pro. He did a great job and he also welded my block-off plate in place as well. I have never regretted using a professional welder to help me with the hardest part of the Hearthstone Clydesdale installation.
See also for details about the construction of the HeatForm: http://ia600702.us.archive.org/29/items/HeatrormFireplaces/HeatformFireplaces.pdf
Good luck with your installation project.
Yes, I see that inside the fireplace there are ribs as you describe and an ash box with "superior" written on it. I would assume this is the heat form. I know this will be a task, but I am really tired of so called professionals doing something for me and i have to go back and fix what they did because they are idiots who just want to do it as cheap and fast as possible. Not right. Sorry for the rant.
Will let you know results...
Hogwildz
Minister of Fire
Some flex is called "smooth" as it has less protrusion of the ribbing inside. It is smoother, but if I remember correctly it is a bit less flexible and less forgiving of bends as regular flex.What is the difference, scratch that, advantage of smooth liner to rigid liner?
Rigid is sections, similar to class 3, but made for lining. It is pre-insulated between the inner and outer shells, gives less resistance to the draft & flow, and cleans easier.
Of course it costs more, but after buying flex and the insulation kit, it ain't ungodly more to buy double wall rigid. It is also less pron to be damaged during install, and no chance of unraveling.
Eaglecraft
Member
Yes, I see that inside the fireplace there are ribs as you describe and an ash box with "superior" written on it. I would assume this is the heat form. I know this will be a task, but I am really tired of so called professionals doing something for me and i have to go back and fix what they did because they are idiots who just want to do it as cheap and fast as possible. Not right. Sorry for the rant.
Will let you know results...
Claybe:
I do share your pain about "others" doing work for you. I do most of the needed work and repairs on my place for that reason. For example, last year my wife and I constructed a 20 foot by 30 foot utility building essentially by ourselves. When we needed to raise and place a stud wall on our foundation, I brought in a boom truck and operator. I had to "fire" the first boom truck operator because he ran his truck into my stack of BCI-Joists. However, the replacement operator was truely a pro and even provided help when it came time to place the roof trusses on the top plates.
For a truly horrific example of "pro" level work, see : https://www.hearth.com/talk/threads/chimney-liner-and-cap-help.61083/#post-764803
My next door neighbor owns/operates a steel fabricating shop. I asked him to recommend a welder to cut out the damper and heat tubes. He recommended one welder that he had worked with for many years. For that reason I felt confident that he would be OK. It turned out that he was more than OK, he was also a very nice guy who charged very reasonable for his work.
I am interested in learning how you go about removing your damper and heat tubes - reciprocating saw, or right angle grinder - and how long it takes you to do the job. If you could take some pictures as you progress and post them, that would be useful to others who follow you with the same issue. In previous posts, I have added photos of how we took out our heat tubes using a plasma torch.
Again, I wish you good luck with your project. You won't regret the effort once the job is done and your woodstove is in place.
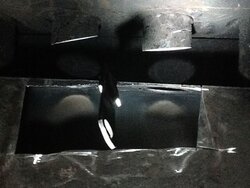
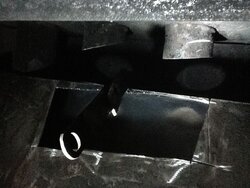
Started the cut out tonight, well actually I started on Sunday. Long story short all I had was blades and cut off wheels from the cheap tool store. I went through 5 blades with the reciprocating saw within about 5 minutes and only cut about 3 inches. Then went through 4 cut off wheels in another 10 minutes and another 3 inches. I finally got to lowes today and got some blades that said they would cut through thick steel. They worked AWESOME! Moral of the story USE THE RIGHT TOOLS
 Not some good cut off wheels too. Took me about 15 minutes to get what you see above. I have some more cutting to do tomorrow night and the liner should fit through the damper area. More to come
etiger2007
Minister of Fire
Looks good, make sure you cut your hole so the liner after its installed wont rest againt those sharp edges, my hole ended up being more oval to accomplish this. Great Job looking forward to more pics.
- Status
- Not open for further replies.
Similar threads
- Replies
- 22
- Views
- 1K
- Replies
- 8
- Views
- 299
- Replies
- 8
- Views
- 566


