On Sunday I cleaned my chimney and removed my insert in advance of installing my new Jotul F600
wood stove. As some of you know from my previous post when my wife and I bought our home eleven years ago it had an insert installed slammer style in the living room fireplace. Over the years I cleaned the chimney twice, but over time I started getting some stage 3 creosote in the huge 18"x13" clay flue. So, I decided to replace the insert with a new free standing stove and do a proper installation with a ss liner.
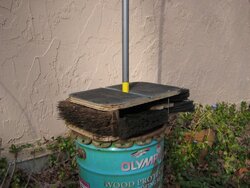
Here is a photo of the brush I cobbled together for my chimney cleaning:

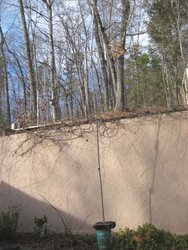
And here it is with the 20' of handle that I pieced together from the broom handles I bought at WalMart to make this brush (4 brooms @ $1.48 each!).

It worked great! I must have shoved it down and up the chimney at least 100 times if you count each three foot push and pull.
That turned out being the easy part. Next, I pulled out the insert and proceeded to clean up all 20 gallons of creosote that had fallen down the chimney! After seeing all that creosote I told my wife that we really dodged a bullet by not having had a chimney fire! A good reason never to go with the slammer installation!
Today I spent another two hours inside the fireplace scraping and vacuuming up the rest of the creosote in the smoke chamber. Once that was finished I proceeded to use my sawzall to cut an 8" hole in my cast iron flue door and assembly. That went pretty well, but I'm pretty sore tonight from all the contortions I had to do crammed in the fireplace!
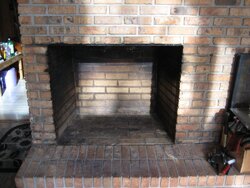
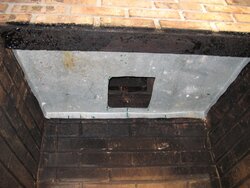
Finally, I fabricated a stop plate for the bottom of the chimney. This took a couple of hours since it was tricky shaping the trapezoidal size, but it came out pretty well I think. Here is a photo of the empty fireplace and the new stop plate:


I have a 13" x 13" top plate with 6" hole that I'll be placing over this 8" square hole once I have my T connector down the chimney. I plan to put insulation on top of this stop plate and then use high temperature silicone caulk to seal the smaller cap plate when I screw it in place.
Tomorrow I plan to spend some time seeing how clean I can get all those dirty bricks inside the fireplace. If I can't get them clean I'll probably paint the walls black. I'm hoping they clean up though.
wood stove. As some of you know from my previous post when my wife and I bought our home eleven years ago it had an insert installed slammer style in the living room fireplace. Over the years I cleaned the chimney twice, but over time I started getting some stage 3 creosote in the huge 18"x13" clay flue. So, I decided to replace the insert with a new free standing stove and do a proper installation with a ss liner.
Here is a photo of the brush I cobbled together for my chimney cleaning:

And here it is with the 20' of handle that I pieced together from the broom handles I bought at WalMart to make this brush (4 brooms @ $1.48 each!).

It worked great! I must have shoved it down and up the chimney at least 100 times if you count each three foot push and pull.
That turned out being the easy part. Next, I pulled out the insert and proceeded to clean up all 20 gallons of creosote that had fallen down the chimney! After seeing all that creosote I told my wife that we really dodged a bullet by not having had a chimney fire! A good reason never to go with the slammer installation!
Today I spent another two hours inside the fireplace scraping and vacuuming up the rest of the creosote in the smoke chamber. Once that was finished I proceeded to use my sawzall to cut an 8" hole in my cast iron flue door and assembly. That went pretty well, but I'm pretty sore tonight from all the contortions I had to do crammed in the fireplace!
Finally, I fabricated a stop plate for the bottom of the chimney. This took a couple of hours since it was tricky shaping the trapezoidal size, but it came out pretty well I think. Here is a photo of the empty fireplace and the new stop plate:


I have a 13" x 13" top plate with 6" hole that I'll be placing over this 8" square hole once I have my T connector down the chimney. I plan to put insulation on top of this stop plate and then use high temperature silicone caulk to seal the smaller cap plate when I screw it in place.
Tomorrow I plan to spend some time seeing how clean I can get all those dirty bricks inside the fireplace. If I can't get them clean I'll probably paint the walls black. I'm hoping they clean up though.


 !!
!!