Pics of stove and chimney - thoughts?

  • Active since 1995, Hearth.com is THE place on the internet for free information and advice about wood stoves, pellet stoves and other energy saving equipment.

    We strive to provide opinions, articles, discussions and history related to Hearth Products and in a more general sense, energy issues.

    We promote the EFFICIENT, RESPONSIBLE, CLEAN and SAFE use of all fuels, whether renewable or fossil.
Status
Not open for further replies.

Trickle

New Member
Jan 20, 2013
47
East Central Missouri
Hi all,

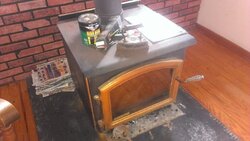
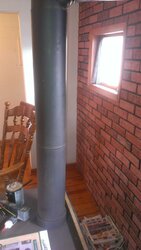
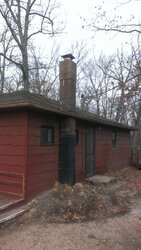
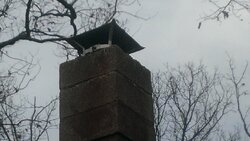
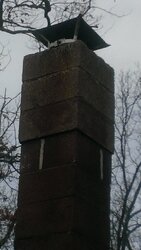
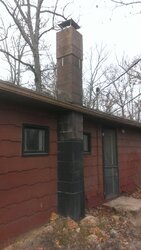
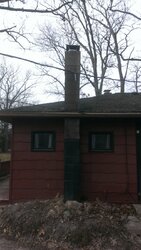
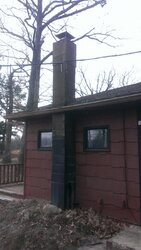
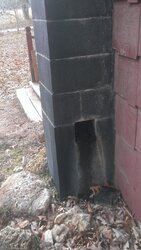
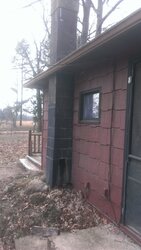
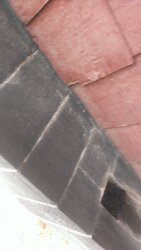
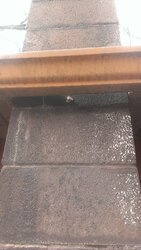
I am in the process of purchasing a 862 sq. ft. home in Eastern Central Missouri. Just had the home inspection done and had a chance to take pics of the wood stove and chimneys. I will be having a certified chimney sweep out to clean and inspect, but wanted to post pics here for you all to have a look, discuss, and let me know your thoughts.

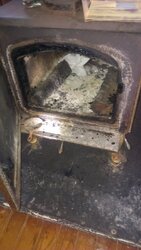
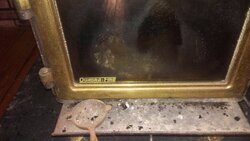
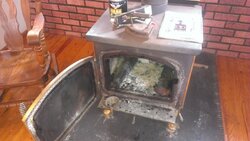
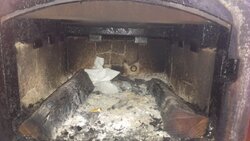
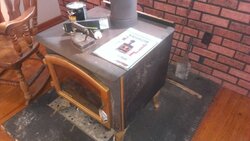
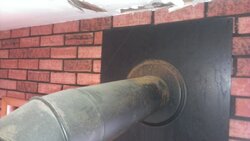
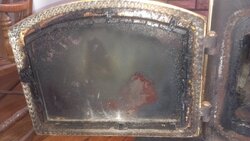
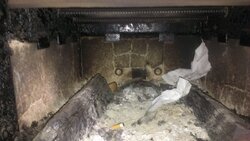
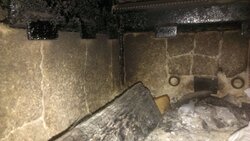
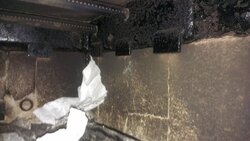
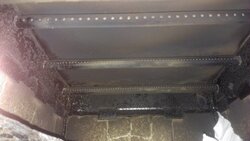
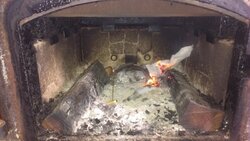
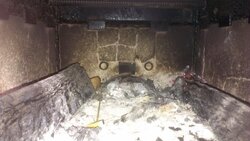
The stove is the only heat in the home. It's rough, some rust spots, and a ton of creosote. Can tell they burned wet wood and who knows what else in there.

Thanks!

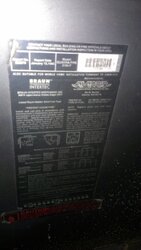
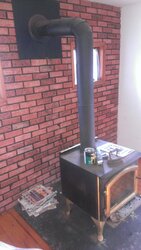
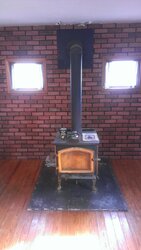
First up is the Quadrafire 3100 flat top stove installed in the home in 1998 -
 

Attachments

  • IMAG0149.jpg
    IMAG0149.jpg
    164.4 KB · Views: 312
  • IMAG0150.jpg
    IMAG0150.jpg
    157.9 KB · Views: 313
  • IMAG0154.jpg
    IMAG0154.jpg
    106.4 KB · Views: 302
  • IMAG0169.jpg
    IMAG0169.jpg
    165.9 KB · Views: 305
  • IMAG0170.jpg
    IMAG0170.jpg
    158.7 KB · Views: 322
  • IMAG0171.jpg
    IMAG0171.jpg
    173.6 KB · Views: 282
  • IMAG0172.jpg
    IMAG0172.jpg
    147.7 KB · Views: 301
  • IMAG0173.jpg
    IMAG0173.jpg
    138.8 KB · Views: 304
  • IMAG0174.jpg
    IMAG0174.jpg
    120.8 KB · Views: 280
  • IMAG0197.jpg
    IMAG0197.jpg
    163.9 KB · Views: 310
Here is the rest of the stove pics -
 

Attachments

  • IMAG0198.jpg
    IMAG0198.jpg
    155.7 KB · Views: 235
  • IMAG0209.jpg
    IMAG0209.jpg
    182.3 KB · Views: 224
  • IMAG0210.jpg
    IMAG0210.jpg
    166.2 KB · Views: 222
  • IMAG0211.jpg
    IMAG0211.jpg
    162.7 KB · Views: 231
  • IMAG0212.jpg
    IMAG0212.jpg
    157.8 KB · Views: 222
  • IMAG0213.jpg
    IMAG0213.jpg
    133.1 KB · Views: 191
  • IMAG0221.jpg
    IMAG0221.jpg
    175 KB · Views: 248
  • IMAG0222.jpg
    IMAG0222.jpg
    171.7 KB · Views: 223
And here is chimney #1, the chimney that the stove is attached to -
 

Attachments

  • IMAG0175.jpg
    IMAG0175.jpg
    229.8 KB · Views: 233
  • IMAG0176.jpg
    IMAG0176.jpg
    151.1 KB · Views: 229
  • IMAG0177.jpg
    IMAG0177.jpg
    139.1 KB · Views: 242
  • IMAG0178.jpg
    IMAG0178.jpg
    178.6 KB · Views: 239
  • IMAG0179.jpg
    IMAG0179.jpg
    207.5 KB · Views: 235
  • IMAG0180.jpg
    IMAG0180.jpg
    175.5 KB · Views: 225
  • IMAG0182.jpg
    IMAG0182.jpg
    222.2 KB · Views: 248
  • IMAG0183.jpg
    IMAG0183.jpg
    175.9 KB · Views: 236
  • IMAG0184.jpg
    IMAG0184.jpg
    114.4 KB · Views: 233
  • IMAG0186.jpg
    IMAG0186.jpg
    296.5 KB · Views: 220
Hi Trickle, It looks like a fine set-up to me, the 3100 is a nice stove. Some wire brushing, some Brasso, and a little paint and it will look good as new. Looks like you'll need some firebricks too. What is that on the exterior chimney that looks like it was an ash door at one time? SB
 
@Sodbuster - the ash door is an ash door. Its FULL of ash and creosote. My guess is the chimney hasn't been cleaned in years. I will have it cleaned by a certified sweep soon.

Concerns that I had are:
1. Small cracks in chimney - are they cosmetic or something more?
2. Why is the bottom half of the chimney black and the top half not?
3. Any problem with the way the gutter is run across the chimney?
4. The door fails the dollar bill test, so new gasket or what do I do?
5. House will get a new roof, that will take care of the leak that is dripping on the exhaust pipe. Looks like some rust on the exhaust pipe, ok if I hit it with high temp paint or is more needed?
6. How do I replace the broken firebricks?

Thanks!
 
Honestly, I would get a sweep out to clean and inspect the chimney before you work on it too much. All of your concerns fall into the expertise area of a chimney sweep,(a good one). That being said, here are my two cents:
1. Small cracks in concrete or brick are usually cosmetic, and if the steel chimney goes all the way to the top they are a non-factor. If the liner doesn't go all the way
to the top, I would line it, it's a short section of pipe and will make your stove burn much nicer.
2. Hard to tell from the pictures but could it be moisture? I can't tell from the pics, but if your roof doesn't have a water diverter installed above the chimney have your
roofers build one, it is just a piece made from 2x4's and OSB to make water flow around your chimney and not against it, make sure they flash it right.
3. I think your gutter is fine, provided the chimney is flashed correctly so water can't seep in between the house and chimney.
4. Yes, new gasket on the stove, very easy fix.
5. As far as rust on the pipe, if it's surface rust just paint it. It appears to be single wall black pipe which is very inexpensive. Your sweep will be able to tell you if it's
rusted from the inside, in which case your only option is to replace it.
6. Firebricks are just set in to place, when you look in your stove, you will see the little steel tabs that hold them in at the top, I believe your stove has 8 of them.
when you tilt the bricks you can work them out from behind the steel keepers. You reinstall the bricks in reverse order. You may need to do a little cutting if the old
bricks are not standard size. It's not a hard job at all.
Hopefully this was helpful to you, I'm sure others will jump in if I missed something. As I said at the beginning, start with a good sweep, he will be invaluable in answering these types of questions. Don't just go by the phone book, call a few local stove shops and see who they recommend. That will give you a short list to start from.
SB
 
As far as the cracks go, there is a chance it is nothing to worry about. If you have a stainless steel chimney liner inside the chimney, it does not seem like it, even less to worry about with the cracks. Considering the condition of the stove and the amount of creosote in the chimney, as you suggest, basically the previous owners didn't do a good job taking care of it. Those cracks may be a sign of a chimney fire and/or cracked flues.

Many times the mason who built the chimney is a great mason but knows nothing about chimneys, it's a different field. The flues should not have mortar between them and the block, there should be an air space. I have seen too many times where they add mortar in the space thinking they are making it stronger. But when the flues heat up they expand, that ok if there is that air space. If no air space, they still have to expand, but now they expand with the chimney block and crack the chimney block and the flues also. To solve the cracked flue problem, install a stainless steel liner. If the blocks are in too bad of condition, you would have to rebuild that chimney.
 
Newer style stove, as I noticed the secondary burn tubes up top. Fire bricks fairly simple to replace as mentioned above same for door gasket. Now on to the chimney if it checks ok by the sweep then enclosing it in a insulated chase would be in your best interest and replacing the ash door is a must. that complete exposed chimney is cooling the flue gas way to quick which leads to the formation of creosote per your description. Building an insulated chase around the chimney will produce a dramatic change in the stoves operation and likely, with good properly seasoned dry wood, all but eliminate the creosote formations you are seeing (always going to be a bit at the top ).
 
Quadrafire brick set replacement is no cheap thing. They use pumice bricks with those in the back having to be pre-drilled with the holes. May be cheaper places but the last person I saw on here that got them from a dealer paid $175 for a set.
 
I wonder if the chimney ever drafted well? Looks like 14'-15' chimney with 2 x 90* elbows. 2 x 45* with in house black pipe probably would help.
 
I wonder if the chimney ever drafted well? Looks like 14'-15' chimney with 2 x 90* elbows. 2 x 45* with in house black pipe probably would help.

That is my first impression though I am thinking more like 12' vertical flue with the 2 - 90s.. The stove looks like it has always run cool. This combo of short chimney with the 90's looks like a creosote maker. It will never draft well. I would consider either abandoning the present chimney for a taller one more centrally located or insulating the present chimney and adding another few feet.
 
As BG said, I like abandoning present chimney. Some options:
1. Stove in same place.
2. Vertical black pipe with 2 x 15* elbows (or 2 x 30*) to move ceiling penetration closer to ridge line (more attic room to work,
less Class A height needed = less Class A above roof deck)
3. Probably cheaper than insulated liner. Class A is $28/ft at big box stores (Lowes). Need 6-8'. Ceiling Support Box is ~$190.
4. Should draft like a vacuum.
 
Congratulations, Enjoy
 
For a house that size, it's no wonder a stove that size was run cool.
You may have a tough time not doing the same thing.
You could do as all have suggested with the stove, etc., and if it's too much for the house, sell it. Get a more appropriately sized stove for the space.
Might be close to a wash.
Also, do a quick check on the door and front of stove to see if either is warped, although I doubt it.
Congrats on the house and stove.:cool:
 
Bought the place today. More updates to come as we get things repaired and settled.

Pics or it didn't happen ... :)

Need to see Golden retriever pack (per your sig) enjoying their new home!! :):):)
 
  • Like
Reactions: PapaDave
I take it you haven't yet climbed up on the roof to look down the chimney to see if it is lined and if so, with what? My neighbor had a similar looking chimney put up for a stove at his house and the mason only used those square cinder blocks with no clay flue tiles inside. Once you see what you are working with you'll be able to develop a plan. As for the fire brick inside the stove it doesn't look to be in that bad of shape to me. Yes, I see the cracks, but I don't see any missing pieces of big gaps showing anywhere. If it really is going to run $175 to replace them I'd try burning the stove as is first to determine if replacement is really needed. I agree with PapaDave on the stove size vs. the house size. I suppose you can build small fires to limit the heat output, but if you really fire that stove up you're likely to have to open some windows! I'll be interested to hear how things unfold for you.
 
black pipe seems a bit close to the ceiling and that flaking paint appears to be from water not just heat, even the pipe is a bit rusty.
re: imag0174
 
I had two sweeps clean and look at everything. They both noted cracks in masonry and clay flue, but no major cracks. Both advised a ss liner and cap. I do have a clay flue but do not know the ID yet. Will get detailed up close pictures and measurements soon.

Inside black pipe flue is single wall and rusty so I will replace. Maybe double wall, maybe 45s instead of a 90. There will be a rise on the horizontal when I'm finished.

The issue with the paint flakes is a roof flashing leak that will be fixed when we replace with a metal roof and flash properly plus add diverter for chimney.

Also removed the door and having it serviced, cleaned, new seal, etc. I think the seal is 24 years old and has never been serviced. Not only did it fail the dollar bill test, it could have failed the stack of $25 bills test. I know there are other issues with this setup but suspect the door was a big contributor.
 
I wouldn't put a dime into the old setup.
 
  • Like
Reactions: dougand3
Status
Not open for further replies.