Whitfield Prodigy finally dies, well sort of.

  • Active since 1995, Hearth.com is THE place on the internet for free information and advice about wood stoves, pellet stoves and other energy saving equipment.

    We strive to provide opinions, articles, discussions and history related to Hearth Products and in a more general sense, energy issues.

    We promote the EFFICIENT, RESPONSIBLE, CLEAN and SAFE use of all fuels, whether renewable or fossil.
Status
Not open for further replies.

Snowy Rivers

Minister of Fire
Feb 7, 2010
1,810
NW Oregon
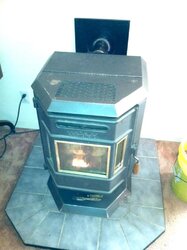
We bought the little whit used back in the winter of 2009 and I installed it as a helper for real cold weather and to take care of the "shoulders" when only a small fire is needed to heat the house.

The family though I was crazy, having 3 stoves on the one floor, Haaaaaaaaaaaaaaaa, soon everyone was quite convinced that I knew Waaaaaaaaaaaasup, and had a real worthy plan.

Not to mention being a backup if the large Whit goes down.

A stove in every corner my daughter remarked from time to time with a roll of the eyes.
I still have 2 "stovable" corners left, so all bets are off.

Anyway, I am recovering from having my Left kidney removed on April 1 and still very sore, but the little Whit has been acting up for the past two weeks and burning with a very lazy fire, Hmmmmmmmmmmmmmmm, ???????

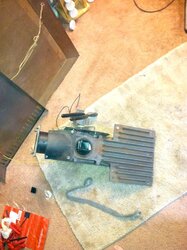
This stove has no ash traps or baffles, ????????? The exhaust fan is mounted in the top of the stove in a casting with a sheet metal box bolted to it that houses the fan assembly.

The stove was as far as I could see, CLEAN but the fire was lazy and sooting up the glass in less than a days burn. ?????????
Multiple sucks with the leaf blower had done little good in rectifying the issue.

OOOOOOOOOOK, time to rip it apart.

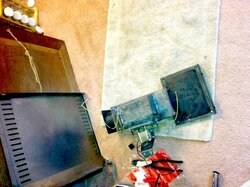
I unhooked the beast at the quick connect flange and slid it out to gain good access.
Off with top, sides, back etc to see wassssssup in there.

The service manual IS VAGUE to say the least, but a bit of snooping with a flashlight revealed the way it comes apart.

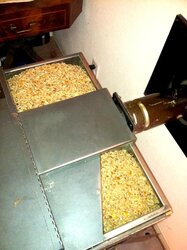
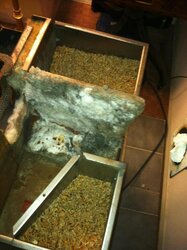
Removing the exhaust fan casting and assembly quickly revealed the problem, the entire area over the heat exchangers and the entrance into the fan housing was totally plugged with what looked like charcoal.

Just a lot of years of collecting soot and such had finally plugged the little beast up tight with crud.

The soft gasket rope that sealed all the components came off in hard chunks, so new stuff was needed.

I finished ripping the thing apart and cleaned it all up good, then off to Ace hardware to get some new rope seal and high temp silicone.

The design is not bad, but getting the rope seal all stuck correctly is a tad tedious, as it has to be spot on to seal right.

I replaced the exhaust fan with a new one, as a stack/fan housing fire a while back had caused the old one to warp and vibrate some.

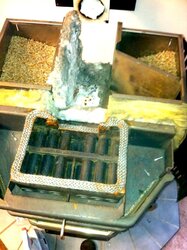
So, with all the gasket rope siliconed to the fan box and the assembly back together it was time to tackle the main heat exchanger housing and goop the rope on there as well.

All done with that part, and getting tired and sore, I decided to let the silicone cure on the heat exchanger housing so the rope would not move when I drop the fan casting assembly back into the stove.

My plan is to get things back together today and fire the beast tonight.

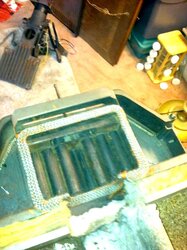
All told, things look very good inside the little stove, with the heat tubes in very good shape and everything else fine as well.

I am toying with the idea of cutting a hole in the front of the heat exchanger housing and making a removable cover plate for it, thus allowing periodic cleaning access, rather than having to tear the stove apart to clean it out.

But for now, things look good.

I will update things after I fire the beast back up, which I hope is soon, as the big whit is toooooooooo much stove for this time of year.

Snowy
 

Attachments

  • pr1.JPG
    pr1.JPG
    96.4 KB · Views: 242
  • pr2.JPG
    pr2.JPG
    86.6 KB · Views: 242
  • pr3.JPG
    pr3.JPG
    88.1 KB · Views: 245
  • pr4.JPG
    pr4.JPG
    86.4 KB · Views: 238
  • pr5.JPG
    pr5.JPG
    91.4 KB · Views: 264
Snowy, wishing you a speedy recovery. Hope you cured the little Whitfield. Was the soot the cause of the stack/fan housing fire or was it the result?
 
Thanks for the well wishes

The nut shells I burn will give off an oily residue if the fire is set to really low and can skunk up the vent some.
I had been running on low for several weeks, then kicked it up and things took off.

I have since revised the feed/draft fan settings and stopped the issue with skunking up the vent.

The fire would nearly go out between drops of fuel, then smoke a little bit, during which time it would be leaving oily deposits in the stove/vent.

Nearly back together, need to bolt the quick connector together and build a fire in it.

Just want to be home for the initial refire and run in.

Looks good though

Snowy
 
Hi Snowy

Glad to see you are posting and doing better! I like reading all your details and seeing such nice technical pics. :)

I use a razor knife and then a dremel or drill/driver with a wire wheel that you can get at the local hardware store to remove the old gasket glue. Works great!

Lazy flame is definately and air flow issue. I recently purchased a Manometer from Grainger for $125. Easy to hook up where the vacuum switch goes into the stove. Other stoves have an input for one.
Once you become familar with the air pressure readings it is a great Heath check on the stove to see if it is breathing properly.

What I do with the stove off as a baseline, is to put the AC test cord on the exhaust blower then take a manometer reading.
Example:
1.
A Cumberland Castle HPS09 stove read -0.29 Wg when the internal ash chambers were so dirty the vacuum switch would not stay engaged.
All the venting was clean so the problem was in the stove!
After cleaning just the internal ash chambers with the brush and air hose, the reading was -0.60 Wg. That is for a healthy stove that works well
2.
Again, All the venting was clean so the problem was in the stove!
A Magnum BabyCountryside stove read -0.40 Wg when the internal horse shoe chambers were plugged so bad the stove would not run above heat level 1.
After a good blowing out with a 150 PSI air compressor the reading went up to -1.60 Wg Four times better with the upgraded 105 CFM exhaust blower!

I know the leaf blower works well, but I also believe in root cause and fix. A leaf blower on the Baby Countryside may have fixed it, but I drilled a hole in the right side to access the inaccessible vertical chamber and blew it out. Then I realized that was the root cause and the right air to the right place was the real fix!
See my video http://www.youtube.com/ watch?v=iHPQkps1ML4


More pics here
https://www.hearth.com/talk/threads...ind-the-firebox-cleanout.107437/#post-1408858

Good luck with your stoves!
 
As usual Snowy, you are one of the largest assets to this Forum. All your skills and knowledge is indispensable.

Hope you have a speedy recovery. Burn on :)
 
Thanks for all the ATAGIRLS :)

UPDATE
Got home tonight and replaced a couple bolts in the fan casting that were not to my satisfaction.

Tied off the wires that run the exhaust fan and low temp switch.
Got the stove bolted back to the vent pipe, the side panels back on and good to go.

Dumped in a little hanful of pellets (start easy) and hit it with the propane torch.

Less than 3 minutes and the little beast is running like a champ, and even better than its ever worked.

Exhaust fan is quiet and smooth, and nooooooooooooo smoke leaks ;)

Here are some pix taken about 30 minutes ago

I checked the fire box depression and its spot on with a nice negative pressure.

The air wash will likely work far better than its worked in a long time too.

The one piccy shows the shells in the hopper.

Having the split hopper is a PITA but we dip the shells in with one of those 1 quart plastic pitcher they give you in the hospital. (NEVER WASTE THINGS) EH ???

The very best part of this little stove is that it cost me $200 and it came with the hearth pad too.

Snowy
 

Attachments

  • pr6.JPG
    pr6.JPG
    74.5 KB · Views: 234
  • pr7.JPG
    pr7.JPG
    98.1 KB · Views: 175
  • pr8.JPG
    pr8.JPG
    73.6 KB · Views: 278
Hi Snowy

Will you explain the split Hopper? How does it work?

Thanks
 
The exhaust fan housing sits in the middle of the stove and the exhaust goes out the back.
The hopper is made so it straddles the exhaust fan housing and just has two areas that both drop fuel into the common area below the fan housing where the auger is located.

Just a way to gain much needed fuel storage.

The Prodigy 2 is a great little stove, but does have some interesting anomalies as far as how it was designed.

I think that Whitfield wanted to keep their tradmark shape the same across the lines, and in order to use the top fan design in such a small stove required some very creative thinking.

The first prodigy did not have an exhaust fan, and required a tall chimney in order to work.
The early ones could not be direct vented ( Short horizontal )

The later ones saw the addition of the exhaust fan which really took a chunk out of the hopper volume.

If I was to redesign the thing I would definately make changes, but thats just so much water under the bridge eh ??

Overall, a very good little unit.

If I could buy a brand new one, I would in a heart beat.

This is our moderate weather unit as well as the helper when it gets real cold.

Snowy
 
Don
It amazes me that so many stoves are designed with areas that can't be cleaned.
I am certainly thinking about adding a clean out port on the little whit, so I can access that upper chamber right over the heat exchangers and ahead of the fan.

Had that been available then a quick swish every couple months with a steel bottle brush and a sucking with the leafer would have easily handled the issue.

With the door open now, the exhaust fan just howls in there, so I think this thing had been skunked up for a long time.

The glass windows are nearly totally clear this morning after running all night.

This along with the nice lively fire really makes things good.

I need to rip the large Whit down this summer after all fire season is over and give it a good scrubbing in the exhaust passages as well.

I t would seem that the engineers do not understand that everywhere the smoke and gases go, there exists the very real fact that over time, carbon, soot and crud will build up.

Back in the days of the old steam locomotives, the fireman would scoop sand up and feed it through the view port in the firebox door. He would do this while the engine was being worked hard wit a massive draft.
The sand would scour the crud off the tubes as it blasted through them on the way out.

Well a pellet stove is never gonna draft like that, but it still would be great if access was made so critical areas could be cleaned.

Ahh well, such is life
 
Hello Snowy

Thanks for the explanation. I like to study the history of these designs, it helps me to understand where they came from and why. The hard to clean areas yo talked about really chimes true in my recent jobs on the Magnum Baby CountrySide and Castle pellet stoves. I just found out yesterday the US Stove Forester model is among the harder to clean!
See >> https://www.hearth.com/talk/threads/ugly-flame-issue.108923/#post-1432129

Do you like this article I wrote on pellet stove design evolution?
http://www.pelletstovemaster.com/1_24_Pellet-Stove-Evolution-Servicing.html
 
W
 
We had an Avalon for a while, and it was a real PITA to clean, with no real good way to clean the ash traps.

Two little clean out covers, and no way to really get the ashes out.
 
We had an Avalon for a while, and it was a real PITA to clean, with no real good way to clean the ash traps.

Two little clean out covers, and no way to really get the ashes out.
The Astoria has 2 ash trap doors in the firebox, and 2 doors on the outer part of the ash traps that allow side to side cleaning. A few good raps with a small hammer on the steel back wall, and I could get almost all the ash in there. I thought it was pretty easy to clean. Once the comb. blower was removed, the exhaust plenum was large enough to get your hand w/ a brush in through the back.
 
As these stoves evolve over time, the more progressive manufactures make changes that fix little issues like cleaning and such.

Many of the older stove makers (now defunct) never kept up with engineering in new and better ideas.

Snowy
 
The Astoria has 2 ash trap doors in the firebox, and 2 doors on the outer part of the ash traps that allow side to side cleaning. A few good raps with a small hammer on the steel back wall, and I could get almost all the ash in there. I thought it was pretty easy to clean. Once the comb. blower was removed, the exhaust plenum was large enough to get your hand w/ a brush in through the back.

X2, If you take the top baffles out then you can get a 3 inch pellet brush down each ash chamber from the top and then vacuum out the bottoms. Not hard at all.

However you said Avalon so maybe not the Astoria like Imacman and I have. What model? 900PS?

P.S. I just posted the final pics of the Shed Electrical project.
I find it amazing that over 11,555 people here were interested in view that thread! Incredible!
https://www.hearth.com/talk/threads...ld-i-use-10-3-uf-b-or-10-2-uf-b-and-is.76717/
 
Its been since about 1994 900 sounds familiar

The stove choked on all the extra ash with the shells

SR
 
update

The little prodigy is working great. I still have to give the fire pot a swish twice a day to clear out the ash cake that forms in the bottom.
The prodigy simply does not blow a high enough volume of air through to toss out the materials left behind

I may try and build a different fire pot for that stove that is smaller and allows a higher velocity airflow through the thing. ??????????
 
Status
Not open for further replies.