Looking for a new insert

  • Active since 1995, Hearth.com is THE place on the internet for free information and advice about wood stoves, pellet stoves and other energy saving equipment.

    We strive to provide opinions, articles, discussions and history related to Hearth Products and in a more general sense, energy issues.

    We promote the EFFICIENT, RESPONSIBLE, CLEAN and SAFE use of all fuels, whether renewable or fossil.
Status
Not open for further replies.
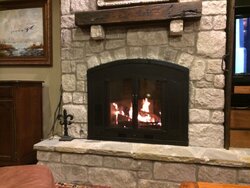
Well if it were me, I would go with an insert. I'm not an expert but I think the lopi dealer did not explain correctly to you. I feel that you will definitely need a 6" ss pipe going from your insert out the chimney. Now you have something very unique, that masonry cap. What you are gonna need to do is extend and secure the new ss pipe 6" above the chimney top, underneath your permanent cap, then you are going to have to seal off any extra space between the new liner and the old masonry line up where your ss liner protrudes your masonry liner. Do you understand my point? If you were not to use a proper ss liner connected to your insert, back smoking would occur and it would be coming back into the house through the surround edges. You seem to have something very unique, I would not put in some sort of hokey contraption if you are trying to get heat out of it. I would get the biggest insert that would fit and looks pleasing to you.....my opinion and again I'm not an expert. Before I got my insert, I was looking at fire racks with blowers, cast iron plates to line the firebox, etc, don't waste your time or money on contraptions, my insert gets great heat and is medium in size, I'd prefer bigger but the look I get from my montpelier is at the top of my needs list....anyways good luck and keep trying to learn image.jpg
 
One option could be pulling up the liner from the bottom. It wont be easy but it appears it would be easier than inserting it from the top down. I would insulate the liner and tie a pulling cone to the top of the liner. Drop a rope down the chimney and have one guy pull it up and another help maneuver it inside the house.
 
You could pull a liner up from the bottom instead of pushing it in from the top like most here have done. Not real hard to do. I did one by myself. With a lot of trips up and down a ladder.

Whoops. Didn't see James' post.
 
One option could be pulling up the liner from the bottom. It wont be easy but it appears it would be easier than inserting it from the top down. I would insulate the liner and tie a pulling cone to the top of the liner. Drop a rope down the chimney and have one guy pull it up and another help maneuver it inside the house.
I think that is the way to go if it can be done, by the way, how big are the holes up at the top, can a skinny guy slip in or work in that area?
 
Update - OK, I ordered the unit in May, it arrived in July and I got to work installing it. Although I measured carefully, the unit was a tad too big to fully slide into the opening. It stuck out a couple inches. I'd recommend anyone ordering one of these to "shrink" their measurements 1/2" or so. I debated between taking the unit to the barn and subjecting it to the plasma cutter and welding rig, but opted to chisel and grind the rock to enlarge the opening. After that arduous task was completed, the unit now sits in fairly flush with the rock face. However, being rock, there was still some gaps to deal with.

The unit came with some felt stuffing, which I crammed into the cracks from the inside. I then went to Lowe's and found some hi-temp caulk that worked great for filling the gaps. It was fairly viscous so it didn't run down when filling the sides. It also set up very hard. So, last night I lit the first fire and it cranked the heat out into the room and made for a very enjoyable experience. There was some burning paint smell, but that will fade with use.

I definitely recommend this unit and I think I'm all set up for the upcoming winter. Now to go split some logs....

115225-614c9e21c81d381e91e11514ddf60021.jpg


Attachments

  • Fireplace.JPG
    Fireplace.JPG
    197.1 KB · Views: 154
  • Like
Reactions: jaychino415
That looks great, good for you, enjoy it...
 
Congratulation to your new stove. That is a really great looking install. You will be happy. :)

Update - OK, I ordered the unit in May, it arrived in July and I got to work installing it. Although I measured carefully, the unit was a tad too big to fully slide into the opening. It stuck out a couple inches. I'd recommend anyone ordering one of these to "shrink" their measurements 1/2" or so. I debated between taking the unit to the barn and subjecting it to the plasma cutter and welding rig, but opted to chisel and grind the rock to enlarge the opening.

Good call. Maintains your warranty, your insurance coverage and the safety of your family.

The unit came with some felt stuffing, which I crammed into the cracks from the inside. I then went to Lowe's and found some hi-temp caulk that worked great for filling the gaps. It was fairly viscous so it didn't run down when filling the sides. It also set up very hard. So, last night I lit the first fire and it cranked the heat out into the room and made for a very enjoyable experience. There was some burning paint smell, but that will fade with use.

Right. Get some progressively hotter burns done now while you can still open the window to get the fumes out. After 3 or 4 times you should be all set.

I definitely recommend this unit and I think I'm all set up for the upcoming winter. Now to go split some logs....

Those are for the next winter, right?
 
Wow Viny, that came out wonderfully. It looks perfect in that setting. Thanks for the update. Nice job.
 
Status
Not open for further replies.