Rebuilding Surround/Hearth for Insert

  • Active since 1995, Hearth.com is THE place on the internet for free information and advice about wood stoves, pellet stoves and other energy saving equipment.

    We strive to provide opinions, articles, discussions and history related to Hearth Products and in a more general sense, energy issues.

    We promote the EFFICIENT, RESPONSIBLE, CLEAN and SAFE use of all fuels, whether renewable or fossil.
Status
Not open for further replies.

hazexban

New Member
Sep 23, 2013
22
Parsippany, NJ
Hello!

First I would like to thank the moderators who helped me getting signed up since I was getting blocked (Maybe you all wish I had..).

Secondly thank you all in advance for any help you can provide, I have already read so much on this site which has expanded my mind to the point of wanting to make this post in the first place.

Here is the issue: My wife and I want to install a Wood Burning Stove insert to heat our home, possibly to eliminate our need for oil which killed us last year. We are first time home owners as of December and the oil bills were shocking considering how low we were keeping the thermostat (60 degrees, force hot air).

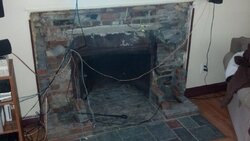
The problem is we had a company come out and do a site survey of our existing fireplace. At first they said no issue at all but then upon further inspection he discovered a problem (which a man I spoke to on the phone for another company said would be an issue but I didn't believe him *doh*). The issue is that we apparently have very oddly shaped fireplace. I will have to post pictures tonight to help illustrate, but the fireplace surround is all brick and possibly a "heatiliator" (has vents on the side that appear to do nothing when fires were built up). This surround of brick extends 18 inches out from the actual fireplace pit. The pit itself is 17 inches deep.

The height is about 25 inches and width is pretty wide, enough for the insert. The bottom line is that the insert not being deep enough to meet up with the flue properly. The surveyor recommended I tear down this huge surround and build up a smaller one that does not stick out as far and possibly redo my hearth, that way the insert sat in the pit and could better connect to the flue.

I am relatively handy but this would be my most advanced task yet and I would love to undertake it. I have been reading the codes for how a surround needs to be built with minimum distances for combustible materials etc, but I want to make sure i am fully aware of anything that we need to do to make this work, specific safety materials etc.

I will definitely get pictures up tonight and am basically looking for any guidance to the best way to remove the old surround/hearth/mantle and any resources/tips/advice on getting the space at least usable for the insert install.

As for the insert we were looking to get installed it is the Lopi Revere. http://www.lopistoves.com/product-detail.aspx?model=210

Also if you recommend I have this handled by a professional in regard to the surround and hearth just let me down easy...lol. I have a mason and a cabinet maker in the family so I am hoping they can help with this too, just need to break the news to them.

I should also mention the installer said they might be able to make a different insert work but it sounded like it would be a hack job and possibly have a very restricted draft which I know is important.

Thanks again!

Regards,

Pete
 
I'd like to see some pictures! I find it very hard to believe a Revere won't find in there with 25" in height!
 
Do you have to go with an insert? Do you have enough room for a free stander?
 
I'd like to see some pictures! I find it very hard to believe a Revere won't find in there with 25" in height!
Do you have to go with an insert? Do you have enough room for a free stander?

Pictures incoming!

So the entire Fireplace is 35'' deep. In the pictures I am showing the whole thing from the front, one side, the inside side, the inside top, and the inside depth. Here is a crude attempt at a drawing as well. Basically it's just really big and the issue is the insert won't go deep enough for a nice run up the flue according to the retailer/installer. Given our space I don't think a free stander will work. The diagram is a top down view. I believe the height inside this brick box is 25''.

Let me know if you could use any more pictures to help.

Thanks!

Front.jpg


Side.jpg

Inside.jpg

Inside_side.jpg

Inside_top.jpg


Diagram.jpg
 
Last edited:
Actually its not that big, its about the same size as my small fireplace which limited what I could install. I think that prefab has to come out but I'm not sure on this type so I'll let the experts help you with this one.
 
That's not a pre-fab, so it ain't coming out. It's a heatilator firebox.
That is a little odd, it looks like at some point the fireplace got refaced which made the damper opening really far back.
The hearthstone Clydesdale and the Blaze King Princess both have angled flue collars, that might be a big advantage here.
 
Yup, looks like a heatilator, had a very similar setup in my house
 
That's not a pre-fab, so it ain't coming out. It's a heatilator firebox.
That is a little odd, it looks like at some point the fireplace got refaced which made the damper opening really far back.
The hearthstone Clydesdale and the Blaze King Princess both have angled flue collars, that might be a big advantage here.

When you say "ain't coming out" do you mean that I am going need to leave that heatilator box there? Is the back portion of our fire place, the area with the flue, physically apart of the front surround or can they be separated? I am very confused by this setup. Also the installer mentioned MAYBE being able to get a stove with angled flue collars but said it would still be difficult bending the liner to fit. I am just concerned about having a crappy install with not so good results if a tight bend situation would impact the efficiency/draft.

Yup, looks like a heatilator, had a very similar setup in my house

Glad to hear someone else has/had something similar, what was your solution?

Thanks again everyone.
 
I didn't have the same situation with the flue. I'm willing to bet there is masonry behind that metal firebox. I was able to leave mine in and just redo the hearth and add some brick to the face. Some pics in this thread

https://www.hearth.com/talk/threads/frustrated.108446/
 
I didn't have the same situation with the flue. I'm willing to bet there is masonry behind that metal firebox. I was able to leave mine in and just redo the hearth and add some brick to the face. Some pics in this thread

https://www.hearth.com/talk/threads/frustrated.108446/

Wow what a great install you have. I see you are in NJ, so am I, do you mind letting me know who did your install? I am hoping I can just break apart the big surround we have and make a new surround. It looks like we have an almost identical steel liner on the back side. Mine slopes up like that as well. Already just with a basic install, ss liner and the unit they are looking to charge me 4k...Getting nervous that this will cost a lot more.
 
You cannot remove the firebox. It is the fireplace, without it all you have is some cement blocks. The face can be removed though. Don't worry about having a "tight" bend in the liner. Most every insert that goes in has a 30 or 45 degree elbow on the unit. It's very normal and acceptable.
 
You cannot remove the firebox. It is the fireplace, without it all you have is some cement blocks. The face can be removed though. Don't worry about having a "tight" bend in the liner. Most every insert that goes in has a 30 or 45 degree elbow on the unit. It's very normal and acceptable.

Thanks, sorry my terminology is horrendous, I meant removing the face, the 18'' inches of brick and vents. But if we can make an insert work with what we have I think we will go that route. I believe we would need to extend our hearth though. Getting a lot of education here.
 
Wow what a great install you have. I see you are in NJ, so am I, do you mind letting me know who did your install? I am hoping I can just break apart the big surround we have and make a new surround. It looks like we have an almost identical steel liner on the back side. Mine slopes up like that as well. Already just with a basic install, ss liner and the unit they are looking to charge me 4k...Getting nervous that this will cost a lot more.

Thank you, yup I'm right in Rockaway. If I were to do it all again I would install myself as I'm now confident I could have done it just as easily. I got the insert from the Energy Barn on route 23 in New Foundland. Great people. They have their own installers which were also great.

Got some help from my brother doing the hearth and the brick but was pretty simple
 
I am also in NJ and also have a masonry fireplace built around a heatilator heat form, very similar to yours. I spent days and days reading everything I could about what what to do. I ended up using a sawzall and cut out enough of the heatilator throat/dampener area to have the liner come straight down the chimney and connect to the insert. It actually went pretty smoothly once I got the right blade. No going back to a masonry fireplace, but oh well. Used rigid DuraLiner and installed myself. I am a handy DIY'er but had no prior experience doing something like this, and it all went pretty smoothly. Passed inspection and burned nonstop all last winter (except for one week of vacation).

First get that brass surround/doors off so you know what you're working with. Pick your insert and then build a cardboard model of it to figure out exactly how much room you need. If you want to go permanent, you can probably just cut out a section of wood floor and extend the hearth. If not it will depend on the insert/stove you get and what the required clearances are.

Save your self some money and go for it. I just about paid for my insert in the first year of oil savings (~600 gallons @ $3.50/gallon). This year will pay for the liner and chainsaws, and next year I'll be in the green. I'm about 40 mins south of you if you want a hand putting it in, but you're getting up on the roof, not me.

Here's a pic of what I cut out to fit the liner straight down... will try to find some more.

 
Thank you, yup I'm right in Rockaway. If I were to do it all again I would install myself as I'm now confident I could have done it just as easily. I got the insert from the Energy Barn on route 23 in New Foundland. Great people. They have their own installers which were also great.

Got some help from my brother doing the hearth and the brick but was pretty simple

Oh wow very close. Would definitely want ours to look as nice as yours one day. I feel like the liner install and cap are not that problematic from watching videos and reading guides. I am proficient with mechanical things like motorcycles and cars but I am nervous about messing something up with this and burning down my house.

I appreciate you letting me know who you used, I am going to speak with them as well. Maybe we can get it to work with our existing setup but I almost have it in my head to redo the whole thing now to make it look nicer and make it an easier install.
 
Give em a call before they get real busy, they will probably send someone out (free of charge) to look things over and give you some ideas.
 
I am also in NJ and also have a masonry fireplace built around a heatilator heat form, very similar to yours. I spent days and days reading everything I could about what what to do. I ended up using a sawzall and cut out enough of the heatilator throat/dampener area to have the liner come straight down the chimney and connect to the insert. It actually went pretty smoothly once I got the right blade. No going back to a masonry fireplace, but oh well. Used rigid DuraLiner and installed myself. I am a handy DIY'er but had no prior experience doing something like this, and it all went pretty smoothly. Passed inspection and burned nonstop all last winter (except for one week of vacation).

First get that brass surround/doors off so you know what you're working with. Pick your insert and then build a cardboard model of it to figure out exactly how much room you need. If you want to go permanent, you can probably just cut out a section of wood floor and extend the hearth. If not it will depend on the insert/stove you get and what the required clearances are.

Save your self some money and go for it. I just about paid for my insert in the first year of oil savings (~600 gallons @ $3.50/gallon). This year will pay for the liner and chainsaws, and next year I'll be in the green. I'm about 40 mins south of you if you want a hand putting it in, but you're getting up on the roof, not me.

Here's a pic of what I cut out to fit the liner straight down... will try to find some more.


Thanks for the offer, and it sounds like you had to deal with something similar as well. I would love to tackle this on my own and save some cash. If you are serious on the offer that would be amazing and I would definitely appreciate it.

These last couple of posts have inspired me to tackle the job myself. I will talk it over with my wife tonight and see how she feels about it. Could be a good weekend project. I also have no issue going on the roof as I was up there right after we bought the house to put to watch a guy install a new damper.
 
that top seal damper will be replaced with the top cap and top plate. the damper area will need to be cut to fit the liner down. The installers used a plasma cutter for mine, to save everyone a headache. You can install a block off plate to ensure the heat stays in the house.
 
Spoke to homeowners insurance today, has to be installed by an insured professional (to keep coverage, no increase in premium though which is nice). Guess that eliminates the DIY part. I am going to have another installer come check it out. Thanks again, will post back when all is done or if we have any issues!
 
That sucks... State Farm didn't care who put it in, as long as it was inspected.
 
I finally got a call back from the original installation place and they think an Avalon Rainier - 45 would fit. The price is also lower I guess because it's not as nice as the Lopi Revere. Any quick thoughts on that stove?


USMC80 I did call your place and they had me get in touch with an independent installer. He won't be able to check out my house till next Wednesday. I do like some of the Hampton Stoves.

I really wish we thought about doing this sooner so that in case I need to rip apart the brick and install a flatter surround it would be done already...
 
I finally tore down the giant brick surround after a 4th installer said we had to do it...So it's pretty much gone, well I still have a few bricks to knock out on the bottom.

Question is, we have the metal firebox left and it is still surrounded by brick on the sides. The insert will be sitting in here. I now have brick showing that is the original fireplace. It's very uneven in terms of being flush from top to bottom as mortar and bricks are not uniform. Even this metal shelf that hold brick up is installed crooked.

Do I have to redo the surround entirely of brick and done in a way of making a flush canvas of brick to install tile on (we are interested in some sheets of tile that have this nice 3D stone feature).

Thanks,

Pete
 

Attachments

  • brick.jpg
    brick.jpg
    142.4 KB · Views: 269
Last edited:
Would just like to repost about this, can I just use any brick for this or can I get by with using a mix of brick, mortar, and concrete blocks?

I am just wanting to redo the surround to get the right depth for the insert and then put a nice stone veneer on the face of of it. I cannot seem to find any info on what I can and cannot use in that regard.
 
Progress, I am having the stove and liner installed next week. Job tomorrow is to finish the rest of the project which is going over the brick with this decorative stack stone we picked out. Should be done tomorrow. Redid the hearth, raising it 3/4'' above the floor with slate. Was grouted a couple days ago, no pics oops. Will post back when it is all done.

I spoke with some masons and my brick job is ok, I used wall ties like crazy to attach my brick work to the existing brick that was there. Poured concrete in the hearth to fill in and level it out. That wood border is just for the install, I have 3/4' round trim that will be stained and go where that is now. It's coming out ok, been learning as I go.

hearth.jpg
 
Doesn't seem like much interest here but I finished putting up the slate stack stone on the surround. The stove goes in on Wednesday. Just need to work on re-purposing the old mantle and cleaning up the thinset. Can't wait till this is all done.

I have to start using my time to chop wood! My dad gave me his chainsaw since he shouldn't need it anymore, it's a Husqvarna 445.

Will post back when the stove is installed.

Thanks for looking.
Slated.jpg
 
Status
Not open for further replies.