Can I install my own 4" exhaust pipe?

  • Active since 1995, Hearth.com is THE place on the internet for free information and advice about wood stoves, pellet stoves and other energy saving equipment.

    We strive to provide opinions, articles, discussions and history related to Hearth Products and in a more general sense, energy issues.

    We promote the EFFICIENT, RESPONSIBLE, CLEAN and SAFE use of all fuels, whether renewable or fossil.
Status
Not open for further replies.

Proulx06

Member
Oct 2, 2013
37
Southern NH
We live in a split-level home in Southern NH and have decided on the Harman Accentra insert. We'll be purchasing it next week and will install it on the main floor of our home, replacing a wood fireplace.

I've gone back and forth with several local dealers on the purchase and install, and I've been most satisfied with the responses of one in particular. They have a competitive price and are adding in a free ton of pellets with any stove purchase.

The only drawback is that they don't hang the liner. They suggest a 4" pipe. I've never done any sort of chimney work, but had planned on getting on the roof to clean both flues (we have a wood insert in the lower level). How hard is it to install the exhaust pipe at the same time? Is it something best left to pros? What price should I be looking for (both for the part & install service)?

I'm pretty handy, but obviously don't want to put my family in danger. That said, if it's brainless and tough to screw up, I'll do it myself to save a few bucks.

Thanks all! This is a great forum and I've learned a lot from your posts so far.
 
I've never done any chimney work myself and we hung a 16ft liner for our stove. Went up to the roof and fed the liner down. You want the liner to run the full length up to the cap. I got a stainless steel uninsulated liner (don't need the insulated stuff in a chimney) kit from one of the many companies online.

You may need to remove your damper, I did.
 
Thanks John. Is it as simple as dropping the liner down the chimney from the roof and hooking it up to the adapter at the time of install? Do I need to block off anything at the damper on the way down? How does it attach at the top? I already have a chimney cap with a mesh screen. Will I need to replace that?

What's involved in removing the damper?

And since we live in a split-level which has a wood stove insert in the lower level (with a separate flue), are there any considerations I need to make for that?

Thanks, and sorry for all the questions...

I just did the liner install yesterday. I fed the flex-liner up the chimney and had a cone tied to the end with a heavy rope. After getting it halfway up, I went to the roof and pulled it the rest of the way. I bought a whole kit online that included the liner, top plate/cap and a few adapters. You will need to change the cap you have on there now.
My only snag (chronicled here) was the adapter to the stove, I had to do a little improvisation due to my stoves funky outlet. I also went from a 3" to 4"
The liner cut easily enough with a hacksaw and a fresh blade, and the liner screwed onto the cap. Pretty straight forward.
 
If you're not afraid of heights and feel comfortable going on top of your roof with a coiled up flex liner, It's honestly super simple. I'm not a fan of heights so I rented a allowable bucket lift and had a friend help me, just made it alot easier that way. Took about an hour to have it lined between my buddy working the top and me pulling from the bottom to guide it past the damper + sealing and end termination.
 
Thanks all.

I just had a brief convo with a dealer who quickly talked through the process...he said something about using silicone to attach the pipe to a block-off plate. Doesn't sound like you guys did this part...sounds like it's as simple as just dropping the flex liner from the roof down to the fireplace and letting it sit there until install day (dealer will arrive with stove and adapter). True/false?
 
Very easy install, the only thing I would do different is off center the block off plate at the top, drill a hole slightly larger that 3" and run a 3" pipe (dryer vent will work) OAK down.
 
Thanks all.

I just had a brief convo with a dealer who quickly talked through the process...he said something about using silicone to attach the pipe to a block-off plate. Doesn't sound like you guys did this part...sounds like it's as simple as just dropping the flex liner from the roof down to the fireplace and letting it sit there until install day (dealer will arrive with stove and adapter). True/false?

When I put the proper adapter on (it's on order), I will use high temp RTV silicone to seal the adapter to the stove. The cap plate also used a bead of silicone adhesive to seal the plate to the top of the flue.

It makes sense IMO having the flex liner hanging in the chimney waiting for the installer to connect it to stove.
 
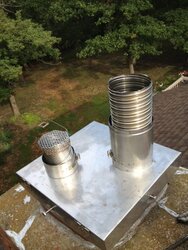
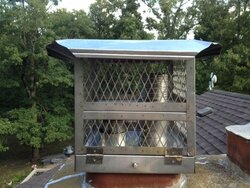
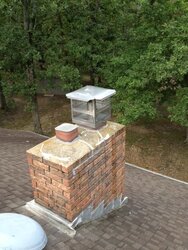
I also installed 2 flex liners about a month ago. One 4" for the vent and one 3" for the outside air. First I removed the movable part of the damper. Then I used a 1/4 inch rope with a funnel duck taped to the front end of the liner. I pulled the rope from the roof up the chimney while my wife fed the liner thru the damper area from below. It took about 45 total minutes to get both liners in place. Very easy install.

I used a prairie style ( coliner) cap on top of the chimney.

I made a block off plate above the stove and used Roxul insulation above the block off plate, in the damper area and below the top cap. I did not insulate either flex other that listed above.

I had problems with the stove adapter that I used. When the 4" flex was attached to the adapter it came in contact with the top of the stove so I had to remove the factory installed stove exhaust from the combo blower and reposition it so that I had clearance.
 

Attachments

  • photo(2).JPG
    photo(2).JPG
    64.3 KB · Views: 218
  • photo(26).JPG
    photo(26).JPG
    67.8 KB · Views: 265
  • photo(3).JPG
    photo(3).JPG
    73.4 KB · Views: 205
Last edited:
When I put the proper adapter on (it's on order), I will use high temp RTV silicone to seal the adapter to the stove. The cap plate also used a bead of silicone adhesive to seal the plate to the top of the flue.

It makes sense IMO having the flex liner hanging in the chimney waiting for the installer to connect it to stove.

I would suggest you use a couple short screws on the adapter in addition to the high temp silicon to make sure everything stays in place.
 
Gotcha. OAK is an alternative to pulling from inside the room, right? Any idea if a Harman Accentra Insert needs it? I'll search around for the benefits...I would like to do this right, and do it right the first time.
 
Hello

OAK is outside air kit. When installing the 4" diameter flex liner you may install a 3" diameter flex liner for the OAK at the same time. Just as easy to install both at the same time with chimney 2 caps. The OAK is not needed per code but it works very well and prevents warm room air from going up the chimney. We also install Roxul Fire Proof insulation from Home Depot on the damper shelf to keep that nice warm room air you are paying for, from convecting up the chimney. Some towns may require an aluminum blocking plate. It is a good idea to hold the insulation up but may not be required.
 
Last edited:
I used my Harman Accentra insert for the first year with no OAK but was getting bad drafts in my house when it was on. Put an OAK in this year and it seems to have helped. I would suggest doing it when you first install the stove, makes life much easier! Either way, you'll love the stove!
 
Status
Not open for further replies.