Eko Orlan Model 25 Nozzle

  • Active since 1995, Hearth.com is THE place on the internet for free information and advice about wood stoves, pellet stoves and other energy saving equipment.

    We strive to provide opinions, articles, discussions and history related to Hearth Products and in a more general sense, energy issues.

    We promote the EFFICIENT, RESPONSIBLE, CLEAN and SAFE use of all fuels, whether renewable or fossil.
Status
Not open for further replies.

JTWALL

Member
Feb 2, 2013
111
Greene, NY
Good day.

Just this week (5 Oct 2013), I replaced the nozzle in my Eko Orlan Model 25. I thought I would share some of what I learned and also an experiment I am trying.

To begin, this is the first time I have ever changed a nozzle. The original nozzle lasted three full winters. I have three YouTube videos showing the process and issues I encountered.


...or on YouTube search for: kntryhart

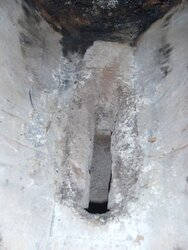
Briefly, I was shocked at the poor manufacturing techniques and total lack of quality control! The secondary air tube on the left side of the boiler was totally misaligned inside the unit; I would say only 10% of the air could be delivered to the nozzle. The new nozzle did not fit and required significant modification. Once fitted, I discovered the holes on the right side of the new nozzle did not align with the holes in the boiler!

One would think the factory would ensure parts were properly aligned since the manual stresses the importance of proper air adjustments! The way the boiler was assembled made any secondary air adjustment a waste of time. For certain, the adjustment values listed in the manual were worthless! Again, see my YouTube videos.

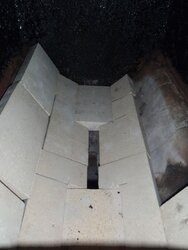
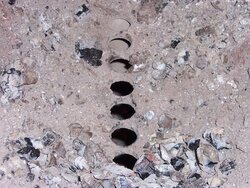
Now, for my experiment. In an attempt to reduce nozzle wear, I took two ceramic floor tiles I had and modified them as shown in the photo. The tiles were sized so they sit nicely over the nozzle. I placed one tile glazed side up and the other glazed side down to see if it affects longevity. I did put refractory cement on both non-glazed backs, dried them and baked before installing.


I have done a couple tests burns and like what I see. The holes reduce the amount of charcoal falling into the lower chamber. There has been some cracking and tile damage at the narrow part between the holes; but I really don't care about that. As long as the area near the nozzle remains intact, I will be happy. Even if I have to replace the tiles several times during a heating season, it will be worth it.

Also, I made a modification to the primary air adjustment gates that I find very useful. It allows me to change the air adjustment without the need to remove the fan and cover assembly. Again, please see my YouTube channel.

Regards,
JT
experiment.jpg
 
  • Like
Reactions: hobbyheater
Welcome JT

I liked your original videos,I watched them several times before I bought my boiler.

I always figured that the nozzle replacement would be a job and a half. Looks like you proved me right. Thanks for sharing.

I know this is to late to help You,but I and others have had pretty good luck with installing an overlay of regular firebrick from the homecenter over the nozzle forming a new nozzle opening.

pics from old computor 970.JPG
Mine has worked well to extend the life of the original nozzle plus like you said it prevents coals from falling thru having the nozzle width correct.
 
Last edited:
JT,
One thing I noticed on your video of the primary air adjusters.
The air gates or sliders on yours are installed opposite of the way mine are. Mine are installed with the lip that is bent up slightly towards the center of the boiler where as yours are installed with the lip towards the outside of the boiler.
Might not make much difference other than when comparing opening measurements.

Anyways good Idea on threading the hole for the adjusting screw,I might do that when I get time.


Thanks. I really like being able to change the settings while the boiler is operating. I check the flame, look at the top of the chimney and adjust the air settings as required. Good catch on the sliders. I reversed them. The angled section fits nicly over the weld fillet. Also, I saw a Model 60 that had the sliders that way. Seeing how they assemble these things, it might be either way.

FYI - my experiment with the tile is a resounding FAILURE! Tiles didn't last a week. So, today I made up a new plate from 304 stainless steel (1/4-inch thick). Bored 7 1-inch holes equally spaced. Will see how long this one lasts :-(((
 
Last edited:
JT,

Thanks for starting this thread, I installed my boiler in 2008 and have been noticing the eroding of my nozzle. It is good to see that New Horizons is now selling a nozzle replacement. Last year I replaced my lower refractory blocks and was dissipointed when they didn't fit and had to spend about 3 hrs. grinding down the tops so they would fit. That refractory material is way tougher then the original! Any how I watched your video and I am no excited about rushing into replacing my nozzle I took a Mr. Fix it and this week I put fire brick in my burn chamber, I hope this buy's me some time. It only took 1 1/2 hrs. to do all the cutting and most of that was trying to figure out the right dimensions.

I have done one burn and I am happy the results. I will be happy if the nozzle wear significantly slows and I can get 1 season out of the fire brick.
 

Attachments

  • EKO_20131010_082.JPG
    EKO_20131010_082.JPG
    71.8 KB · Views: 516
  • EKO_20131010_083.JPG
    EKO_20131010_083.JPG
    54.3 KB · Views: 464
Timberr,
Good day and thanks for the message. The nozzle in your boiler looks tired! If your boiler is a 2008 model, I would not be surprised to learn that it has a nozzle like mine. I hope the firebrick works out for you.

The stainless steel plate I made for over my nozzle is working well. I am hoping the 304 stainles can take the "heat"! If it works, I should never have to change another nozzle since it is protected completely.

I have another modification that I hope to make on the boiler electrical system in a week or so...waiting for some parts I ordered.

Regards,

JT
 
I thought I was going to have to replace my nozzle last fall. Instead I got some premixed refractory from menards and patched it up. I vacuumed the dust off it., wedged a piece of 1 1/2 inch foam board in the hole and patched around it. Let dry, remove foam and just like new. It's holding up very well and I expect to get another year or two out of it. I have a spare on hand just in case. The stuff I patched it with seems a lot more durable than the original.
 
I am also disapointed in the quality of the Eko 25. I had screws falling off before it was installed. At the begining of the 3rd year the controller started going wacky. By the end of the 4th year it was junk. I bought the good one for 465 from Ahona. Seems better and hope it lasts. There is no reason for the nozzle to wear like that. It should have steel covering the nozzle and have it cemented in. It also shouldn't be such a pain to get to the back to clean the tubes. Just unreal how they designed it. We shouldn't have to modify like this. Otherwise I think th eboiler will last a long time.
 
Many thanks JTwall for this post. Did you call the distributor of the nozzle about the poor fit? what did they say and Im assuming you got no help there. If I could go back I would have picked a different boiler than my eko 60, just too many issues similar to what you found inside your nozzle. I have the 60 model, but found it worked much better when I blocked one of the 2 nozzles and used it like a 40 model but with more wood capacity. so for the past 3 seasons Ive burned using only the rear nozzle. I see your video and I think I will rotate to the front nozzle before attempting to do what you did- if the new one would fit out of the box sure I am ready to do that, but what you had to do was just ridiculous.

How much did the new nozzles cost (shipping$) and also does anyone know the cost of the u shaped pieces in the secondary chamber? mine are worn out but then some have said the new ones don't fit either.
Ill assume these came from New Horizon?
 
I also would like to hear more results of adding the firebrick to the upper chamber. My biggest problem right now with my unit is the falling of good coals to the bottom chamber before they can fully burn. I am always recycling those coals for each new burn.

Ive had my eko 60 since 2003. I feel like it has never really burned to full potential.
 
Many thanks JTwall for this post. Did you call the distributor of the nozzle about the poor fit? what did they say and Im assuming you got no help there. If I could go back I would have picked a different boiler than my eko 60, just too many issues similar to what you found inside your nozzle. I have the 60 model, but found it worked much better when I blocked one of the 2 nozzles and used it like a 40 model but with more wood capacity. so for the past 3 seasons Ive burned using only the rear nozzle. I see your video and I think I will rotate to the front nozzle before attempting to do what you did- if the new one would fit out of the box sure I am ready to do that, but what you had to do was just ridiculous.

How much did the new nozzles cost (shipping$) and also does anyone know the cost of the u shaped pieces in the secondary chamber? mine are worn out but then some have said the new ones don't fit either.
Ill assume these came from New Horizon?

Good day. Yes, I did contact the distributor (New Horizon) regarding this problem. A couple things bothered me. First, I was amazed that while they have sold many of these nozzles, they have never gone through the process of changing one themselves. The second was their reply: "yes, I have heard of that problem". The solution from New Horizon was to "grind it to fit". The cost of the new nozzle (delivered) was about $95.00. Once I got the proper fit, I made a mold from Plaster of Paris for the outside and a foam core for the hole in the center. It turned out well and other than the sacrificial foam core it can be reused. I have a pattern so I can cut additional foam cores as needed. If the lower u-shaped pieces fail on mine, I will make a mold and cast them myself. I see New Horizon sells the material and stainless steel needles.

I rebuilt the protective nozzle shield (as shown above) using 304 stainless steel. So far it is working very well. I might never need to worry about another nozzle.

Once last thing. I want to state how utterly disgusted I am with AHONA (the people I bought this unit from). They are absolutely worthless! Starting last spring and for over 6 months I tried to get parts for my Model 25. I left many messages, sent e-mails - nothing. Finally, in August, I managed to talk to Mark a couple of times. All I got was endless promises..."I have to make a delivery to Maine, but you are next" or..."I'm in Ohio right now, but call me Saturday". Absolutely worthless! In early September I filed a complaint with the BBB. AHONA never replied till late October! Amazing; AHONA lied about everything. I am here to tell you that AHONA NEVER tried to help me or contact me EVER! Not once! That is the truth! While New Horizon isn't the best, at least they answer the telephone and make quick deliveries.

Regards.
 
I was one of the first to post about an overlay for the nozzle and other clever members took it and seemed to have improved on the procedure. Although the cut out brick works well for me the other methods may not need to be replaced as often. I'm starting my third season using the overlay and still have the spare nozzle sitting on the shelf. I've had to replace it every year since it crumbles when I remove it for cleaning in the spring.

https://www.hearth.com/talk/attachments/resized-brick-1-jpg.85068/
 
Here's the thread I started when I did my first overlay https://www.hearth.com/talk/threads/oak-nozzle-erosion-on-eko-40.72151/
It has worked out well. The bricks forming the nozzle opening last about 1 season for me.
Right now I have the nozzle opening narrowed down to 1-1/8"wide and 5"long,quite a bit smaller than the original size.
Maybe JT could post the size of the new nozzle opening?

My theory on the reduced size is that with limited storage capacity I have (500gal),the boiler will idle less with the reduced output.
By time we are in the peak heating season the nozzle opening is going to enlarged somewhat.

The boiler sure seems to gassify faster now,and I am able to run the fan at 50% after everything gets up to temp good.
The flue temps run lower also(because of the fan speed).

Personally I like this boiler,it heats alot of sq. ft. on little wood and it does it without alot of smoke.

Every wood burner I have ever owned has needed some sort of maintenance ,door gaskets,firebrick,cat converter,chimney cleaning often.
So far the Eko has all my previous wood burners beat by a long shot.
 
So far the Eko has all my previous wood burners beat by a long shot.
+1 on that. The replacement nozzle orifice measures 1 1/8 x 8. I tried 3/4" back when I was first experimenting and I didn't like the burn. I suppose I could have played with the air but it took me so long to get it right ai decided to leave it alone. My cut out brick measures 1" wide and works well. It gets wider with time.
 
I was one of the first to post about an overlay for the nozzle and other clever members took it and seemed to have improved on the procedure. Although the cut out brick works well for me the other methods may not need to be replaced as often. I'm starting my third season using the overlay and still have the spare nozzle sitting on the shelf. I've had to replace it every year since it crumbles when I remove it for cleaning in the spring.

https://www.hearth.com/talk/attachments/resized-brick-1-jpg.85068/

I am posting a two photos I just took (2 Nov 2013). One shows the piece of 1/4-inch thick 304 stainless steel installed over the nozzle on my Model 25. There are seven 1-inch diameter holes bored through the plate. This keeps larger-sized pieces of fuel from falling into the lower chamber. There does not appear to be any degradation of the plate. The second photo shows the fine ash that results from having the plate over the nozzle. I am still playing with the air adjustments a little to get the right mix.
 

Attachments

  • 1nov_1.jpg
    1nov_1.jpg
    93 KB · Views: 426
  • 1nov_2.jpg
    1nov_2.jpg
    151.7 KB · Views: 428
JT,since you have taken your nozzle out,do you think it would be possible to cast a new nozzle right in place after the worn nozzle is removed?
Possibly using plastic tubing to form the air passages and a piece of 1"foam board to form the nozzle opening?Then block off the bottom and just pour in refractory cement.

Woodmaster here patched his nozzle with the refractory cement from menards and said it was holding up good,so it should make a good complete nozzle casting.

Anyway I thought this might be easier than going thru what JT did.

I always thought that the original nozzle looked like it was cast in place,but who knows what they did.
 
Many thanks JTwall for this post. Did you call the distributor of the nozzle about the poor fit? what did they say and Im assuming you got no help there. If I could go back I would have picked a different boiler than my eko 60, just too many issues similar to what you found inside your nozzle. I have the 60 model, but found it worked much better when I blocked one of the 2 nozzles and used it like a 40 model but with more wood capacity. so for the past 3 seasons Ive burned using only the rear nozzle. I see your video and I think I will rotate to the front nozzle before attempting to do what you did- if the new one would fit out of the box sure I am ready to do that, but what you had to do was just ridiculous.

How much did the new nozzles cost (shipping$) and also does anyone know the cost of the u shaped pieces in the secondary chamber? mine are worn out but then some have said the new ones don't fit either.
Ill assume these came from New Horizon?

I just had one of my crazy ideas.
JT,since you have taken your nozzle out,do you think it would be possible to cast a new nozzle right in place after the worn nozzle is removed?
Possibly using plastic tubing to form the air passages and a piece of 1"foam board to form the nozzle opening?Then block off the bottom and just pour in refractory cement.

Woodmaster here patched his nozzle with the refractory cement from menards and said it was holding up good,so it should make a good complete nozzle casting.

Anyway I thought this might be easier than going thru what JT did.

I always thought that the original nozzle looked like it was cast in place,but who knows what they did.

Good day. Sorry, I do not think casting a nozzle in place would be practical. By all means you can try it, but I think you'll have a mess on your hands. Also, my humble opinion, I think proper curing the cast nozzle is very important.
 
I've also rebuilt my nozzle. I plugged the ends of the air inlets with styrofoam plugs and cut a piece of 1" blueboard (styrofoam) to fit into the nozzle. I mixed up some refractory cement and worked it in. Let it cure 48 hours and it seems fine. I picked away loose/crumbling ceramic and soaked the existing nozzle before casting. I've had my Eko for 8 years now (!), so that doesn't seem too bad.
 
I've also rebuilt my nozzle. I plugged the ends of the air inlets with styrofoam plugs and cut a piece of 1" blueboard (styrofoam) to fit into the nozzle. I mixed up some refractory cement and worked it in. Let it cure 48 hours and it seems fine. I picked away loose/crumbling ceramic and soaked the existing nozzle before casting. I've had my Eko for 8 years now (!), so that doesn't seem too bad.
Wish I had 880 gallon of storage!
I am glad that the nozzle has worked for you. Just an FYI, I carefully examined the new nozzle that New Horizon shipped to me. I discovered the opening at the top is narrower than that at the bottom (by quite a bit). So when the gasses go into the nozzle they expand in a venture-like jet. I did make a mold (Plaster-of-Paris for the outside and custom-cut blue board core for the hole). I made two wooden templates that matched the angle of the new nozzle I got from New Horizon. I glued the wooden templates on the ends of a piece of 2" thick blue board then cut it to shape with a homemade hotwire. The foam cores are sacrificial and are melted using a hot air gun after the refractory cement hardens.
Regards,
JT Wall
 
I've also rebuilt my nozzle. I plugged the ends of the air inlets with styrofoam plugs and cut a piece of 1" blueboard (styrofoam) to fit into the nozzle. I mixed up some refractory cement and worked it in. Let it cure 48 hours and it seems fine. I picked away loose/crumbling ceramic and soaked the existing nozzle before casting. I've had my Eko for 8 years now (!), so that doesn't seem too bad.
8 years at what,4 or 5 cord a year? Mine is 4 years at 10-11 cord a year so seems about right.


Jt,how wide does the new nozzle flare out to?
Might be nice to have the nozzle opening dimensions recorded on this thread for future reference.I think Fred noted the correct width and length above but if it flares out below it would be nice to have that dimension.

Nofossil you type faster than me.
 
I have uploaded the details of my Eko nozzle.
I am sure there are variations out there!
PS: Had a nippy 15 degrees here this morning!
 

Attachments

  • eko nozzle.pdf
    388.1 KB · Views: 555
Could we be giving the manufacturer too much credit? Would anyone be disappointed to find that the shape was designed to facilitate removal from the mold?
 
  • Like
Reactions: barnartist
Status
Not open for further replies.