Stove Placement in Barn-Need Thoughts.

  • Active since 1995, Hearth.com is THE place on the internet for free information and advice about wood stoves, pellet stoves and other energy saving equipment.

    We strive to provide opinions, articles, discussions and history related to Hearth Products and in a more general sense, energy issues.

    We promote the EFFICIENT, RESPONSIBLE, CLEAN and SAFE use of all fuels, whether renewable or fossil.
Status
Not open for further replies.

Srbenda

Burning Hunk
Dec 27, 2009
117
PA Horse Country
I am slowly upgrading my very old barn, and got the new floor put in today.
It's not huge, the enclose area will measure 30x12, with about 10' to the roof peak.
The stove is a Fisher Mama Bear, so I think I will have plenty of heat for the space.

I have several questions:

1) The barn is all wood, the floor is all wood, what type of base and surrounding shielding do I need to protect the barn?

2) Where should I place the stove, I am planning on it being in the center of the space as much as possible, as that seems to be the most effective way to heat the space, am I wrong?

Pics of the space as it is...

IMG_20131005_153212_850-M.jpg
 
As far as placement of the stove goes, where can you best run the piping?
 
Looks like stall space. What are you gonna be using it for? That will have a lot to do with placement.
 
Looks like stall space. What are you gonna be using it for? That will have a lot to do with placement.

Yes, this is old stall space I am converting. As far as the piping, really, anywhere works. It's just a matter of how much pipe is inside the barn, versus above the roof.
From an install perspective, the closer to the edge of the roof will make it easier to install.
 
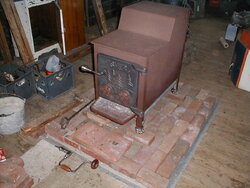
In my wood floor cabin, I simply laid a piece of 24 ga galvanized sheet metal on the floor, 1/2" cement board, then covered with bricks. I add a bottom shield which makes the most difference in radiation to the floor below. The floor stays cold.
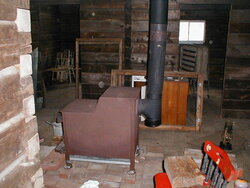
If the floor pad is going to get bumped, I'd use hollow bricks on edge with threaded rod through the outer courses to keep tight. I put my chimney in the center, and without attaching to floor, I can swing the pad to face the stove different ways to move it about 4 feet if future plans change.
P1010046.JPG P1010045.JPG

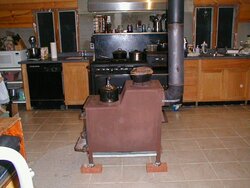
Here's the same stove in my kitchen that shows the bottom shield better. It's clamped on and kept the tile floor cold in the center. It was hot enough to be uncomfortable to hold my hand on the tile in the center without it. (1/2 inch rockboard with the same 24 ga metal under tile)

Brown Mama in kitchen 2011.JPG
Notice I put an extra brick under each leg to make it more comfortable loading and cooking things on top.
 
Last edited:
I made it from a piece of 24 ga. sheet metal from a local sheet metal shop. It happened to be galvanized left over from another project. Anywhere that makes ductwork should sell you a small piece. You can fold the edges over for strength, or bend it like I did on a 90* angle like on prefabricated shelving. If you have an old metal shelf that you can do without one of the shelves, you can cut it down to fit between the legs. About 1 inch away makes a huge difference since air is the best insulation. It simply stops the radiation from going straight down.
The later UL listed stoves had them rear and bottom.
 
The prints for the factory shield called for 20 gauge cold rolled steel for a better finish. Goldilocks had a double shield on the back that reduced clearance to combustable wall down to 12".
 
Closest nearest the center that makes most sense, plan it out now....
 
Got a little closer on the project today, by moving the stove out to the barn. Fortunately, I didn't have to do much heavy lifting.
IMG_20131012_150118_344-L.jpg


This is about centered in the space, but I am a bit concerned about how far it will jut into the room. I am thinking about putting it in more of a corner position, which will not improve the heat, but will certainly make the space more useable. The opening to the left will become a window, and the opening to the right will become a door.

IMG_20131012_150709_785-L.jpg
 
Mind the clearance requirements to combustibles of 36" in all directions. This can be reduced to 12" with a proper NFPA 211 wall shield.
 
Can be done with a little advance planning.
 
Yea having the stove in the center is nice but its in the way, put the stove in the corner that you can take advantage of the prevailing winds in the winter so you have some natural air flow to the rest of the room. I assume the building is not totaly air tight.
That will be a nice work area in the winter.
 
Despite the opinions of SWMBO, I placed the stove in the center of the barn, not in the corner. While this divides the barn into two spaces, it should help for more even heat distribution, and a much easier install for me.

Placing the metal studs on the floor and wall to create my non-combustible gap.

IMG_20131128_120424_774-M.jpg


The first concrete board mounted to the studs. I need two more for underlay support, since the stove is about 400 pounds. After I get those laid down, then we'll add the base concrete board for the hearth and figure what I will cover it with.

IMG_20131128_125214_103-M.jpg
 
Be sure to allow for a 1" air gap at the bottom and top of the cement board wall shield. That is a critical part of an NFPA211 wall shield. If the wall shield is not ventilated the clearances can't be reduced. Will there also be more studs on the floor for the full width of the required hearth?
 
It's tough to see, but there is a gap at the top, and at the bottom. Additionally, the underside of the hearth will "vent" to the back of the wall shield, which should create a nice airflow.

AND- On the back of the wall shield there is a nice gap straight down to the dirt, so, plenty of cold air flow in the winter.
 
With only 1 DuroRock board on top of the metal studs, it seemed to have too much flex and give. So I added a second, which seems much firmer. It will be in the mid-40's tomorrow, so I hope to get the bottom of the hearth mortared and slate tiled.
 
Durock isn't meant for no backing and you don't want any flexing if tiled. Normally the durock would be ontop of a very rigid surface like 5/4 plywood. To support the stove I would put a sheet of steel on top of the metal studs and pop rivet it to the studs so that it's drum tight.
 
Hmmmm.

I have neither a sheet of steel or pop rivets.
I didn't want to use plywood because of the heat.

It seems pretty firm now, even when I stand on it.
 
Status
Not open for further replies.