Last edited by a moderator:
Help Selecting A Quality Stove
- Thread starter RossB
- Start date
-
Active since 1995, Hearth.com is THE place on the internet for free information and advice about wood stoves, pellet stoves and other energy saving equipment.
We strive to provide opinions, articles, discussions and history related to Hearth Products and in a more general sense, energy issues.
We promote the EFFICIENT, RESPONSIBLE, CLEAN and SAFE use of all fuels, whether renewable or fossil.
You are using an out of date browser. It may not display this or other websites correctly.
You should upgrade or use an alternative browser.
You should upgrade or use an alternative browser.
- Status
- Not open for further replies.
bag of hammers
Minister of Fire
A cricket probably would have saved my neighbor's chimney. Great idea with the metal bars - kind of a snow and ice brake.There is a snow wedge available, called a cricket I believe. http://www.icc-rsf.com/main.php?t=chem_produits&i=22&l=en
I'm not sure what you would need if snow decided to come off that top roof. I have a metal roof so definitely more of a sliding issue. I put metal bars across on the roof above the chimney like a ladder to prevent sliding down above the chimney.
Maybe you could add a third brace to have the wind and snow issues covered.
cableman
Minister of Fire
Looks great! Im glad i have a tile friend to help with mine! He floats mud like no tomorrow lol. How bigs that hearth 50, 60"s?
Looks great! Im glad i have a tile friend to help with mine! He floats mud like no tomorrow lol. How bigs that hearth 50, 60"s?
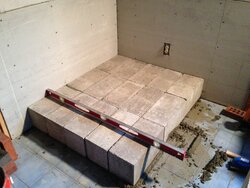
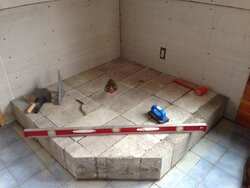
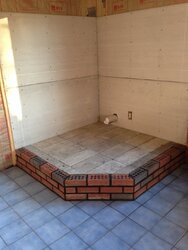
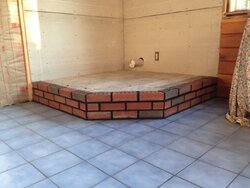
I think I'll be at 52" square when done
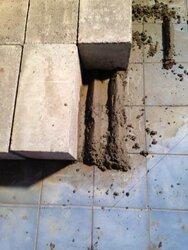
Spent last night cutting bricks at 22.5 degree angle for my hearth base. I had bought a 14" masonry blade (abrasive disc) for my Milwaukee metal chop saw, but it cuts sloooooooooooooooow. Must have taken me 2 hours to cut 6 bricks. It cuts a perfect angle and leaves a nice clean edge, but it takes forever and I blew the circuit breaker every time I got a little anxious and tried to apply some actual force to the cut. I'm not willing to buy a 14" diamond blade. I'm hoping to have all my bricks cut for the base by tonight so I can get back to mortar on Friday.
OK...if you're going to cut bricks or blocks, and you're going to use a circular saw, please buy the diamond/steel blade. You cannot believe the difference between using an abrasive cut-off type of blade vs. the steel/diamond blade. The diamond blades cut through like a hot knife through butter...no struggle...no force...no wiggling around as you try to follow the line...just smooth, clean cuts. I used one blade in my 7 1/4 saw to cut cinder blocks and I was so impressed that I bit the bullet and bought a 14" blade for my chop saw. Bricks don't stand a chance now. It's like cutting pine 2x4s.
So anyhow...back to the project...
You may recall that the room initially looked like this...lots of tongue and groove pine and 3 skylights
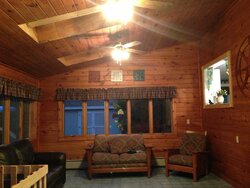
The skylights came out because they leaked occassionally and, facing south, they just let in too much light...the glare on the television was irritating and the sun beating on my bald head was never enjoyable. I also need to relocate the baseboard heating to accommodate the increased floor height.
So anyhow...back to the project...
You may recall that the room initially looked like this...lots of tongue and groove pine and 3 skylights

The skylights came out because they leaked occassionally and, facing south, they just let in too much light...the glare on the television was irritating and the sun beating on my bald head was never enjoyable. I also need to relocate the baseboard heating to accommodate the increased floor height.
Last edited by a moderator:
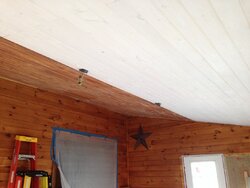
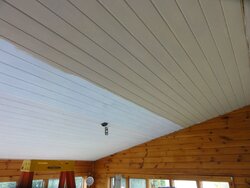
I tore out half of the ceiling when I removed the skylights. That way I can use 16' boards to fill it back in and I can salvage some boards to patch the walls where I removed the slider and the window. Otherwise, it's impossible to match up the 20 year old boards that were originally polyurethaned and then aged in the sun.
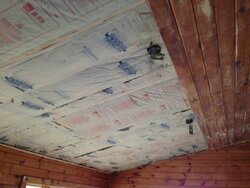
We decided to pain the ceiling, but since the original half had a shiny coating of poly on it, I'd hae to sand the entire thing...:suck:

We decided to pain the ceiling, but since the original half had a shiny coating of poly on it, I'd hae to sand the entire thing...:suck:
Last edited by a moderator:
cableman
Minister of Fire
My old heath was brick and blue stone on top, the guy filled under the blue stone with sand, i took out like 12 spackle buckets of sand! You bricking the back also?
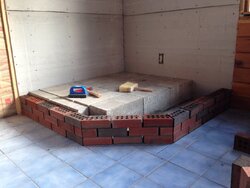
Unfortunately, I don't have any pictures for the next phase. Mostly because it was an abject failure and my hands were far too coated in mortar to even attempt to use a camera. I was probably cursing a lot too. The short story is that while riding high on my success with the cinder blocks, I decided to take a crack at the first 3 courses of brick. It was a train wreck. I couldn't get the right consistency to "butter" the ends of the brick and I was having a hell of a time filling all the spaces between the bricks. My initial bed or mortar was too thin so by the time I got the 3rd course in place, it was half an inch shorter than the cinder blocks. I made a mess of the brick faces and it wasn't exactly level either. It was a mess. I spent a few minutes trying to figure out if I couldsalvage my work and then I conceded failure and tore it all out...doing my best to salvage as many bricks as possible in the meantime. It's my own fault. I knew I should practice before attempting the real thing, but my childhood Lego building skills made me arrogant...I was flying high on wings made of Jenga blocks...and I crashed and burned.
So back to YouTube videos and I'll try again. It's a good thing that bricks are relatively cheap.
So back to YouTube videos and I'll try again. It's a good thing that bricks are relatively cheap.
My old heath was brick and blue stone on top, the guy filled under the blue stone with sand, i took out like 12 spackle buckets of sand! You bricking the back also?
Yes sir! I've got 350 bricks stacked up in the room; just waiting for me to figure out how to lay them. Incidentally, there's a good reason why shaking a brick mason's hand is a lot like slamming your hand in a car door. Forget the fact that they're carrying brick and stone around all day...just work the trowel for a couple hours and your forearms start to feel like Popeye's. This is physical work.
cableman
Minister of Fire
northwinds
Minister of Fire
It's hot water, but I do expect that we'll still be using it at some point. I'm not sure how often the stove will be running and the room gets pretty cold with no heat at all. If nothing else, I'll need it during the early winter/late spring seasons to maintain the room. I may get too lazy to burn wood some day. Besides, I already have the baseboard so there's no cost to reinstalling it. I'll spray paint it brown and sweat it back in place.
bag of hammers
Minister of Fire
then I conceded failure and tore it all out...
Man, if I only had a dollar for every time I did that. I feel like the king of do-overs sometimes. Don't let it bother you - you're making great progress IMHO....
That sanding must have been a b*tch - but your refinished ceiling is going to look nice - the primed area kinda reminds me of my stove room ceiling (a "blue stain" t&g pine with white pickle stain finish). The notion of sanding a ceiling is exactly why I'm not putting a clear coat on my current project (plywood ceiling with battens) - I'm good with "rustic" and I plan to re-stain / re-paint it in the next few years.
Last edited by a moderator:
Machria
Minister of Fire
bsruther
Minister of Fire
- Status
- Not open for further replies.
Similar threads
- Replies
- 22
- Views
- 1K
- Replies
- 7
- Views
- 2K
- Replies
- 17
- Views
- 3K
- Replies
- 19
- Views
- 567


