Replacing the old Pull Chain light for a new drop ceiling is Plug & Play

  • Active since 1995, Hearth.com is THE place on the internet for free information and advice about wood stoves, pellet stoves and other energy saving equipment.

    We strive to provide opinions, articles, discussions and history related to Hearth Products and in a more general sense, energy issues.

    We promote the EFFICIENT, RESPONSIBLE, CLEAN and SAFE use of all fuels, whether renewable or fossil.
Status
Not open for further replies.

Don2222

Minister of Fire
Feb 1, 2010
9,117
Salem NH
Hello

The old pull chain does not cut the mustard with the new drop ceiling. Just removed the old pull chain socket, Mark the wires with a black marking pen, put in a wall switch and just did a lil lectrical and pluged in the new one. The light panel can be moved to a different square very easily too.

Has anyone else done something like this?
How did you do it?

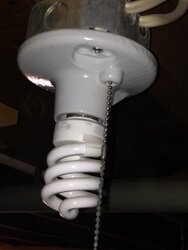
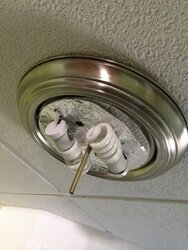
Pic1 - Old Pull Chain
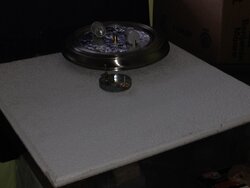
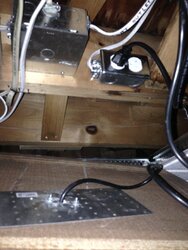
Pic2 - Drop ceiling pane with pancake electrical box
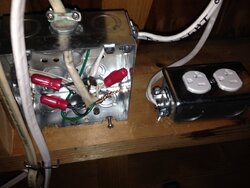
Pic3 - New workbox and outlet
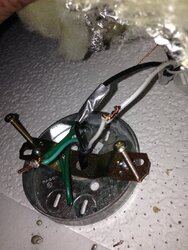
Pic4 - Twist, solder and duct tape wires
Pic5 - Plug in Panel
Pic6 - screw in bulbs
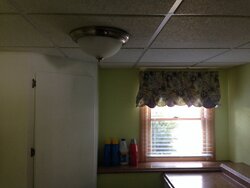
Pic 7&8 - It works and looks good!
 

Attachments

  • LaundryLightPlug&Play (1).JPG
    LaundryLightPlug&Play (1).JPG
    87 KB · Views: 390
  • LaundryLightPlug&Play (2).JPG
    LaundryLightPlug&Play (2).JPG
    88.3 KB · Views: 265
  • LaundryLightPlug&Play (4).JPG
    LaundryLightPlug&Play (4).JPG
    159.8 KB · Views: 392
  • LaundryLightPlug&Play (5).JPG
    LaundryLightPlug&Play (5).JPG
    231.9 KB · Views: 302
  • LaundryLightPlug&Play (6).JPG
    LaundryLightPlug&Play (6).JPG
    161.1 KB · Views: 449
  • LaundryLightPlug&Play (8).JPG
    LaundryLightPlug&Play (8).JPG
    218.2 KB · Views: 248
  • LaundryLightPlug&Play (9).JPG
    LaundryLightPlug&Play (9).JPG
    137.9 KB · Views: 248
  • LaundryLightPlug&Play (10).JPG
    LaundryLightPlug&Play (10).JPG
    144.2 KB · Views: 243
Last edited:
Nice install! I've never used solder before on home wiring. I just twist and use wire nuts.
 
Nice install! I've never used solder before on home wiring. I just twist and use wire nuts.

This was a tight area so used the solder.
I usually use the Scotch Locks, they work the best!
connectors3.gif
 
I can't tell if you used wire nuts, or just soldered and covered the connections with duct tape. If that's the case, I'd highly recommend pulling off the duct tape and using electrical tape. I don't think duct tape has near the insulating property of electrical tape.
 
The main mistake made here (and mentioned before) is that the wires are stripped too short. In the box each wire should be at least 6" long. This makes future work so much easier. And in the fixture, well that is just plain wrong. Duct tape, short connection, no wire nuts, what could possibly go wrong? That duct tape will be dust in a few years. I'd do it over.
 
Agreed - lose the duct tape ASAP!
 
Thanks for keeping me on track. I will find 2 more wire nuts and loose the duct tape.
 
  • Like
Reactions: Warm_in_NH
If you're gonna post pics and detailed descriptions of your DIY projects, please take the time first to make sure that what you're showing off about has been done correctly, professionally, and in accordance with applicable code requirements such that it would pass an inspection. What you've shown us here doesn't measure up, and we're not interested in passing along bad ideas on these forums. Thanks, Rick
 
I'm sorry.
 
There are a bunch of code violations there i will address a couple of them and give you some suggestions to make it right.

Plugs above a drop ceiling are illegal along with using that appliance whip to convert a hard wired fixture to plug in base.

That box is not proper for the application nor is the support.

This nifty box snaps right onto the t-grid. The box must have a tie wire from the box to the structure (floor joist in your case) in case the ceiling gets wet or a fire the fixture will stay suspended and not be a hazard to you or fire fighters.

As others have said, soldering connections is a big no no and is not kosher to do now a days. If a fault condition occurs (the wires or fixture or bulb shorts out) the intense current flow will blow the connection apart. Put some of those nice wire nuts you pictured on there and you will have a nice solid mechanical and electrical connection. Duct tape is not an insulator, and electrical tape is not a proper connection. Those wires could be touching your metal box and from minute vibrations the copper will wear through the tape and eventually short out.

There should only be 1/4" max of the romex sheath in your 4" box and a staple within 6" of the romex where it enters the connector.

I want to make sure you have a safe install! If you have any questions please ask

/Electrician is the day job
 
This nifty box snaps right onto the t-grid. The box must have a tie wire from the box to the structure (floor joist in your case) in case the ceiling gets wet or a fire the fixture will stay suspended and not be a hazard to you or fire fighters.

Thanks for showing the T-Grid light work box, I never knew they made one for that. :)
 
Don, I think we may have you straightened out on the electrical projects now???

Next, we'll move on to burning wood, not pellets!
 
Don, I think we may have you straightened out on the electrical projects now???

Next, we'll move on to burning wood, not pellets!

Thanks Dave

You know I had a Franklin and then a VC Consolidated DutchWest Federal Design Large Wood/Coal Stove model # FA288CCL (Pre90) with the catalytic combustor for 19 years, but even with typical stove temps from the top mounted thermometer were 800 to 1000 deg F, I was not happy with the heat output. The convection fan was mounted in the back and may have been an add on design because it never seemed to work that well. Do you think a better wood stove like a BK or something like that would be better?

I do like the P61 updated to a P61a-2 better than the Astoria because it radiates heat very well, just like a wood stove! LOL Also notice in the background the old Valiant oil boiler with tankless coil was upgraded to the triple pass,cold start Buderus boiler with the outdoor reset and SuperStor DHW. :)
See pics
 

Attachments

  • FranklinWoodStove.jpg
    FranklinWoodStove.jpg
    192.2 KB · Views: 184
  • VCDutchWestWoodCoal.jpg
    VCDutchWestWoodCoal.jpg
    248.2 KB · Views: 161
  • VCDutchWestWoodCoalFire1.jpg
    VCDutchWestWoodCoalFire1.jpg
    158.3 KB · Views: 146
  • PS3PelletStoveBackPlane&Connection 250.jpg
    PS3PelletStoveBackPlane&Connection 250.jpg
    176.5 KB · Views: 166
  • HarmanP61aBasement.JPG
    HarmanP61aBasement.JPG
    120.3 KB · Views: 181
Last edited:
Status
Not open for further replies.