US Stove 6039 Door Gasket Replacement & Agitator Help Needed

  • Active since 1995, Hearth.com is THE place on the internet for free information and advice about wood stoves, pellet stoves and other energy saving equipment.

    We strive to provide opinions, articles, discussions and history related to Hearth Products and in a more general sense, energy issues.

    We promote the EFFICIENT, RESPONSIBLE, CLEAN and SAFE use of all fuels, whether renewable or fossil.
Status
Not open for further replies.

goode2shoes

Member
Dec 23, 2011
32
Southern IN
Merry Christmas everyone!

I'm a newbie to this forum and to owning a Pellet Stove.

I acquired a used US 6039 from some friends that purchased a newer/larger model.

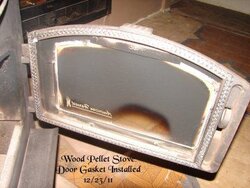
I tore the girl down, sanded and spray painted with high temp Rustoleum paint, I did as complete a cleaning as I could, replaced the Drive Motor, outer gasket to the Exhaust Fan and replaced the Door Gasket prior to lighting her up for the first time.

US Stove told me that 1/2" was the correct size of gasket to use and they were out of gaskets. So I went to TSC and bought/used the 1/2" Rutland Graphic-Glas kit. After installing/curing the door gasket I had a good seal. I used a sheet of paper test method. I did feel resistance for the entire door when I tried to pull out the paper in increments.

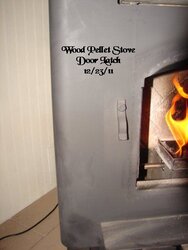
The first few days, my flame was what I think good and it went straight up in the fire box. Then all of a sudden the flame was being pushed to the firebrick and burning like a furnace flame. White at the bottom and just at the tip top it was yellow.

Also I was using 80# of pellets in just under 24 hours on a HR-4. Which I have spent many hours trying to remedy.

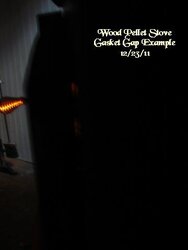
So I shut her down, cleaned the firebox and retested the door gasket. I found part of my problem. The gasket has lost it's seal in several places. The gasket is fully adhered everywhere in the troft. Meaning that I do not have a bad installation.

So I'm thinking I must have used an inferior door gasket?

Can anyone tell me if I should move up in size to maybe a 5/8" gasket or larger? Any recommendations on a GOOD gasket manufacturer?

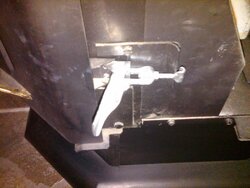
Also one of the fingers on the agitator broke off so now I'm needing a new agitator. US Stove has them for just under $60 + the $18 shipping charge.
I did a Google search, Amazon search and Ebay search trying to find better pricing and shipping charges with no luck. Can anyone tell me if there is another place to purchase a agitator?

Any help/suggestions would be greatly appreciated!
 
Can your door be adjusted or tightened?

Some have adjustments along the hinge side, others are around the latch. Some have no adjustment. But its worth a look.

When you cleaned it. Did you clean the entire exhaust path inside the stove. From the combustion blower, ash traps, and baffle areas. Oil combustion blower ports (if applicable).
 
That agitator is a custom part, likely there is no after-market replacement.

As DexterDay is suggesting check for adjustment capabilities of the door ether its hinges or latching system.

Rutland is a very old and established maker of various items used in wood burning equipment, I've never known their gaskets to be faulty. It is more than likely the door has moved on its mounts.

Under certain firing conditions (over-firing for example) it has been known for metal to change shape.

Somewhere on here there is post that tells you how to reduce the firing rates via the USSC controller. It has also been known for the firing rates to be other than what was in the manual. I'd suggest getting that information from USSC.

The post on here was by Polish Princess it was in a thread asking about how many pellets to buy for a season.
 
Hello

Below is a picture of a door hinge that has an adjustable nut on it to make the door gasket tight. If you do not have that then I suggest you go with a 5/8" gasket. I had a similar issue with a stove once. The manufacturer spec was for a 1/2" gasket and the original gasket was loose on the left side. When I replaced it with a graphite 1/2" gasket it was still loose on the left side. Now when you install the gasket it can be stretched out some or pushed back to make it thicker but that is hard to do. So if you have the time I would really appreciate you trying the 5/8" gasket and let us know how you make out.

Also see thread on all the tips of door gasket replacement including using a Dremel tool to remove the old gasket cement quickly!
https://www.hearth.com/econtent/index.php/forums/viewthread/83473/

Good Luck
 

Attachments

  • TRHDoorClaspSC.jpg
    TRHDoorClaspSC.jpg
    87.8 KB · Views: 416
I replaced the door gasket on mine last year...used a Rutland 5/8" kit, still working OK today. The only adjustment on the door is a small metal tab the door latch grabs when closing-I tapped the bottom of the tab toward the stove with a small hammer (very carefully) until the door tightened up to my liking. Had to readjust a couple of times as the door gasket broke in a bit. Can't help you on the agitator though.
 
My buddy at work makes his own agitators. Has a Breckwell and just picked up an older Whitefield that has one. Some stainless rod, careful cutting, little machining on one end, and welding (sounds like a lot, but really isnt if materials are available and your a little handy).

If its only one lobe, it may not affect performance that much. I would shop around if your going to buy one. Many different suppliers out there for OEM parts. Varying in prices.

mscj has some good advice above. Gaskets due tend to "break in" after you replace them and may need some adjustment.
 
WOW! Thank you all for your quick responses!

First of all I can't figure out how to reply to the individual postings, so I'm responding in a group manner.

I did clean everything except the auger motor when I took the stove apart for cleaning/painting. I used an air compressor to blow out all the built up dust/dirt, etc. It looked like the biggest dust storm you have ever seen!

Then I used steel wool to clean the hard/caked on dust build up on the fan blades of the blower and the exhaust fan (I couldn't break loose the screws that mounts the auger motor to the backside of the firewall?).

Then I took my vacuum cleaner and sucked out the channel of the exhaust fan housing area, the 2 cleanout pockets that are on the left and right side of the firebox, the 2 clean out areas behind the firebrick, the firebox, the 9 holes where the hot air is blown out into the room (the best I could) and I did use Pam (mfg recommended lubricant) on the spindles/axles of the blower fan and the exhaust fan.

I wish I had taken before and after pictures!

I'm trying to attach 3 pictures showing my gasket installation, an area that the gasket is not touching the door opening and of the door latch. I hope I made the pictures large enough for you to see them clearly.

When I close the door, there is NO TENSION when I lock down the lasp. There is no adjustment to the door tension available on this model. I'm going to try to tap the latch down like MSCJ did on his unit.
The gaps I tried to show in the picture are very small and they are spotted on the top right side of the door, the left side of the door around the latch area and I'm not sure about the bottom of the door because I just can't see there due to a plate that is mounted just under the door.
Now my question is this..........if I tap down on the latch, it should give me tension to close up the small gaps on the left of the door but will it have any effect on the top right side of the door???
 

Attachments

  • Wood Pellet Stove Door Gasket Installed - 12-23-11.jpg
    Wood Pellet Stove Door Gasket Installed - 12-23-11.jpg
    22.9 KB · Views: 811
  • Wood Pellet Stove Door Latch - 12-23-11.jpg
    Wood Pellet Stove Door Latch - 12-23-11.jpg
    22 KB · Views: 428
  • Wood Pellet Stove Gasket Gap Example - 12-23-11.jpg
    Wood Pellet Stove Gasket Gap Example - 12-23-11.jpg
    9.6 KB · Views: 368
You might want to take a straight edge an see if where the gasket hits against is straight.


I'd remove that latch, insert it in a vise and do my tapping that way. Do it slowly and test it.

In the upper portion above the door hinge (Is that where the small gap is?) it looks like that is a little frayed. On some stoves it has been known for the hinge pins to bend, have you checked them.

To reply to an individual post just hit the quote button.
 
SmokeyTheBear said:
You might want to take a straight edge an see if where the gasket hits against is straight.


I'd remove that latch, insert it in a vise and do my tapping that way. Do it slowly and test it.

In the upper portion above the door hinge (Is that where the small gap is?) it looks like that is a little frayed. On some stoves it has been known for the hinge pins to bend, have you checked them.

To reply to an individual post just hit the quote button.

Thanks Smokey for the heads up on the quote button!!

I have used a metal square and checked all sides of the door opening where the gasket meets the stove face. No gaps anywhere. So my stove is not warped.

The gasket wear you mentioned on the upper portion on hinge side is my cut of the gasket when I installed it last week. It isn't worn, just a frayed cut. I don't understand that happening because I used a new straight edge razor to do the cutting of the gasket.
The gasket I did remove last week was a one piece gasket. That surprised the heck out of me because everything I found for purchase was lengths of gasket, not a one piece unit.

Regarding tapping the latch plate............I was thinking about doing it while the unit was running and warm. I would think the latch plate would be more pliable?? Any thoughts?
 
goode2shoes said:
SmokeyTheBear said:
You might want to take a straight edge an see if where the gasket hits against is straight.


I'd remove that latch, insert it in a vise and do my tapping that way. Do it slowly and test it.

In the upper portion above the door hinge (Is that where the small gap is?) it looks like that is a little frayed. On some stoves it has been known for the hinge pins to bend, have you checked them.

To reply to an individual post just hit the quote button.

Thanks Smokey for the heads up on the quote button!!

I have used a metal square and checked all sides of the door opening where the gasket meets the stove face. No gaps anywhere. So my stove is not warped.

The gasket wear you mentioned on the upper portion on hinge side is my cut of the gasket when I installed it last week. It isn't worn, just a frayed cut. I don't understand that happening because I used a new straight edge razor to do the cutting of the gasket.
The gasket I did remove last week was a one piece gasket. That surprised the heck out of me because everything I found for purchase was lengths of gasket, not a one piece unit.

Regarding tapping the latch plate............I was thinking about doing it while the unit was running and warm. I would think the latch plate would be more pliable?? Any thoughts?

I hate taping on metal when the stove is running, if you make a mistooke (well you now see mistakes happen ;-) ) best it not happen on a unit with a fire going if you get my drift.
 
SmokeyTheBear said:
goode2shoes said:
SmokeyTheBear said:
You might want to take a straight edge an see if where the gasket hits against is straight.


I'd remove that latch, insert it in a vise and do my tapping that way. Do it slowly and test it.

In the upper portion above the door hinge (Is that where the small gap is?) it looks like that is a little frayed. On some stoves it has been known for the hinge pins to bend, have you checked them.

To reply to an individual post just hit the quote button.

Thanks Smokey for the heads up on the quote button!!

I have used a metal square and checked all sides of the door opening where the gasket meets the stove face. No gaps anywhere. So my stove is not warped.

The gasket wear you mentioned on the upper portion on hinge side is my cut of the gasket when I installed it last week. It isn't worn, just a frayed cut. I don't understand that happening because I used a new straight edge razor to do the cutting of the gasket.
The gasket I did remove last week was a one piece gasket. That surprised the heck out of me because everything I found for purchase was lengths of gasket, not a one piece unit.

Regarding tapping the latch plate............I was thinking about doing it while the unit was running and warm. I would think the latch plate would be more pliable?? Any thoughts?

I hate taping on metal when the stove is running, if you make a mistooke (well you now see mistakes happen ;-) ) best it not happen on a unit with a fire going if you get my drift.

I didn't make myself very clear on my tapping intentions. I meant I was trying to figure out if I could remove the latch plate while the stove was running and tapping the latch, then re-installing it to check out if I had a snug fit.

I'm in full agreement with what you posted. I would never try to beat/tap on the stove while running.

Sorry for not making my intentions clear. My mind was way head of my fingers..........once again.
 
Status
Not open for further replies.