
Over the years I've learned that if you want to stack firewood to any decent height without it falling over, it's best to build it up evenly along the entire length of the stack. I usually go up in 2-foot intervals. While I'm not the neatest wood stacker (or cutter) on the planet, I do get free-standing piles over 6 feet high that don't fall down while they're being built, or later.
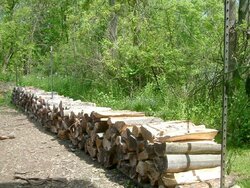
To make sure I'm stacking straight between the posts, I run a piece of thin nylon string on the ground between the posts. If you make sure that the string is in the middle of the chunks when you put down the first layer, your pile will be straight.
This first shot is the first course of a 40-foot long pile of 24-inch (more or less) beech and hard maple. This wood was cut, hauled and split in the summer of 2005. I'll be burning it this winter.
")
 !
!