
I sure could use some help. I am trying to figure out my 6" class A chimney install and don't have a clue how to calculate for these answers. I have only seen 30* elbows in the Class A.

How to calc chimney measurements?
- Thread starter BillsWS
- Start date
-
Active since 1995, Hearth.com is THE place on the internet for free information and advice about wood stoves, pellet stoves and other energy saving equipment.
We strive to provide opinions, articles, discussions and history related to Hearth Products and in a more general sense, energy issues.
We promote the EFFICIENT, RESPONSIBLE, CLEAN and SAFE use of all fuels, whether renewable or fossil.
You are using an out of date browser. It may not display this or other websites correctly.
You should upgrade or use an alternative browser.
You should upgrade or use an alternative browser.
- Status
- Not open for further replies.
Dakotas Dad
Minister of Fire
Just like most "useful" math, it's better to know where to find the answer than to figure it out yourself... lol
Depends on the manufacturer. You will need to go to their instal manual and look at the chart..
For instance.. if you are using Simpson DuraPlus the offset chart is found on page 74 of the manual.. http://www.duravent.com/docs/L820_2011-oct.pdf
for instance , the chart shows.. for SIMPSON DURAPLUS, 15" offset with 33.75" of rise .
Osburning
New Member
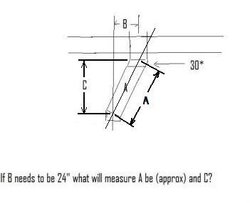
B^2+C^2=A^2
You should be able to fill in A or C based off the length of pipe they sell or you want to buy.
You should be able to fill in A or C based off the length of pipe they sell or you want to buy.
BlankBlankBlank
Minister of Fire
You should search the Web for the topic "right triangle trig" to learn how to calculate the missing dimensions. What you really need to do is look at the offset tables in the manual for your brand of class A chimney. You could also use a yard stick and compass on cardboard to layout your lines and angles.
Your offset needed according to your diagram is 24". Based on that I calculated that the length of your pipe (hypotenuse which is your A) should be 27.71". And the other dimension (your C) 13.855".
The offset table in your manual is what you really need as the manual will directly tell you what pieces to install at various lengths to achieve the result.
Thank you Dakota's Dad. From that manual, page 72, with 45° elbows, to gain the 24 1/2†offset I need (to center my pipe in the alcove) the pipe (A) will be 24" and the rise will be 36 7â„8â€. What an awesome forum with awesome folks.
madison
Minister of Fire
If this drawing is in the living space, you will transition to class a at the ceiling, so you could use flex pipe dbl wall for "A" in your drawing. The class a at the transition has a code distance if I believe maybe 6-9" depending on the junction box and ceiling.
If this is the attic, different ballgame
If this is the attic, different ballgame
Dakotas Dad
Minister of Fire
BillsWS said:Thank you Dakota's Dad. From that manual, page 72, with 45° elbows, to gain the 24 1/2†offset I need (to center my pipe in the alcove) the pipe (A) will be 24" and the rise will be 36 7â„8â€. What an awesome forum with awesome folks.
Close, but no cigar.. lol
You won't find, even though they are shown in the chart, 45° elbows for Class A pipe. National code outlawed them a few years ago as I understand. 15° and 30° bends will be all you can find/use.
However, your reply here confuses me a bit.. are/were you asking about CHIMNEY or STOVE PIPE. Two different critters, though you use both in most installs.
And also, are you planning to use that exact brand and type of chimney/stove pipe, they are not all the same.
madison said:If this drawing is in the living space, you will transition to class a at the ceiling, so you could use flex pipe dbl wall for "A" in your drawing. The class a at the transition has a code distance if I believe maybe 6-9" depending on the junction box and ceiling.
If this is the attic, different ballgame
Wow Madison, I never even thought of that till just now. Yes, I will be opening up the chase to living space, probably bricking the back and sides. It would look better with the double wall black pipe all the way up too. Thank you. I am not sure what the 6" - 9" clearance is. The ceiling in this case is the the floor of the upstairs area. The living room floor upstairs was framed into the chase and there is a gas fireplace on that level as well. The reason my class A will need to hug the side of the chase is to miss the gas fireplace on the main floor as it makes its journey up and out the top of the chase. And I see you posted while I was adding this; there are no 45* class A - which with your previous info I guess I won't need. Is the 6 - 9" how far the class A "hangs down" into the top of the chase before the black pipe starts? Also, I may not use the exact brand, but right now I am just trying to wrap my head around how to make this all work.


madison
Minister of Fire
There is a "box" that will need to be used to transition the wall/ceiling. The box is framed to maintain safe clearance of the Class A pipe that is required to be used to transition the wall/ceiling. Go to the website of the vendor you will use for details.
This link pretty much sums it up: http://www.class-a-chimneys.com/docs/Selkirk ClassA-Ceiling Support Installation.pdf
Follow this thread as there is similar info being discussed, https://www.hearth.com/econtent/index.php/forums/viewthread/89000/
There are pictures in my signature link that show those transitions while in construction of the hearth
I want to thank everyone for their input on this, but after I gave this some thought today, it appears that I won't be able to run my black pipe to the protruding class A after all. The class A will be coming down 2" away from the side of my chase and if I came up to the class A with my stove pipe, the stove pipe clearance would be too close to the wall of the chase. I have to keep the class A near the side to miss the gas fireplace that occupies the center of the chase on the floor above.
So, now more questions come up. If I change to a "through the wall" application, does an opening in the wall behind the stove qualify as an access for cleanout for the 'T" in the chase? I don't EVER want to go up on the roof to clean the chimney and would like to accommodate for cleaning from the ground in the future. Will I be able to fish my fiberglass rods past those two 30* elbows to clean the chimney from below? Thanks if you have any suggestions.

So, now more questions come up. If I change to a "through the wall" application, does an opening in the wall behind the stove qualify as an access for cleanout for the 'T" in the chase? I don't EVER want to go up on the roof to clean the chimney and would like to accommodate for cleaning from the ground in the future. Will I be able to fish my fiberglass rods past those two 30* elbows to clean the chimney from below? Thanks if you have any suggestions.
madison
Minister of Fire
I'm lost in your drawings and pictures. Personally, I think the access behind the stove may not work, or if it does, it would be a messy nightmare. That access door would more than likely be a "combustionable" , so you would have to have clearance requirements depending on the stove purchase. Then getting behind the stove etc to run the pipe etc.
Is your current idea to run the class A WITHIN the brick chase or OUTSIDE the brick chase. If WITHIN, are you positive that the brick chase is hollow and constructed properly and large enough to contain the class A and maintain the clearance to combustionables ?
Personally, I would get a reputable local stove/chimney sweep person to assess your options.
And/Or post some interior pictures where you are thinking of constructing the hearth.
madison said:I'm lost in your drawings and pictures. Personally, I think the access behind the stove may not work, or if it does, it would be a messy nightmare. That access door would more than likely be a "combustionable" , so you would have to have clearance requirements depending on the stove purchase. Then getting behind the stove etc to run the pipe etc.
Is your current idea to run the class A WITHIN the brick chase or OUTSIDE the brick chase. If WITHIN, are you positive that the brick chase is hollow and constructed properly and large enough to contain the class A and maintain the clearance to combustionables ?
Personally, I would get a reputable local stove/chimney sweep person to assess your options.
And/Or post some interior pictures where you are thinking of constructing the hearth.
Thanks Madison. The chase is 2 x 4 framed, OSB exterior with brick veneer. It is "hollow" except for where we extened the first floor deck into the chase to support a gas fireplace and we extended the second story floor and ceiling into the chase to enlarge our MBR closet. My plan is to leave the gas fireplace on the main floor and hug the class A to the side to miss the gas set up and cut a hole in the floor and ceiling of the MBR closet for the class A. I will then frame in the class A and finish the closet minus the new chase for the class A to pass through. I will dismantle the gas fireplace in the basement (this weekend hopefully) and measure, take pictures and post. I'd prefer to open the chase into the room and have the stove sit back in it. I think you are right about getting someone local to lend a hand - I tend to overthink things. Dokatas Dad did something similiar and it looks great: See our conversion from cheezy prefab fireplace to wonderful wood heat: http://tinyurl.com/ylye7l5
sin30 = 24/A or A = 24/sin30 so A = 48"
tan30 = 24/C or C = 24/tan30 so C = 41.57"
However, these dimensions do not exactly apply to the way you've drawn your diagram. You've drawn an indeterminate diagram which means that the dimensions cannot be calculated unless you provide more information. The dimensions provided above apply to my slight revision (below) of your diagram:
BillsWS said:I sure could use some help. I am trying to figure out my 6" class A chimney install and don't have a clue how to calculate for these answers. I have only seen 30* elbows in the Class A.

Attachments
- Status
- Not open for further replies.
Similar threads
- Replies
- 1
- Views
- 539
- Replies
- 13
- Views
- 765
- Replies
- 4
- Views
- 767
- Replies
- 5
- Views
- 520