
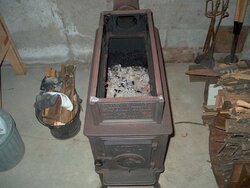
I bought this Jotul 118 sometime around 1990 and set it up in my basement with the intent of using it for backup heat during extreme cold spells and power outages. It's served me well over the years, most recently during a 3 day power outage after the freak Halloween snow storm we had here in New England.
The burn plates were pretty well warped and cracked when I got it, but with the little amount I used it over the years they seem to have continued to do their job of protecting the cast iron sides. I recently decided to give it a bit of TLC and figured I'd start by replacing the burn plates. Before I spent the money on those I inspected it by removing the top baffle and burn plates, brushing down the interior walls and giving it the drop light test. The sides and top baffle appear to be in tact, but I noticed a few other things that I need some advice on. Below are some photos to accompany the following questions:
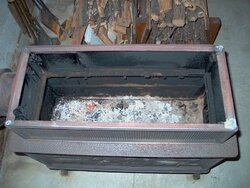
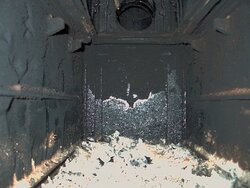
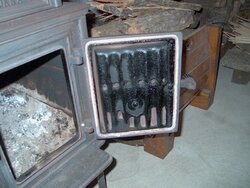
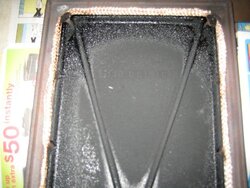
1) As you can see in the photos of the interior there is some glazed creosote buildup inside. I have to admit I have never really taken a good look inside this stove since I bought it, so I am not sure how much of this was there, and how much my use has contributed to it. I was wondering if this looks like an excessive build up or if this is somewhat average. If this is something I should be concerned about what are some recommended methods to clean/remove it. I just picked up a stove/stove pipe thermometer, something I never had before, so that I can keep an eye on temperatures in the future to avoid more creosote buildup.
2) The rope gasket around the top is falling off and is not consistently placed around the groove so I would like to replace it. Does anyone know what size rope gasket to use and what the procedure is for replacing it. I know I need to pull off the old one and remove any left over gasket cement and clean up the surface. But can anyone describe how to install the new gasket... what type of gasket sealer to use etc... And where exactly should I lay the gasket? The top has a lip in it as you can see especially in the corners where the gasket is not covering it, which I think it probably should be.
3) Although the stove passed the light test I can see that some of the side seams look like they have lost some material. Can these be refilled with a new bead of sealant, or is this something I shouldn't even bother with.
4) Does anyone know what the purpose of the little half circle cutout on the back left side rim of the seconday smoke chamber is for?
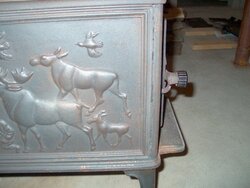
5) I want to blacken the stove again and clean up the outside a bit. I know that some of these stoves were enameled, but this one was not. Mine appears to be bare cast iron but I am not sure. Can anyone confirm this? Right or wrong I know I have used stove black on this before and still have some left. It is Williams black semi-paste stove polish made with graphite and carbon black and no waxes. I tried some on the top recently and it didn't seem to do a whole lot. Any other recommendations on how to spruce up the finish. Would it be okay to use the other type of stove polish that contains wax over this graphite/carbon black type.
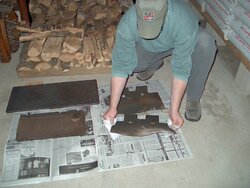
6) I belive this stove was made in 1978 as there are what I think are date codes marked in some of the panels under the part numbers. Looks like 29/3-78 which appears in several places. The existing burn plates are the two hole type and were hung on the back two hooks. The stove has three hooks on each side. So it looks like I have a non-UL stove with the original non-UL burn plates. I ordered a new set of the non-UL, two hole plates. Any opinions on which is the best position to hang the new burn plates when I get them?
Thanks in advance for any help in answering these questions.
The burn plates were pretty well warped and cracked when I got it, but with the little amount I used it over the years they seem to have continued to do their job of protecting the cast iron sides. I recently decided to give it a bit of TLC and figured I'd start by replacing the burn plates. Before I spent the money on those I inspected it by removing the top baffle and burn plates, brushing down the interior walls and giving it the drop light test. The sides and top baffle appear to be in tact, but I noticed a few other things that I need some advice on. Below are some photos to accompany the following questions:
1) As you can see in the photos of the interior there is some glazed creosote buildup inside. I have to admit I have never really taken a good look inside this stove since I bought it, so I am not sure how much of this was there, and how much my use has contributed to it. I was wondering if this looks like an excessive build up or if this is somewhat average. If this is something I should be concerned about what are some recommended methods to clean/remove it. I just picked up a stove/stove pipe thermometer, something I never had before, so that I can keep an eye on temperatures in the future to avoid more creosote buildup.
2) The rope gasket around the top is falling off and is not consistently placed around the groove so I would like to replace it. Does anyone know what size rope gasket to use and what the procedure is for replacing it. I know I need to pull off the old one and remove any left over gasket cement and clean up the surface. But can anyone describe how to install the new gasket... what type of gasket sealer to use etc... And where exactly should I lay the gasket? The top has a lip in it as you can see especially in the corners where the gasket is not covering it, which I think it probably should be.
3) Although the stove passed the light test I can see that some of the side seams look like they have lost some material. Can these be refilled with a new bead of sealant, or is this something I shouldn't even bother with.
4) Does anyone know what the purpose of the little half circle cutout on the back left side rim of the seconday smoke chamber is for?
5) I want to blacken the stove again and clean up the outside a bit. I know that some of these stoves were enameled, but this one was not. Mine appears to be bare cast iron but I am not sure. Can anyone confirm this? Right or wrong I know I have used stove black on this before and still have some left. It is Williams black semi-paste stove polish made with graphite and carbon black and no waxes. I tried some on the top recently and it didn't seem to do a whole lot. Any other recommendations on how to spruce up the finish. Would it be okay to use the other type of stove polish that contains wax over this graphite/carbon black type.
6) I belive this stove was made in 1978 as there are what I think are date codes marked in some of the panels under the part numbers. Looks like 29/3-78 which appears in several places. The existing burn plates are the two hole type and were hung on the back two hooks. The stove has three hooks on each side. So it looks like I have a non-UL stove with the original non-UL burn plates. I ordered a new set of the non-UL, two hole plates. Any opinions on which is the best position to hang the new burn plates when I get them?
Thanks in advance for any help in answering these questions.
")