
Fisher Insert with upper air wash
- Thread starter jacksnipe
- Start date
-
Active since 1995, Hearth.com is THE place on the internet for free information and advice about wood stoves, pellet stoves and other energy saving equipment.
We strive to provide opinions, articles, discussions and history related to Hearth Products and in a more general sense, energy issues.
We promote the EFFICIENT, RESPONSIBLE, CLEAN and SAFE use of all fuels, whether renewable or fossil.
You are using an out of date browser. It may not display this or other websites correctly.
You should upgrade or use an alternative browser.
You should upgrade or use an alternative browser.
- Status
- Not open for further replies.
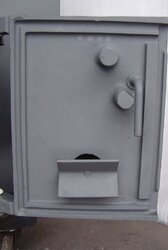
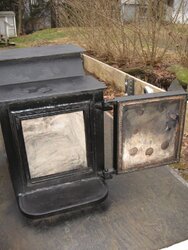
") I have not posted this image of our unit, but thought since there is so much intrest in these units here it would be intresting to see some of the inserts installed around the country
I have not posted this image of our unit, but thought since there is so much intrest in these units here it would be intresting to see some of the inserts installed around the country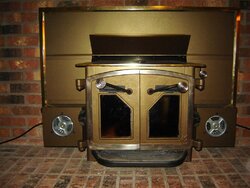
The insert has been cleaned up a bit over the years & repainted with Stove Brite Honey Glo Brown. It was quite a job hiring a sweep to bust out the clay liner & installing a new insulated stainless Liner all the way to the top 17" staright up. The custom firebrick baffle is another story.. which will follow if some are intrested..
jacksnipe said:The custom firebrick baffle is another story.. which will follow if some are intrested..
Very interested. Whip it on us.
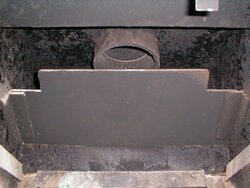
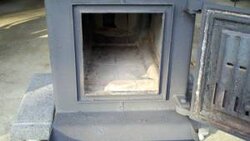
The upper air wash works OK as long as the damper is kept open fully while burning. The baffle keeps most of the heat from escaping up the chimney. We don't use the damper very much, unless the chimney is pulling very hard do to high winds with cold temps. I patterned the baffle assy from Pens Fisher stove design & made the modifications for the insert model. I went through a few experiments in design before I settled on the final product we now use. Another user on the forum has incorporated the design also. We have been in contact with each other over the last few years, going over various experiments with using the baffle & air controls during various cold weather conditions. I will post the PDF file for the baffle design later. The files are on another hard drive. I love the firebrick baffle
assy, there is definitely no worry about it breaking apart like some of the newer baffle materials.. Much better than a steel plate type baffle that could warp.
assy, there is definitely no worry about it breaking apart like some of the newer baffle materials.. Much better than a steel plate type baffle that could warp.
Bone1099
Member
Have you added any kind of secondary air or just purely baffle? Either way i think the interest is here for you to post some pics and diagrams. We're always looking for a better mouse trap.
I have a bit older fisher insert and have experimented with a few different baffles. So far i have been pleased the most with my most recent i think because it is bigger. But i did use firebrick for the past two and it just seemed to take up too much space in the firebox. The newest one is 1/4" plate sitting on top of four fire bricks on their sides. No warpage yet but i did slide a couple extra firebricks on top of the plate just thinking that maybe they will help prevent warping. Could be way out of line just seems like maybe the two on top will absorb some of the heat from the plate but i guess we will see.
I have a bit older fisher insert and have experimented with a few different baffles. So far i have been pleased the most with my most recent i think because it is bigger. But i did use firebrick for the past two and it just seemed to take up too much space in the firebox. The newest one is 1/4" plate sitting on top of four fire bricks on their sides. No warpage yet but i did slide a couple extra firebricks on top of the plate just thinking that maybe they will help prevent warping. Could be way out of line just seems like maybe the two on top will absorb some of the heat from the plate but i guess we will see.
jacksnipe said:Much better than a steel plate type baffle that could warp.
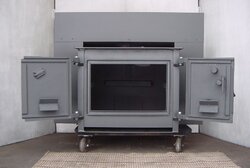
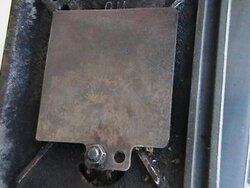
Here's the original steel baffle in a double door Goldilocks that was built to heat 1250 s.f. I'll give you an idea what it's been through. First, we heated 1000 square feet with this brand new stove from January 1985 to 1996 when I doubled the size of the home and added a second stove and chimney. The stove was then used in the middle of the kitchen to heat half the house, and do most of the cooking. It was retired last year in favor of a Mama Bear to heat the entire home and has a larger cooking area. The baffle plate is factory, and straight as new. I've never cleaned it during use or for the photos. The plate is 5/16 thick, same as the stove top material. I'd say if you warp the baffle, it's far too hot since this was also our ONLY heat; no electric, no furnace, no other heat source. One chimney was all we had for all those years, so it was pushed hard on days in the single digits. I remember entire months not breaking the freezing mark, and we were warm.
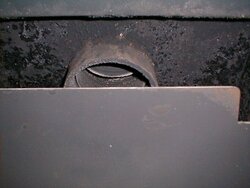
The notches on the corners do a few things. Create turbulence in the upper combustion area, and allow heat to the stove top at the sides of the outlet. This heat has to go sideways to get out and has a chance to burn off smoke particles on it's way. Notice the outlet pipe extends down into the upper chamber. That's another good thing to add to the roof of an Insert if your collar doesn't extend down a few inches. It makes the heat soak at the top longer before being pulled downward to get out the pipe.
Bone;
5/16 stayed straight in our stove. You can always weld rebar in a couple X patterns on the top of 1/4" to keep it straight. There are a couple cook stove manufacturers doing that under their large cook tops (43 X 21 inches) using 5/16 on new stoves. One tried 1/4" and went back to 5/16. They warped under extreme use. They use cold rolled for better surface finish.
1/4" may be fine, the extreme use I refer to is Amish neighbors getting together for an extended canning session where quite a few pressure canners are used on one stove for overnight time periods processing what most would consider commercial use.
If you make your plate glow with weight on it, it's going to sag.
Attachments
I agree that a collar which extends down from the roof of the firebox would help as you describe. A full width sheet of 5/16" thick steel for a baffle on a insert would be tough to get through the door opening. I did post the baffle in the hearthwiki section, BrotherBart tipped me off on this area since it is in pdf format. it is listed as Fisher Insert Baffle Frame pdf
Defiant
Vermont Castings Geek

D
DexterDay
Guest
Normally only browse through here. But gotta say, very nice..... Very Nice.
Love the Old Fishers. The Bob Fisher Story above is one of the first "books" I have read in awhile.
Looks awesome. Thanks for sharing.
Love the Old Fishers. The Bob Fisher Story above is one of the first "books" I have read in awhile.
Looks awesome. Thanks for sharing.
Bone1099
Member
I figure if the 1/4 sags ill go to 5/16 or 3/8 maybe on the next one ill bend the forward lip up maybe 1-1 1/2" on a 45 for stiffness and turbulence. so i been thinking about making the baffle extend forward a bit more toward the front of the stove maybe 3-4" from the front then make a new set of heat shields inside the doors to seperate the upper and lower openings in the doors to provide for air to come to the fire from the lower openings and the uppers provide some fresh air near the top of the stove. with all teh flames whipping near the doors the shields would preheat the upper air a little. Maybe enough for some secondary lightoff under just the right conditions. Maybe ill just drink on it a while.

Here's the Timberline way to split the air towards the top, or you can make a "nickel shield" and bend the sides on a 90* towards the door, and bend the top inwards on about a 45* to direct the air where you want it. You may want to put the shield over the inside nut and mount it with a half nut if there are enough threads sticking out. The top should only get about half to quarter of the air the bottom gets. During start up, if too much goes in the top and rushes up the chimney, you'll cool the stack and be slow starting. Same as when in operation, too much upper air cools the stack.
Fisher shield shown, and Alpiner's idea of getting air to the center and top. (their draft cap was in the center of the door but that shouldn't matter)
And finally All Nighter's hollow door shows a good mix.
Fisher shield shown, and Alpiner's idea of getting air to the center and top. (their draft cap was in the center of the door but that shouldn't matter)
And finally All Nighter's hollow door shows a good mix.
Attachments
- Status
- Not open for further replies.
Similar threads
- Replies
- 5
- Views
- 659
- Replies
- 2
- Views
- 528
- Replies
- 1
- Views
- 847
- Replies
- 3
- Views
- 2K