High Desert Build

  • Active since 1995, Hearth.com is THE place on the internet for free information and advice about wood stoves, pellet stoves and other energy saving equipment.

    We strive to provide opinions, articles, discussions and history related to Hearth Products and in a more general sense, energy issues.

    We promote the EFFICIENT, RESPONSIBLE, CLEAN and SAFE use of all fuels, whether renewable or fossil.
Status
Not open for further replies.

Dirtsurgeon

New Member
Jun 11, 2011
62
Mojave Desert
This is my first attempt at any kind of remodel so I thought I would keep a photo log and share it with the people who will undoubtedly play a big part in helping me along as I ask for ideas and advice. This site has already been a great source of information and ultimately the reason I took this project on as a DIY adventure.

Thanks in advance for your help and advice.

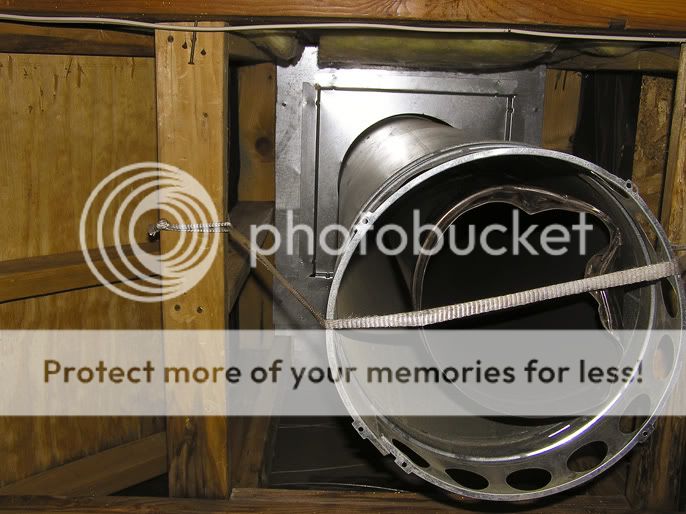
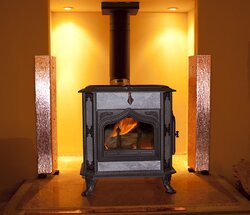
Here is what's coming out.

oldfirebox.jpg


Here is where I stand today.

Wreckout2.jpg


Actually, here is where I stand. The piece of plywood is the footprint of the new Fireview that is on the way.

Holenthewall.jpg


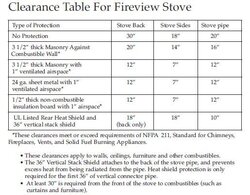
Now I need to design a hearth and figure out how to tie in the stove pipe to the existing structure.

Here we go.......

Colin
 
First thing to do is to download the manual and look at the clearances to combustibles for the stove. Second, that looks like an air-cooled flue pipe which probably is not ok to use with the stove.
 
Rear heat shield will help with the clearance requirements.


http://store.woodstove.com/xcart/product.php?productid=16287&cat=0&page=1

Rear Heat Shield and Pipe Shield Kits #16287
You can reduce the clearance between the back of a Fireview or Classic and a combustible wall to 18 inches by installing a rear heat shield and pipe shield on the back of the stove and the back of the first three feet of stovepipe, respectively. In a corner, clearance can be reduced to 12" from the back corners of the stove to the walls.
 
Den, good for you for going on the web site for information. I hope you have looked at all the information on the Fireview which is basically the manual online. The rear heat shield does help for sure.

Be sure to pay very close attention to the post by BeGreen on the chimney. That can be extremely important. After all, you will not have high chimney temperatures with this Fireview. We typically run in the 300-325 range, measured about 12" from the stove on a horizontal flue. We do take that temperature up to 500 on reloads or when starting a cold stove.
 
Thanks Green, Den, and Backwoods.

Here is a picture of the existing flue pipe. It's an 8" stainless inside a 10 or 12" sheet metal.

My thinking is that I could go with 6" double wall out of the stove up to the 8" connection point, and continue with 6" single wall installed right thru the 8".
Am I thinking that right?

I will absolutely download the owners manual for the clearances. It seems to me I read on the Woodstock site where I could construct a heat shield 1" away from an existing combustible wall using porcelain spacers and long as I have openings on 3 sides for air movement. I certainly will verify that and stay in contact with Woodstock via e-mail and phone. They appear to be very customer service oriented.

Thanks for the links.


Flue2.jpg
 
Yea, I got a little carried away with the 8" stainless. Wasn't sure what it was at first and couldn't get it off the existing unit so I went for "a bigger hammer" option.
Not always the best choice. :sick:
 
Colin, we are doing the same project this month. I try to remember that normal operation is not what designed safety is about. My install is for when the stove runs away or there is a chimney fire. We never expect to have a chimney fire, but then nobody does. So I have been using the clearances required by my stove manufacturer plus extra shielding or space. When I am done, everything will exceed minimum by a little bit.

One pleasant surprise: My old flue came in two parts. An inner 10" smoke tube and an outer 15" shell. The 15" shell had spacers to center the smoke tube. These two were not attached. The 10" came out easily, leaving a perfect 15" chase for my type HT listed stainless. I am installing an 8" flue which happens to be exactly 10" outside diameter. The spacers center the new flue perfectly. Now I have 2.5" clearance to noncombustible the entire length of the chimney. The air space between the flue and the shell is ventilated at the top for even more safety.

It is tempting to fill that space between the flue and shell with pearlite and really have a warm flue. Having the space open to outside air all year costs me energy. Might lower my draft in the winter. However, were I to insulate the exterior of the stainless with 2.5" of pearlite, temperatures in a chimney fire would reach a higher peak inside the flue. Perhaps doing more damage or breaking down the mechanical joints. Therefore, in an abundance of caution, I will leave that space filled with air that can circulate to the outside.

Perhaps a member on this forum could address: Restricting circulation with outside air; or filling the space between the flue and shell with pearlite. I would dearly like to slow circulation from outside to that air void or insulate with pearlite. I have ten foot of 8" SuperPro by Supervent Products Inc.
Jim
 
Build for the runaway stove, excellent point Jim. Makes sense.
My chimney sweep informed me I had survived 2 chimney fires this last season.
Of course I was oblivious.

No doubt I can remove the 8" pipe but I'm wondering if I want to.
Does it make sense to utilize it?

I'll have to research "pearlite".

Good luck on your build Jim
 
I would tear out the existing pipe and replace it with 6" class A, high-temp pipe. The stove's normal flue temp is not the issue. You must build it to be safe with any stove and to be safe in case of another chimney fire. This can happen to the best of stoves when creosote accumulates. While researching, find out the local code from your sweep. I'm a little leary of running the connector up into the captive airspace of the chase. An option would be to run class A to a cleanout tee behind the stove, then use a short connector to the tee. An alternative would be to run the class A to the top of the fireplace opening, then use double-wall connector to the stove.

Wall shielding can reduce clearances. From the picture will be needed, for both the chase and perhaps a bit of the room walls. Not a big deal though, it can be done quite attractively.
 

Attachments

  • fireview clearance table.jpg
    fireview clearance table.jpg
    48.3 KB · Views: 550
Thanks BeGreen, but if I ran 6" class A inside the 8" stainless which is inside the 12", all the way to the top of the chimney, wouldn't that be triple protection along with the double wall coming out of the stove?

Thanks for the chart. I will be able to easily get the stove clearance once I install the heat shield with the 1" clearance behind it. I'm thinking a combination of soapstone tile and copper tile attached to concrete backerboard all inside the alcove. I will check the local codes re the chimney tie in.
 
It might work, but could get a little funky for sealing and support. My preference would be for a clean, new installation, especially if this is getting inspected.
 
Dirtsurgeon said:
Yea, I got a little carried away with the 8" stainless. Wasn't sure what it was at first and couldn't get it off the existing unit so I went for "a bigger hammer" option.
Not always the best choice. :sick:
Dirt,
I am not a DIY guy so I will not be able to give you much advice there. You'll get plenty of good advice from the people here. What I can do is tell you I am a big fan of the "bigger hammer option". I tend to pound the square peg into the round hole on a semi-regular basis. Hey, everyone has their strenghts... DIY is not mine.
Good luck.
PB
 
Haven't posted in quite some time so I thought I'd give an update. I've been working out of town for several months so the stove project has been going very slow. At least I'm at the point now where i can call for final inspection. I still have tile work to complete and have to decide what to do with the alcove. I've come to the sad realization that I have the artistic creativity of a paper sack.

In the meantime I've been burning all week and could not be happier with the Fireview. I did end up installing all new chimney and stove pipe topping the whole thing off with a Monsoon Cap. We really have high winds here in the desert and draft problems are common. Those are virtually eliminated with the cap.

I also installed a heat shield on the walls on each side of the stove because I didn't have the required clearances and I have to say it is absolutely amazing. I did several burns while fabricating the copper sheet metal and the walls got pretty darn hot. Almost to the point where you couldn't keep your hand on it. With the shield installed, the metal actually feels cool to the touch, even with a 500 degree stove sitting 13" away. Really remarkable. I used a couple of 2x3 24gauge sheets that I bent on my work bench and used half inch copper water pipe for spacers.

Bottom line is I couldn't be more delighted sitting in a toasty warm house and not worrying about the next propane bill.

Here are a few pics.
 

Attachments

  • Heat Shield.jpg
    Heat Shield.jpg
    84.3 KB · Views: 439
  • Heat Shield2.jpg
    Heat Shield2.jpg
    47.4 KB · Views: 431
  • Stove n Shield.jpg
    Stove n Shield.jpg
    93.2 KB · Views: 449
Dirtsurgeon said:
Haven't posted in quite some time so I thought I'd give an update. I've been working out of town for several months so the stove project has been going very slow. At least I'm at the point now where i can call for final inspection. I still have tile work to complete and have to decide what to do with the alcove. I've come to the sad realization that I have the artistic creativity of a paper sack.

In the meantime I've been burning all week and could not be happier with the Fireview. I did end up installing all new chimney and stove pipe topping the whole thing off with a Monsoon Cap. We really have high winds here in the desert and draft problems are common. Those are virtually eliminated with the cap.

I also installed a heat shield on the walls on each side of the stove because I didn't have the required clearances and I have to say it is absolutely amazing. I did several burns while fabricating the copper sheet metal and the walls got pretty darn hot. Almost to the point where you couldn't keep your hand on it. With the shield installed, the metal actually feels cool to the touch, even with a 500 degree stove sitting 13" away. Really remarkable. I used a couple of 2x3 24gauge sheets that I bent on my work bench and used half inch copper water pipe for spacers.

Bottom line is I couldn't be more delighted sitting in a toasty warm house and not worrying about the next propane bill.

Here are a few pics.

did that use to be a fireplace with a exterior chase?
 
Great looking installation! I particularly like the alcove lighting behind stove...reminds me of "Architectural Digest".
 
Wow, that's a pretty dramatic transition from the old ZC to now. It's a veritable temple to Hestia. Nice job.
 
greythorn3 said:
Dirtsurgeon said:
Haven't posted in quite some time so I thought I'd give an update. I've been working out of town for several months so the stove project has been going very slow. At least I'm at the point now where i can call for final inspection. I still have tile work to complete and have to decide what to do with the alcove. I've come to the sad realization that I have the artistic creativity of a paper sack.

In the meantime I've been burning all week and could not be happier with the Fireview. I did end up installing all new chimney and stove pipe topping the whole thing off with a Monsoon Cap. We really have high winds here in the desert and draft problems are common. Those are virtually eliminated with the cap.

I also installed a heat shield on the walls on each side of the stove because I didn't have the required clearances and I have to say it is absolutely amazing. I did several burns while fabricating the copper sheet metal and the walls got pretty darn hot. Almost to the point where you couldn't keep your hand on it. With the shield installed, the metal actually feels cool to the touch, even with a 500 degree stove sitting 13" away. Really remarkable. I used a couple of 2x3 24gauge sheets that I bent on my work bench and used half inch copper water pipe for spacers.

Bottom line is I couldn't be more delighted sitting in a toasty warm house and not worrying about the next propane bill.

Here are a few pics.

did that use to be a fireplace with a exterior chase?

Yea, it sure did Greythorn. Originally I want to go up to the ceiling with the alcove with an arched top and all sorts of cool stuff but once I got into the wall, all those ideas went down the drain. It certainly could have been done but that kind of work is way above my pay grade. I'm just a weekend "nailbender".
 
BeGreen said:
Wow, that's a pretty dramatic transition from the old ZC to now. It's a veritable temple to Hestia. Nice job.

Thanks Mr. Corcoran, appreciate the kind words.

Thanks BeGreen, I'm embarrassed to say I had to Google Hestia to see who it was.
(Now I'm even more embarrassed)

I get smarter every time I log into this site. :)

Dirt
 
well it looks great! i think im going to do this with our zero clearance too. hate that air leaking zero clearnace fireplace.
 
Status
Not open for further replies.