
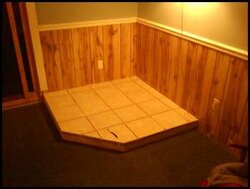
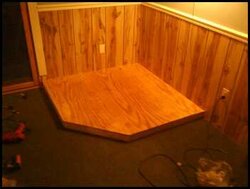
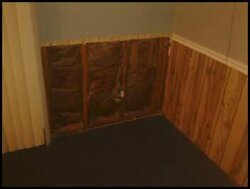
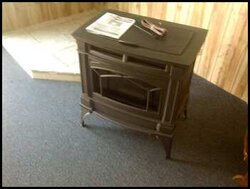
Well Everyone I bit the bullet and Bought a Regency GC60. I was so Upset the M55 got away, but Im really Excited about the stove. I am planning on picking up the stove tommorow morning.. As you will see in the pictures, the first one i pulled the paneling down, to see where all the electric wire is inside the wall. The Next picture, will be the plywood base. The third picture, I have concrete board down, and the tiles in place. I have some trim work, grout, and oak faceing to do on the hearth, as well as the chimmney. I will keep the pics rolling and updateing the progress. Thanks for all the help thus far in helping me to decide on a stove.
Stove Install With Pics
- Thread starter Brokenwing
- Start date
-
Active since 1995, Hearth.com is THE place on the internet for free information and advice about wood stoves, pellet stoves and other energy saving equipment.
We strive to provide opinions, articles, discussions and history related to Hearth Products and in a more general sense, energy issues.
We promote the EFFICIENT, RESPONSIBLE, CLEAN and SAFE use of all fuels, whether renewable or fossil.
You are using an out of date browser. It may not display this or other websites correctly.
You should upgrade or use an alternative browser.
You should upgrade or use an alternative browser.
- Status
- Not open for further replies.
vinny11950
Minister of Fire
S
smoke show
Guest
Xena
Minister of Fire
Defiant
Vermont Castings Geek
D
DexterDay
Guest
Looks nice. Stove will definitely be the focal point of the room..
Welcome to the Forums Brokenwing.
Welcome to the Forums Brokenwing.
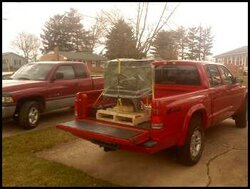
Well thank you for the warm welcome to the forum. I picked up the stove this morning, and I must say to anyone buying a stove, its worth having the company deliver it, and setting it in place. Man was this thing heavy. We pulled it off the truck onto a trailer, and drove it around the house to the back door. No damage except the bottom of the feet might be scuffed a little from the concrete but you will never see it. I thought the dealer would clean it up since it was a display model, but its a little dirty, but not to bad. To my suprise after unwrapping it, a half full hopper of pellets. The only thing i see that makes me curious is the stove top is loose, and upon inspection 2 bolts are backed off half way, so I will call the dealer on Monday and ask them why they had the top off. This stove for being a display model is beautiufl and not a scratch on it. Tommorow I am going to grout and skirt the hearth with oak, so more pictures to come. Then I have to figure out the vent.
Attachments
Very nice indeed.
In the bag of goodies there should be a T-stat, some tools, and a small tube of anti-seeze. The anti-seeze will stop the mixing/agitating rod from sqwealing, and is applied to the left side of the mixing/agitating rod where it fits in the support hole.
If you are paying for an install than make sure that they set the damper with a mag test, and do not believe them if they say it is set at the factory because it is not.
This needs to be done for the best performance of the stove, so unless you are very familiar with setting up stoves yourself you will need to have this done.
When this stove is set up properly, and you get used to how the flame characteristics should look at optimum this stove will burn just about any pellet cleanly.
I just started mixing in dried cherry pits, and I must say they smell nice and have added a bit of extra heat. Cherry pits are not cheaper than pellets, so not very practical at current price levels in my area, so I did this just for testing for future reference.
Awesome stove, and good luck.
1D
IHATEPROPANE
Minister of Fire
jrsdws
Feeling the Heat
Northwoodneil
Feeling the Heat
1Dtml said:Very nice indeed.
In the bag of goodies there should be a T-stat, some tools, and a small tube of anti-seeze. The anti-seeze will stop the mixing/agitating rod from sqwealing, and is applied to the left side of the mixing/agitating rod where it fits in the support hole.
If you are paying for an install than make sure that they set the damper with a mag test, and do not believe them if they say it is set at the factory because it is not.
This needs to be done for the best performance of the stove, so unless you are very familiar with setting up stoves yourself you will need to have this done.
When this stove is set up properly, and you get used to how the flame characteristics should look at optimum this stove will burn just about any pellet cleanly.
I just started mixing in dried cherry pits, and I must say they smell nice and have added a bit of extra heat. Cherry pits are not cheaper than pellets, so not very practical at current price levels in my area, so I did this just for testing for future reference.
Awesome stove, and good luck.
1D
ID what is the metal tool that comes with the stove, is it a screpeing tool for cleaning the burnpot?
Brokenwing said:1Dtml said:Very nice indeed.
In the bag of goodies there should be a T-stat, some tools, and a small tube of anti-seeze. The anti-seeze will stop the mixing/agitating rod from sqwealing, and is applied to the left side of the mixing/agitating rod where it fits in the support hole.
If you are paying for an install than make sure that they set the damper with a mag test, and do not believe them if they say it is set at the factory because it is not.
This needs to be done for the best performance of the stove, so unless you are very familiar with setting up stoves yourself you will need to have this done.
When this stove is set up properly, and you get used to how the flame characteristics should look at optimum this stove will burn just about any pellet cleanly.
I just started mixing in dried cherry pits, and I must say they smell nice and have added a bit of extra heat. Cherry pits are not cheaper than pellets, so not very practical at current price levels in my area, so I did this just for testing for future reference.
Awesome stove, and good luck.
1D
ID what is the metal tool that comes with the stove, is it a screpeing tool for cleaning the burnpot?
I haven't found a good use for that tool, but I can highly recommend purchasing an automotive gasket scraper, and a small wire brush of some kind to clean the burn pot.
Here is the gasket scraper thread:
https://www.hearth.com/econtent/index.php/forums/viewthread/89111/
1Dtml said:Brokenwing said:1Dtml said:Very nice indeed.
In the bag of goodies there should be a T-stat, some tools, and a small tube of anti-seeze. The anti-seeze will stop the mixing/agitating rod from sqwealing, and is applied to the left side of the mixing/agitating rod where it fits in the support hole.
If you are paying for an install than make sure that they set the damper with a mag test, and do not believe them if they say it is set at the factory because it is not.
This needs to be done for the best performance of the stove, so unless you are very familiar with setting up stoves yourself you will need to have this done.
When this stove is set up properly, and you get used to how the flame characteristics should look at optimum this stove will burn just about any pellet cleanly.
I just started mixing in dried cherry pits, and I must say they smell nice and have added a bit of extra heat. Cherry pits are not cheaper than pellets, so not very practical at current price levels in my area, so I did this just for testing for future reference.
Awesome stove, and good luck.
1D
ID what is the metal tool that comes with the stove, is it a screpeing tool for cleaning the burnpot?
I haven't found a good use for that tool, but I can highly recommend purchasing an automotive gasket scraper, and a small wire brush of some kind to clean the burn pot.
Here is the gasket scraper thread:
https://www.hearth.com/econtent/index.php/forums/viewthread/89111/
Thanks ID appreciate the link to the thread!
Well I called the dealer this morning to get some pipe. What he has I know alot of you do not like, but its duravent pro. I told him I have heard good things and bad things about it. He told me that they have had good luck with it, and If i want to wait awhile they can get me Selkirk pipe, but at alot more cost. Im thinking about taking the chance and using the duravent pro. He said they have done alot of installs with it, without many problems.
D
DexterDay
Guest
Brokenwing said:Well I called the dealer this morning to get some pipe. What he has I know alot of you do not like, but its duravent pro. I told him I have heard good things and bad things about it. He told me that they have had good luck with it, and If i want to wait awhile they can get me Selkirk pipe, but at alot more cost. Im thinking about taking the chance and using the duravent pro. He said they have done alot of installs with it, without many problems.
Is this gonna be Direct vent (straight out)?
Or are you gonna have vertical? If so, is it inside or outside?
If its gonna be a Direct vent or if your going out then up, I would say Pellet vent Pro is fine. Just make sure to use High Temp Tape (or silicone). I used just tape on my 4" system in the basement. Doesnt look bad.
If your not gonna see the pipe inside, it shouldnt matter much. But if your going up and then out (looks), you may want to ponder....
gymrat0663
Member
Brokenwing said:Well I called the dealer this morning to get some pipe. What he has I know alot of you do not like, but its duravent pro. I told him I have heard good things and bad things about it. He told me that they have had good luck with it, and If i want to wait awhile they can get me Selkirk pipe, but at alot more cost. Im thinking about taking the chance and using the duravent pro. He said they have done alot of installs with it, without many problems.
If you have the intention of burning mutli fuels other than just pellets than make sure the venting is approved for this.
Corn or cherry pits etc are more corrosive and need a multifuel grade piping.
I used ICC brand EXCELPellet which is approved for multifuels and has gaskets, so is pretty leak resistant.
http://www.icc-rsf.com/en/icc/excelpellet-for-pellet-vent
1D
vinny11950
Minister of Fire
Thanks Vinney. Im am planning on a tee and then up about 3 feet a 90 through the wall and straight out. I want to use black pipe inside stainless outside. I have to shoot a few more measurments Im good on door clearnece but I have a outside porch light im going to be close to, So im still throwing a few ideas around in my head right now!
cletus
New Member
Do yourself A favor and get the ICC Pipe, I put my stove in in early January and chased smoke smell for a month I used silicon and metal tape on all the joint's and the duravent still leaked I switched out to icc pipe and all my isues went away instantly.
I switched out to icc pipe and all my isues went away instantly.cletus said:Do yourself A favor and get the ICC Pipe, I put my stove in in early January and chased smoke smell for a month I used silicon and metal tape on all the joint's and the duravent still leaked
+1 on this, or should I say +2, for the installer of my Insert used ICC pipe, and I did my own install for my Enviro Maxx with ICC pipe without any leaks. The only silicone sealant that was used was at the stove adapter, as always. Metal tape, who needs no stinkin metal tape? ;-P
As noted ICC is designed and approved for mutlifuel use as well.
1D
D
DexterDay
Guest
1Dtml said:cletus said:Do yourself A favor and get the ICC Pipe, I put my stove in in early January and chased smoke smell for a month I used silicon and metal tape on all the joint's and the duravent still leaked
+1 on this, or should I say +2, for the installer of my Insert used ICC pipe, and I did my own install for my Enviro Maxx with ICC pipe without any leaks. The only silicone sealant that was used was at the stove adapter, as always. Metal tape, who needs no stinkin metal tape? ;-P
As noted ICC is designed and approved for mutlifuel use as well.
1D
Pellet vent Pro is also Multi Fuel rated vent..
I have 3 Pellet vent Pro systems. One 4" that did need High Temp Tape on the clean-out T and also on both ends of the 90° up top (4 seams). But......
I also have Two 3" systems that dont leak and have no other means of sealing (RTV on adapter of course), other than the seals within the vent. One is direct vent (but doesn't go straight out, couple 45°'s inside) and the other is set up the same as the 4". It has clean out T, 5' vert, 90°, and then a few feet horizontal.
So, I cant say they are terrible. But, it is known to leak. One of mine does. Two dont.
vinny11950
Minister of Fire
cletus said:Do yourself A favor and get the ICC Pipe, I put my stove in in early January and chased smoke smell for a month I used silicon and metal tape on all the joint's and the duravent still leaked
I wondered how you did with your smoke issues, Cletus. Glad you figured it out.
vinny11950
Minister of Fire
Brokenwing, I have to agree with the others on the pipe brand. ICC excel pellet is very good and easy to work with.
- Status
- Not open for further replies.
Similar threads
- Replies
- 1
- Views
- 210
- Replies
- 13
- Views
- 810
- Replies
- 2
- Views
- 833
- Replies
- 18
- Views
- 605