Painting a brand new wood stove insert

  • Active since 1995, Hearth.com is THE place on the internet for free information and advice about wood stoves, pellet stoves and other energy saving equipment.

    We strive to provide opinions, articles, discussions and history related to Hearth Products and in a more general sense, energy issues.

    We promote the EFFICIENT, RESPONSIBLE, CLEAN and SAFE use of all fuels, whether renewable or fossil.
Status
Not open for further replies.

rnmenterprises

New Member
Mar 25, 2012
14
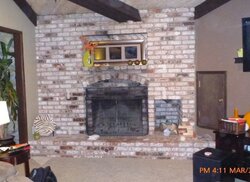
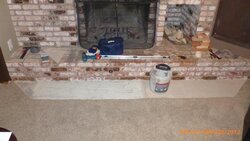
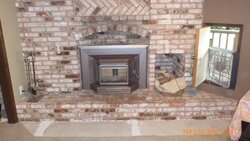
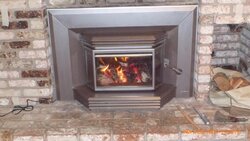
I am about to have a new Osburn 2200 fireplace insert installed. The flat black factory paint is going to be an eyesore compared to the rest of the room so I am going to paint it, probably metallic brown.

Previously I bought, painted, and resold a used Earth Stove Bayview which was really rusted. The only prep I did for it was sanding down the majority of the big rust patches and a wipedown afterwards. It was my first time painting a stove, and the Stove Bright paint was fairly forgiving. Comparatively speaking, it was a good first time effort and definitely improved the appearance.

In my current situation, there is no rust. Do I still need to lightly sand the brand new exterior of my insert in order to get good adhesion? Or is the factory matte finish, flat black paintjob have enough "roughness" to it to disregard the sanding?

(I have read lots of threads about painting stoves, but none of them that I saw addressed this type of issue.)

Thanks much!
 
With my old insert and the 30-NC I didn't sand them. I just wiped them down good with damp paper towels and let them dry. I did fire them with the original paint to cure it before applying the the first couple of coats. Letting each one dry between coats. The I fired them again to cure that before applying three more coats. The paint job on the insert was fine 21 years later. The 30-NC that I painted in 2006 looks like the day I painted it.

Stove Bright brown metallic on both of them. Be careful with that acetone based Stove Bright. Breathing that stuff will hurt ya. Bad.
 
Stove Bright brown metallic on both of them. Be careful with that acetone based Stove Bright. Breathing that stuff will hurt ya. Bad.

I discovered that painting the Bayview in my garage. Even with the door open and a window, I still got light-headed, and felt kinda cruddy for the rest of the day. Lesson learned on that one. Never have felt quite as smart since that day lol.

Thanks for the insights on your experiences. I hadn't thought of firing the stove up first for its breaking in period with the original paint. Probably a good idea to cure the first paint job. The downside is that I'll end up painting inside my house. Send the girls to the mall for the day til the fumes clear out.

That paint job will end up costing twice as much that way :rolleyes: lol
 
The oils in the steel are what you need to cook off first. They cook through the factory coat fine but you don't want to seal them in under several coats over that. Get box fans in the window sucking that stuff out of the house.
 
.... Be careful with that acetone based Stove Bright. Breathing that stuff will hurt ya. Bad.
.... Get box fans in the window sucking that stuff out of the house.

Adding to BB's sage advice, if there's more than one window in the stove room, only open the one that you install the fan in (blowing out). If the window is much bigger than the fan, close up the excess opening with cardboard to reduce the amount of outside air pulled into the room around the fan. Then open some windows in other rooms to let outside air into other parts of the house, and if the stove room has interior doors, close them most of the way. This will create negative pressure in the stove room and a flow of air from the rest of the house into the stove room, drastically reducing the amount of fumes that escape into other parts of the house.
 
great ideas guys, thx!

So would the general concensus be as follows:

Install and cure/break in the stove.
No sanding.
Wipe down so it's clean.
remove glass and tape off areas not to be painted.
Prep work area (covering furniture, proper ventilation established, etc.)
3 coats, fully dried before firing up and curing (with ventilation still).

Watcha think? Multiple opinions welcome. I really don't want to screw up the look of this insert as it was no small chunk of change for us.
 
Is it being installed by the folks that deliver it or are you going to install it?
 
Chimney sweep is picking it up from my local osburn retailer, delivering and installing it for me.
Any chance you can fire it up on your driveway first? And then paint it while it is still outdoors as well? Then have the sweep come back and install another time.

To add to the others, I think I'd worry about your liver as well as your brain with this stuff. I remember, oh, ten years ago, a young local guy painting on the inside of a water tower had to get a liver transplant. You don't mess with that stuff.

Sounds like it will be great when you get it done, though. I orginally was going to paint mine, but in the end just got used to the old girl the way she is.
 
id recommend painting it outside before its installed

be sure to wipe the stove down w/ paint prep (from stove bright) and apply paint when it is 60-80*f
be sure the spray can has been warmed up to 60-80 as well
 
Enterprises please let me know how this goes, Im doing the same thing this summer (kinda). Im ordering the Osburn 2000 insert and painting it brown as well. Im probably going to burn mine next winter then take it outside next summer and paint it. Im good with the black paint however the wife says brown would be better in her library and you know how that goes.
 
Regency "invited" me to join its club and post pictures of my install on their Gallery. I thought I would do so, until the pictures started rolling by. Geesh, they were gorgeous-the gas fireplaces especially so. On the wood insert tab, there were plenty of enameled units. Thankfully, my wife, who started looking at the pictures for "ideas" (dangerous), said she didn't like the look.
http://www.regency-fire.com/Buyer-s-Guide/Idea-Gallery.aspx
 
I will update as things unfold. If I feel good about my install and tile job, I'll even post pix; befores and afters. :)

Gonna be a first time on lots of levels for me on this one. Tiling over brick fireplace/wall/hearth, and building out a mantle to tile over, to boot. May be a long slow process, but the payoff could be great... and hopefully save me a wad of money on someone else doing the work.

Wife and I went through the toughest stretch of our 12 year marriage recently... we had to pick out tile for the new hearth and wall.;lol
BUT we settled on a style, and think we'll both be very happy... who'da thunk it?
 
New update: Installers picked up the stove and pre-painted it for me, getting it installed tomorrow. Weather permitting anyway; we've had lots of high winds lately that may affect the chimney liner installation. fingers crossed.
 
Well, pre-painted over the factory paint be sure and do three or four low temp burns to cure that stuff. Low and slow.
 
Installation yesterday. Took about 4.5 hours. They painted it outside and then got to the prep for the install. Re-sized the flue to make room for the chimney liner; capped off the gas line for the quick-starter.
Not completely impressed with the paint job they did. A few spots where they "forgot" to spray at a distance and sweep; came out like a spot instead :/

The stove itself:
Osburn sent the nickel faceplate for an 1800 instead of my 2200. They also sent a black handle instead of a nickel handle. They ALSO forgot a knob for the damper. Uh, who's running the show around there at Osburn?

The steel at the inside bottom lip right inside the door is jagged looking, like they used a spare piece of metal and didn't bother to grind off the unevenness.

Looking up under the top grill area, again it looks like they used jagged metal, thinking the fins would hide the unfinished look. It doesn't.

I am left feeling like I bought a cheaply made insert with some scraps they had lying around. I don't think I will ever buy an Osburn again based on this experience.

Performance:
At this point, I made a small fire after the installation, about 8 pieces of 2x4 & 2x6 endcuts we use for kindling. Just got to the point it was putting of some nice mellow heat, then dampered it down so it burned low and slow. It almost went out after a couple hours, and I re-stoked it with about 6 pieces of kindling, and let it burn completely out (sometime in the night). Fumes were fairly strong, nothing to run me out of the house, but had a box fan right next to our wood pass thru door, and it was exhausting fairly well.

Woke up this AM, started another fire with kindling, and also added a couple pieces of fir this time. Feedback I got from wifey was that it was starting to put out good heat, no more smell according to her. I'll check it out tonight.

So tonight, I'll amp up the heat a bit. We'll see how that goes.

In the meantime, here's some pics. Bear in mind this is the beginning of a tile project, and not one I'm going to move quickly thru. So this is just the jumping off point for me, but you can see what's done so far.
 

Attachments

  • P1000324small.JPG
    P1000324small.JPG
    79.9 KB · Views: 401
  • P1000332small.JPG
    P1000332small.JPG
    87.2 KB · Views: 414
  • P1000337small.JPG
    P1000337small.JPG
    89.6 KB · Views: 585
  • P1000340small.JPG
    P1000340small.JPG
    87.1 KB · Views: 425
Well I am sorry Osburn hosed you on some of your request. I do like the looks of the stove, what was the color they used? I hope you like the heat output when you crank her up, hell I would see what she's capable of tonight. Good luck look forward to more Info.
 
That came out really nicely. It looks great.
 
I do like the looks of the stove, what was the color they used?

I used Stove Bright Metallic Brown. Figure it will work well with the tile choice and the rest of the room... as well as soften the look for any future buyers of the home (when the time comes).

Thanks!
 
I would at least scuff with a scotchbrite pad if you don't sand. Will give a bit of tooth for the paint to grab.
 
Osburn is a very good company with good customer service. Have you contacted them? We've seen them come on the forum and back up their product and fix mistakes at no cost to the customer. Mistakes happen. Give them a chance to make this right before you run them down. Could be worse, you could be dealing with PE or Quadrafire (in fact, almost all manufacturers), who basically blow off the customer. They deal almost exclusively through their dealer/distributors for any issues. Responses can take months.

BTW, you're stove looks really good.

If you put your insert name in your thread title, Fyrebug (Osburn employee) should be along pretty quickly. You could also PM him.


Thanks for the info re: Osburn CS.

My intent is to provide info regarding my experience with my purchase, so that future buyers can make informed decisions about where they're going to spend their money.
Salesmen have heard for many years, there's 3 types of customers... Happy ones, disgruntled ones who are the squeaky wheels, and disgruntled ones who don't bother the company, but never go back. I am the latter.

Too many times in my previous experiences with CS in general, apparently my expectations are too high. The company finds some way to justify their actions, and the CS rep is a minimum wage phone handler who hates their job and hates me even more for disturbing their game of Chuzzle.

So, I've stopped calling CS... saves me $$$ on Prilosec and Ativan.

Really the only resolution I could see to the issues I have with this stove would be full replacement, and I'm sure not paying $500 for another installation.

so anyway, thanks for all the compliments from the group re: the paint job/color... it'll hopefully look even better once the brick is covered up :)

New slate tile should be here this week. I'll post some pics of it once it comes in... still need to determine the layout... (lazy).
Also still trying to determine the style of mantle to install... tile or wood.
 
Status
Not open for further replies.