
I have ceiling water stains and last night water driping out of the stove pipe ceiling box. I had thought it was a snow dam on the roof. Now I see it's rain water. I don't see anything wrong on the roof. The only thing last year I reapplied more silicon. I wonder if it plug up water from running out from under the shingles. Does anyone have any idea whats the problem is?
Roof leak
- Thread starter xman23
- Start date
-
Active since 1995, Hearth.com is THE place on the internet for free information and advice about wood stoves, pellet stoves and other energy saving equipment.
We strive to provide opinions, articles, discussions and history related to Hearth Products and in a more general sense, energy issues.
We promote the EFFICIENT, RESPONSIBLE, CLEAN and SAFE use of all fuels, whether renewable or fossil.
You are using an out of date browser. It may not display this or other websites correctly.
You should upgrade or use an alternative browser.
You should upgrade or use an alternative browser.
- Status
- Not open for further replies.

I can't tell you where the leak is coming from, but can offer some observations
-you have stains on the roof as evidenced by the black streaks
-the pipe appears canted towards the peak
-you have an angle change in the roof about three feet above the stove pipe and flashing.
-roof leaks often come from far above the point where water enters the house
-I doubt the leak is coming from directly around the stove pipe and flashing
RS267
Member
Roof leaks are hard to pinpoint from outside (unless it's something obvious). It could be happening farther up the roof and finding it's way down the underside of the roof to the outside of your chimney pipe and running straight down. I know this may sound crazy but I've seen it happen. If it rains hard enough for long enough, the water could be flowing up the top side of the flashing cone and in through the ventilation holes under the storm collar. It of course then follows the outside of the chimney pipe straight down.

Did you caulk the seam on the section of pipe that penetrates the flashing? Water can find its way inside that seam and run down behind the caulking around the pipe/flashing. If not, try it, and work the silicone into the seam with your finger. A simple bead isn't always good enough.
I would also check the area where the pipe passes thru the flashing & UNDER the storm collar. Rain water can splash UP when it hits the roof & if there's no silicone under there, it can be a leak point...Also make sure there is silicone ALL around the roof brace kit brackets...
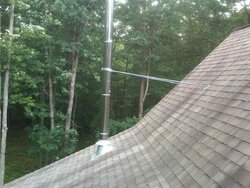
Thanks for the idea's. The roof is 12 years old, and it's starting to get some moss and alge. The leak, if not from the chimney itself, is right in the chimney line. It drips out of the ceiling box. The main roof is 12/12 and the porch roof is 5/12 pitch. The prorch is closed underneath in so I can't see the under side where the water is coming in. I guess I will have to cut in a access door on the side porch. In the picture I do see a bit of the chimney lean. I think it's more of an illusion, but I do tie off the ladder to the chimney support legs when I do a top down cleaning, and they swivel a bit.
Over the years I get dampness in the stove. I wonder if the conection in the ceiling box from single wall to the double wall now has a gap that allows water that was coming down the chimney to get past the connection as it runs down. What direction is the lap in that connection? Yes I have a cap but a bit of rain blows down the chimney. Over the years the chimney has gotten 3 coats of fresh silicon. It looks real tight, including the rain ring to the pipe. I still think this started the last time I siliconed everthing on the roof, a year or more ago. Based on my theory water is getting under shinges and the silicon is stopping it from runnig out. Im thinking to cut out the silcone along the top edge (high side). What a pain in the butt.
Over the years I get dampness in the stove. I wonder if the conection in the ceiling box from single wall to the double wall now has a gap that allows water that was coming down the chimney to get past the connection as it runs down. What direction is the lap in that connection? Yes I have a cap but a bit of rain blows down the chimney. Over the years the chimney has gotten 3 coats of fresh silicon. It looks real tight, including the rain ring to the pipe. I still think this started the last time I siliconed everthing on the roof, a year or more ago. Based on my theory water is getting under shinges and the silicon is stopping it from runnig out. Im thinking to cut out the silcone along the top edge (high side). What a pain in the butt.
Just an observation. The pipe looks underbraced. There must be a brace at every 5 ft above the roof penetration. With a big stick wiggling in the wind, it may be breaking the silicone seal at the storm collar.
DanCorcoran
Minister of Fire
Hello
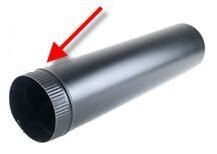
Is the crimped end shown by the red arrow below for each piece at the bottom or at the top?
If it is at the top like mine, then water will not run down the outside of the pipe and get inside the seam!
I was under the impression that the crimped end of flue and/or chimney pipe was always supposed to point down, inside the next joint, so that creosote would run down the inside of the pipe and not the outside.
mtneer
Member
I have this exact problem and about the same pipe setup and roof. I can hear water drip inside the pipe box inside my house. It then collects in one corner and drips on to my stove top.
From inside my house, I can look up into the pipe box through a small gap in one corner. Is it normal to see daylight inside it?
From inside my house, I can look up into the pipe box through a small gap in one corner. Is it normal to see daylight inside it?
Crane Stoves
Burning Hunk
I have this exact problem and about the same pipe setup and roof. I can hear water drip inside the pipe box inside my house. It then collects in one corner and drips on to my stove top.
From inside my house, I can look up into the pipe box through a small gap in one corner. Is it normal to see daylight inside it?
well, depending on the cap you should should see some degree of light in their (if it was totally sealed and zero light you would have much bigger problems then water LOL).
I would like to see the cap used on this set-up (pics dont quite show it).
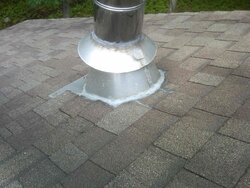
My main points of focus here would be to make damb sure the underside of that flange kit was sealed well prior to the ice & water shield being layed over it, I really like rickg's first comments to you (the area where your two roof's meet and the pitch changes so drastically could be the source of the problem (ice & water shield is amazing stuff and hopefully was used in this area!)
From inside my house, I can look up into the pipe box through a small gap in one corner. Is it normal to see daylight inside it?
The roof flashing is vented, up under the storm collar. Not sure how much daylight you would see, though. Can you access the attic to take a look?
In my travels, I find it interesting to see so many roof flashings installed by just nailing the cone on top the shingles and gooping the heck out of it. Are there systems that are supposed to be installed like that? Or is it laziness from the installer?
Crane Stoves
Burning Hunk
The roof flashing is vented, up under the storm collar. Not sure how much daylight you would see, though. Can you access the attic to take a look?
In my travels, I find it interesting to see so many roof flashings installed by just nailing the cone on top the shingles and gooping the heck out of it. Are there systems that are supposed to be installed like that? Or is it laziness from the installer?
thats total lazyness of installer, no flange kit/cone should sit ontop of your shingles with goop (thats horrible

") )
)thats total lazyness of installer, no flange kit/cone should sit ontop of your shingles with goop (thats horrible
My first thought was the homeowner bought the kit at Lowe's and didn't read/understand the instructions, or didn't think it was necessary to peel up shingles.
mtneer
Member
Can you access the attic to take a look?
In my travels, I find it interesting to see so many roof flashings installed by just nailing the cone on top the shingles and gooping the heck out of it. Are there systems that are supposed to be installed like that? Or is it laziness from the installer?
I can't access it in the attic and my roof pitch is a bit steeper than xman's. I'm having the installers come out a third time. I wish I had the equipment to examine it myself so I can understand what I'm dealing with.
I was under the impression that the crimped end of flue and/or chimney pipe was always supposed to point down, inside the next joint, so that creosote would run down the inside of the pipe and not the outside.
There are different philosophies on the pipe installation. I also hear the crimped end should point down so smoke would not leak out. However when we did our boiler stainless steel chimney we thought of water very easily leaking in if the crimped end was pointing down so we made it point up and I never had any water or smoke problems!
Sometimes there are many ways but this way seems to work well for our oil boiler!
For wood stoves the crimp always should point downward. This is so that creosote will drip inside the pipe, and not on the outside.
The only exception I can recall is with Selkirk Metalbest DSP pipe because it's double-wall and has a crimp on each end. One for the inner wall and one for the outer wall.

The only exception I can recall is with Selkirk Metalbest DSP pipe because it's double-wall and has a crimp on each end. One for the inner wall and one for the outer wall.
Just an observation. The pipe looks underbraced. There must be a brace at every 5 ft above the roof penetration. With a big stick wiggling in the wind, it may be breaking the silicone seal at the storm collar.
Begreen, it is stiffer than it looks. The brace arms are almost 90 degrees back to the 12/12 pitch roof, and about 8' between where they screwed into the roof. I will look at the storm collar ring again, but It's seal never looked broken each time I added a coat of silicon.
I was under the impression that the crimped end of flue and/or chimney pipe was always supposed to point down, inside the next joint, so that creosote would run down the inside of the pipe and not the outside.
Dan and Begreen, My single wall, inside the house points down, as you describe. I didn't do the install, but I recall the last thing the installers did was to slide the single wall up into the box, then put the stove in place, then pulling the single wall back down to join with the stove collar. How far it went up, I don't recall. Does that sound correct?
So my questions, what direction and what is the conection in the box?
If I pull out the single wall out, what will I able to see in the box?
well, depending on the cap you should should see some degree of light in their (if it was totally sealed and zero light you would have much bigger problems then water LOL).
I would like to see the cap used on this set-up (pics dont quite show it).
My main points of focus here would be to make damb sure the underside of that flange kit was sealed well prior to the ice & water shield being layed over it, I really like rickg's first comments to you (the area where your two roof's meet and the pitch changes so drastically could be the source of the problem (ice & water shield is amazing stuff and hopefully was used in this area!)
Doug, sorry I can't find any pictures of the cap. This is a Dura flue chimney. The cap is a dome about 10 inches in diameter, with 4 legs that has about a 3 inch gap, also the screen was removed abot 10 years ago. It's been ok, but in the past we get dampness in the stove with blowing rain.
This could be wind driven rain, hard to say without closer scrutiny. What type of support box is this? Catherdral or ceiling support box?
There is a lot of leverage with a tall stick. Add another brace at the 10 ft level.
"If the chimney extends more than 5 feet above the roofline, an Extended Roof Bracket must be installed at every 5-foot increment of chimney height above the roofline,
leaving no more than 5 feet of chimney extending above the last pipe bracket."
The ceiling is catherdral. The box it 1ft X1ft. This didn't have a problem for 10 years. I'm going the take it apart a piece at a time, as well as cutting in an access door into the sealed space between the two roofs. Hopefully rains this summer will show me the problem.
Hogwildz
Minister of Fire
The base flashing is not on top of the shingles. It is installed as it should be. The bottom part does go over the shingles at the bottom. Some get fancy and muck a tab over the flange at the bottom, but that only creates a damn for the water coming down the sides to back up against. The silicone all over everything is not needed if done properly. The only place there should be silicone is around where the pipe meets the base flashing and around the storm collar.thats total lazyness of installer, no flange kit/cone should sit ontop of your shingles with goop (thats horrible
woodsmaster
Minister of Fire
Apears installed right to me. I wonder if they put the felt paper over the top of the flashing ? It could be leaking up higher and running down the paper and under the flashing. As hogwildz said the silicone is not needed where the shingles meet the flashing.
Ashful
Minister of Fire
As an old house nut, I hate the thought of using silicone on anything, except around my bathroom fixtures. People found ways to flash roofing penetrations for hundreds of years before the invention of silicone caulk. Likewise, the only flashing failures I've ever experienced are 100% attributed to the innevitable failure of caulk and/or adhesives. I'm back to flashing everything with soldered copper, and am happy knowing my work will out-live me.
The fact that this worked without any problem for 10 years, and then started to leak without any obvious damage, is a strong indication of caulk or other adhesive failure.
The fact that this worked without any problem for 10 years, and then started to leak without any obvious damage, is a strong indication of caulk or other adhesive failure.
- Status
- Not open for further replies.
Similar threads
- Replies
- 17
- Views
- 634
- Replies
- 21
- Views
- 514
- Replies
- 7
- Views
- 2K
- Replies
- 17
- Views
- 1K