Jotul Firelight model 12 - Doing the repair, Just about complete

  • Active since 1995, Hearth.com is THE place on the internet for free information and advice about wood stoves, pellet stoves and other energy saving equipment.

    We strive to provide opinions, articles, discussions and history related to Hearth Products and in a more general sense, energy issues.

    We promote the EFFICIENT, RESPONSIBLE, CLEAN and SAFE use of all fuels, whether renewable or fossil.
Status
Not open for further replies.

jsb

Member
Mar 29, 2012
28
North Central Ct
its going great. Need to install gaskets for the glass and install the cat, cat cover and outer burn plate, then a couple of small fires and away we are ready for winter.
I am at the last steps, replacing the door glass gaskets in the next day or two. It went fairly smoothly. I got some good tips from "Summit' including getting enough gasket cement, Just under 4 tubes (11 oz size), close to 50 ft of 1/4" gasket rope plus about another 20 ft of 3/16 gasket rope for the glass, flue outlet and a few other places. I did not get a second stove for parts, I bought new the parts I needed and paid just about $1200.00 for parts, rope and cement.
A few things I learned or did along the way that you might benefit from.
Mark all bolts as you remove them as to what parts they attached to. This will make it much faster when putting it back together as there are about 4 different length 10 mm bolts I believe.
Clean all gaskets and cement away before starting to put it back together taking note of where and how much cement was used.
Dry fit all parts and take note of where to apply new cement.
Cut fit and replace all necessary gaskets while parts are apart, its much easier to get them to stay when they are laying flat.
Use the matching pieces to apply pressure to gaskets when "gluing".
Be sure of your assembly order, The most critical areas I found were the air draft control handle, the cover over the pedal linkage, and the Cat Chamber.
If you have any specific question let me know.
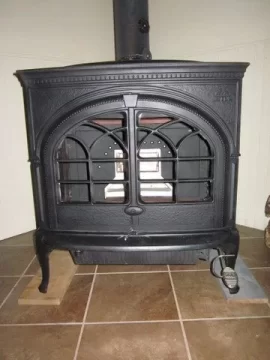
My "new" 1997 jotul firelight model 12. IMG_0502.JPG
 
That is a great looking stove jsb, How long did it take you to rebuild it? It looks brand new something to be proud of. good job hope it serves you well
 
Good tips jsb, she's looking great.

But 20 feet for the glass and 50Ft for the stove? Seems like that amount would be enough to wrap it like a mummy. ::-)
 
Good tips jsb, she's looking great.

But 20 feet for the glass and 50Ft for the stove? Seems like that amount would be enough to wrap it like a mummy. ::-)
its 3 ft for each glass, almost 5 ft for the ashpan housing and I believe another 6+ ft for the back plate.
 
That is a great looking stove jsb, How long did it take you to rebuild it? It looks brand new something to be proud of. good job hope it serves you well
The initial take down was about 2 hours, plus about 3 hours for two bolts of the 4 which attach the rear backplate to the rear backplate frame, tried wd-40 and other stuff including heat. finally snapped them off and had to center drill them and then run tap thru them to clean the threads. Another 3 hours of scrapping gaskets and and cleaning channels with a rotary drill and wire brush. Then about 1 hour for a dry assembly. next I cut, fit and cemented all the gaskets, totaled another 2 hours. Put it back together cementing wherever necessary, another 2-3 hours. Wiped it all down and sprayed it 1/2 hour. So the short answer was about 12-15 hours. It could have been alot faster but I don't think i'll need it for awhile and theres always fishing that needs to be done.
 
I'll buy you a new Jotul Firelight 600 with full warranty transfer, in trade for that old Firelight 12.

Yes... I'm serious.
 
I'll buy you a new Jotul Firelight 600 with full warranty transfer, in trade for that old Firelight 12.

Yes... I'm serious.
Sorry, i'm liking my new 12 - 14 year old stove. I replaced everything that needed replacing and I expect to get another 12 - 14 years out of it. The great things about it was that there was no surface rust, and no warped pieces. Except for the parts that I had to replace, including a $110.00 door glass ( didn't replace the $25.00 andiron when I should have) all the other parts were and are in excellent condition. The other thing is that there was no enamel to chip and crack. There is a guy up around Keene NH who rebuilds and sells them. Last I spoke with him he had a stove like mine. I could dig out his info if you are interested.
 
Great job, looks like new :)
 
The initial take down was about 2 hours, plus about 3 hours for two bolts of the 4 which attach the rear backplate to the rear backplate frame, tried wd-40 and other stuff including heat. finally snapped them off and had to center drill them and then run tap thru them to clean the threads. Another 3 hours of scrapping gaskets and and cleaning channels with a rotary drill and wire brush. Then about 1 hour for a dry assembly. next I cut, fit and cemented all the gaskets, totaled another 2 hours. Put it back together cementing wherever necessary, another 2-3 hours. Wiped it all down and sprayed it 1/2 hour. So the short answer was about 12-15 hours. It could have been alot faster but I don't think i'll need it for awhile and theres always fishing that needs to be done.
\

That takes alot less time than I would have thought. So you do not or did not have to do any painting??? Are they painted....or is cast iron naturally colored like they are? I don't know.
 
Joful, have you contacted this seller?

http://nh.craigslist.org/for/3174709723.html

Good find! Not wanting to drive 14+ hours to look at an unknown stove from a seller with an attitude, though. ;lol Did you read the guy's post? "Please research before offering no I will NOT take $500."

It looks well used / would need some way to verify condition before I made that kind of drive. Any ideas?
 
Sorry, i'm liking my new 12 - 14 year old stove.

It's a testiment to the work you've done, that someone's willing to pay more than the cost of a new stove to take it off your hands. ;)
 
Looks to be in decent exterior condition and in blue-black enamel. Ask for some interior pictures of the burn plates and cat. Maybe he would meet you half way at $700? Assuming you rebuild it, that would be a heckuva lot less than a new F600.
 
Oh, yes... definitely. I already left him a voicemail.

Honestly, I'd be more interested in him meeting half way on driving distance, than on price! ;lol
 
  • Like
Reactions: neumsky
Looks to be in decent exterior condition and in blue-black enamel. Ask for some interior pictures of the burn plates and cat. Maybe he would meet you half way at $700? Assuming you rebuild it, that would be a heckuva lot less than a new F600.

How much is a new 600?
 
Can't remember what I was quoted, but somewhere close to $3k.

The stove posted on Craigslist will likely need a new inner burn plate, cat chamber, cat chamber cover, cat chamber floor, cat, gaskets, etc. We're likely talking a week of evenings and a weekend of two of playing around with it, plus $700 in parts on top of the sale price. So, we're into maybe $1500, plus a whole lot of my time, and it still won't be half as pretty as jsb's.
 
Thank...Jeff
 
Great job on the rebuild. I am in a similar boat. I want to rebuild behind the inner back plate. I am looking for the best method/instructions on how to get it open. I assume you used a wrench and tried to remove those two screws in the upper left and right on the rear inner back plate. Any guidance would be appreciated. THANKS Steve


The initial take down was about 2 hours, plus about 3 hours for two bolts of the 4 which attach the rear backplate to the rear backplate frame, tried wd-40 and other stuff including heat. finally snapped them off and had to center drill them and then run tap thru them to clean the threads. Another 3 hours of scrapping gaskets and and cleaning channels with a rotary drill and wire brush. Then about 1 hour for a dry assembly. next I cut, fit and cemented all the gaskets, totaled another 2 hours. Put it back together cementing wherever necessary, another 2-3 hours. Wiped it all down and sprayed it 1/2 hour. So the short answer was about 12-15 hours. It could have been alot faster but I don't think i'll need it for awhile and theres always fishing that needs to be done.
 
THANKS for the quick response. Got a good distance tonight. Removed four screws behind inner back plate, yet the plate cannot quite come out - seem to be held in slightly on right side.. Conceptually I am trying to figure out if the top needs to be removed, per the thread so to be able to "lift" it out. I will go at it again later in the week. THANKS Steve
 
Definitely take the top off! I tried to do this the first time with the top on, and it was almost impossible. Top comes off by removing the strap for the push rod on the top load door, then two bolts (one each side) under the kid inside the firebox. Just be darn sure to not let that top load door flop open after you disconnect the push rod, or the hinges may break off.

Have a blanket or tarp ready to set the thing down on, before you pull the top. It's not that heavy, but its a little awkward.
 
Hi all - I'm just about finished doing a partial rebuild of my Firelight 12 (all new gaskets and cement) - many thanks to all for the useful instructions and pics above. A couple issues: my cat chamber was pretty worn out but still intact, so I stuck it back in and hope to get at least another year out of it, also the rear burn plate was warped and cracked - so again, being the cheapskate that I am I bolted it back in place and sealed the heck out of it with cement. My problem now is that when I mounted the rear damper assembly back on (with replaced gasket) and I lock it shut then pop the lock bar back open the damper door doesn't fall open. Its almost like it should be sitting at a bit tilted upwards so that the weight of the damper door causes it to fall open when the lock is disengaged - but mine isn't doing it. This is going to be a problem when burning because the damper will be shut when I open the topload door - and I'll set all my smoke alarms off and annoy the dogs. Anyone run into this issue and have a fix?
I gotta get burning, it's gettin cold out!
 
a couple of things come to mind. Just things to check out. As I remember the damper is held in by a bolt and clamp on each side, is it possible that you tightened then to much or they are out of alignment. This might cause the damper to not pivot freely and therefore not open and close properly. Another thing I found is that the left to right alignment of the damper might be off, which might cause the damper to hang, ans lastly is the linkage installed properly, as I remember it gets covered by a plate with a bolt and is cemented all around, I would make sure that it works freely.
 
thanks jsb. Good to see a fellow Connecticutter on here - you know all too well how fast winter is approaching! I'm checking those things right now. The hinges are fine and the damper swings open and shut freely, its just not sitting at the right angle to make it fall open when its unlocked. I think the problem is with my cracked rear burnplate - when the damper assembly bolts over top of it it pulls in too far since the burn plate is warped and cracked - thats all I can think of so far. I'm going to try and tape an extra piece of thick gasket over the top of the burnplate to make the damper sit out a little farther - I'll let you know if it works. Meanwhile if you or anyone else thinks of anything else please let me know.
 
Status
Not open for further replies.