Englander Side Shield & Kids

  • Active since 1995, Hearth.com is THE place on the internet for free information and advice about wood stoves, pellet stoves and other energy saving equipment.

    We strive to provide opinions, articles, discussions and history related to Hearth Products and in a more general sense, energy issues.

    We promote the EFFICIENT, RESPONSIBLE, CLEAN and SAFE use of all fuels, whether renewable or fossil.
Status
Not open for further replies.
Good to know Jake. I have always figured that you heat up a sealed cylinder and pressure is gonna build. Since there has to be some in there to start with to blow the chem out.

Haven't ever taken one of the things apart.
 
Pen hit on it and Jake missed his chance (;)) so I am gonna say it. Always have a fire extinguisher toward the exits. It puts YOU in between the fire and a way to get out. And that is a good thing. I can't touch Bro's 31 but I have six of the things spread around.
 
'sploding fire extinguisher on Mythbusters.

 
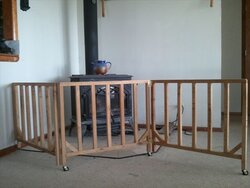
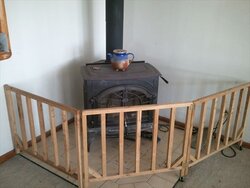
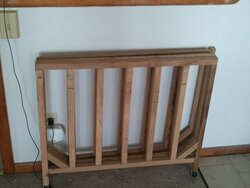
To bring this back around - I found a few pics from last year of the gate I built. Pretty easy to build and was made to be "rustic" which means I didn't put any finish on it and even left some of the saw marks on it = lazy;lol.
gate1.jpggate2.jpggate3.jpg
 
  • Like
Reactions: slinger646
'sploding fire extinguisher on Mythbusters.


A) Unfortunately . . . or fortunately . . . not too many people have AFFF extinguishers in their home. I suspect if there is enough direct heat on an extinguisher folks with working smoke detectors will have a bit of advance warning. ;)
 
Care to share the materials list and dimensions?
He, he, he - you askin' me for a materials list? Jags don't work that way.:p
This started as some rough saw oak that I had laying around. Fed it through my planner till I got it to 1" thick and then set up the radial arm saw for one inch cuts. Just ripped a whole bunch of 1 x 1" boards (still have a few unused spares laying around). Took the measurements for a 3 section gate and started building. Wood glue a few clamps and an air nailer made short work out of it. Found appropriate castors at home box store, drill holes and pressed them into place. Screw to wall.....see.....easy stuff.

(I understand that most people don't have a bunch of wood working tools. Goto your favorite lumber supplier and purchase the square stock - you are now 3 steps ahead of the game.)

Everybody should have a couple of wood clamps in their tool chest - they can/are used for much and are pretty darn cheap. Brad nails and a hammer are cheap. wood glue is cheap. Castors are cheap. You will just need a reasonably accurate saw. All the upright sections need to be very, very close to the same dimensions for the top and bottom rails to fit nice.
 
  • Like
Reactions: pen
Status
Not open for further replies.