99% done with install...I'm hot right now LOL

  • Active since 1995, Hearth.com is THE place on the internet for free information and advice about wood stoves, pellet stoves and other energy saving equipment.

    We strive to provide opinions, articles, discussions and history related to Hearth Products and in a more general sense, energy issues.

    We promote the EFFICIENT, RESPONSIBLE, CLEAN and SAFE use of all fuels, whether renewable or fossil.
Status
Not open for further replies.

Brian

New Member
Aug 31, 2012
60
Long Island,NY
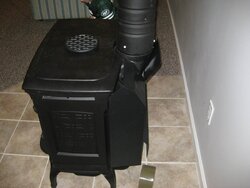
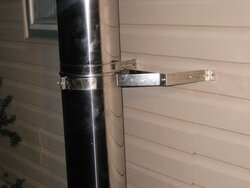
So I bought a new Shelburne after looking at one on Craigslist and got screwed around on the deal.I bought it new and all the double wall stove pipe...I installed it all myself and had to fab a bunch of custom brackets at work..Gotta love working in a machine shop at times ....I cut the rug out and tiled a nice pad for it(on a slab) Basement install....I know,not ideal but my layout is bad upstairs!!!

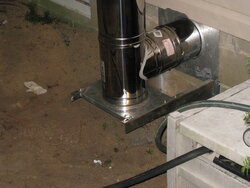
Any who,All I need to do is install the flue thermometer and grade out he dirt by my tee section...Do yall think the tee section is going to be a problem with contacting leaves and such if left uncovered?I'm thinking of building a mimi chase around the tee with a shed type roof made of durock with a cleanout...Thoughts..Thanks for the advice along the way gents.Just gotta figure out how to keep it burning right...

284.JPG 292.JPG 302.JPG304.JPG 299.JPG
 

Attachments

  • 296.JPG
    296.JPG
    91.2 KB · Views: 253
  • 287.JPG
    287.JPG
    106.7 KB · Views: 260
  • 288.JPG
    288.JPG
    71.1 KB · Views: 253
  • Like
Reactions: ScotO and Dairyman
Pics, look great. I like the looks and build of that stove. It should make a nice difference. Did you tile right to the concrete slab floor?
 
Looks great! Have another round you've earned it.
 
That's the most stainless steel I've seen in one picture for a long time. It's real pretty, and I know it's real dear (glad it's not on my credit card ;lol). How are you going to clean that rig? Very nice job all around. Rick
 
Very nice job on the hearth Brian.
If you've not done this before, then double kudos.
Old Jim has you a bit confuzzled....the pics aren't 2x. Have another, maybe your vision will improve.;lol
 
  • Like
Reactions: ScotO
Looking good. The leaves shouldn't be an issue.

Get yourself a HOT fire going and then go feel the Clean-out. Not that bad. It will make you feel better. I have an install that is close to dirt. I did dig down a little and lay down pavers (just for looks).

Looks great. Love pics of Fire...
 
Looking good. The leaves shouldn't be an issue.

Get yourself a HOT fire going and then go feel the Clean-out. Not that bad. It will make you feel better. I have an install that is close to dirt. I did dig down a little and lay down pavers (just for looks)
Looks great. Love pics of Fire...[/quoteyeah I only had the stove to about 400 and the tee was warm enough that I could touch it ...tomorrow I'm gonna get a ripping hot fire and feel it out.thinking of just throwing pea gravel in there and calling it a day if its not that hot
 
That's the most stainless steel I've seen in one picture for a long time. It's real pretty, and I know it's real dear (glad it's not on my credit card ;lol). How are you going to clean that rig? Very nice job all around. Rick
I'm thinking I need to remove the top section and go to town but not sure how difficult that will be after burning it for awhile,but I'm a fat ass so I should be able to twist them apart lol
 
  • Like
Reactions: ScotO
Ha Lol they were doubled when I went to post I swear .i only had 2 drinks:)

The Mod's here do wonderful things.

(Without us noticing, most times) It may have happened. But Fossil and BeGreen are on the ball ;)

Sometimes it's like Magic :cool:
 
I cleaned them up. Maybe I should have my title changed to Forum Janitor.
 
  • Like
Reactions: Brian and ScotO
Nice install.
 
Great looking install. I really like the hearth flush to the carpet.
 
That's a real nice install and I do like that stove choice.
 
  • Like
Reactions: Brian
My setup is pretty similar to yours on how it exits the house with the cleanout....actually yours is higher above grade than mine. I dug a (not sure on the exact dimensions) ~24" (away from house) x 36" (parallel to house) x 18" (deep) hole under the cleanout, formed the walls and poured a concrete foundation around mine. I made the walls thick enough to put down a 2x4 as the sill plate and set anchors in the concrete when I poured. I screwed a sheet of treated plywood down to the sill plate leaving 2" CTC.

The lid on the cleanout can get a little snug so I also added a 1/2" piece of square stock to it so I have something to grip when removing it.

I get a few leaves down there, but they all fall to the bottom of the hole far away from the pipe. Even if they were to ignite the 4 walls are concrete and the plywood is 18" away...

When I clean I remove the lid and put a container in to collect the debris from the pipe. Not ideal, but tolerable.

Looking at your stack, you might want to dig down some to leave room do to a bottom-up cleaning. Not sure how you could go top-down without a scaffold or man lift.
 
  • Like
Reactions: Brian
You did a great job on the install on the hearth and stove! As for the cleanout, you'll be fine. I think your flue pipe can be shortened a little bit. You're gonna have hell to pay getting a brush up there (unless you're REALLY tall!). Welcome to the club.....
 
  • Like
Reactions: Brian
My setup is pretty similar to yours on how it exits the house with the cleanout....actually yours is higher above grade than mine. I dug a (not sure on the exact dimensions) ~24" (away from house) x 36" (parallel to house) x 18" (deep) hole under the cleanout, formed the walls and poured a concrete foundation around mine. I made the walls thick enough to put down a 2x4 as the sill plate and set anchors in the concrete when I poured. I screwed a sheet of treated plywood down to the sill plate leaving 2" CTC.

The lid on the cleanout can get a little snug so I also added a 1/2" piece of square stock to it so I have something to grip when removing it.

I get a few leaves down there, but they all fall to the bottom of the hole far away from the pipe. Even if they were to ignite the 4 walls are concrete and the plywood is 18" away...

When I clean I remove the lid and put a container in to collect the debris from the pipe. Not ideal, but tolerable.

Looking at your stack, you might want to dig down some to leave room do to a bottom-up cleaning. Not sure how you could go top-down without a scaffold or man lift.
I actually went up ther the other day and was able to tie a rope to a tee shirt loaded with some stuff to weigh it down and it went right down...I don't have a brush yet but i'm guessing if i put weight to it it would work for me...Oh and I've been burning and the outside pipe does'nt get hot enough for me to think it will ignite anything!!!
 
Pics, look great. I like the looks and build of that stove. It should make a nice difference. Did you tile right to the concrete slab floor?
Yes sir,right on the slab...Question be green,I seem to be getting a small little black puddle on the left and right sides of the stove on the tiles...Is this just the stove burning off condensation that the cast absorbs when it's not run?Thanks for all of the advice along the way!!!
 
Status
Not open for further replies.