Used Enviro EF2 with wire havoc!!!

  • Active since 1995, Hearth.com is THE place on the internet for free information and advice about wood stoves, pellet stoves and other energy saving equipment.

    We strive to provide opinions, articles, discussions and history related to Hearth Products and in a more general sense, energy issues.

    We promote the EFFICIENT, RESPONSIBLE, CLEAN and SAFE use of all fuels, whether renewable or fossil.
Status
Not open for further replies.

MELO

New Member
Oct 5, 2012
8
Hi there,

This is my first post but I have been reading several posts looking for insights and pictures to help me.
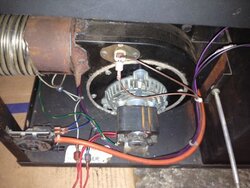
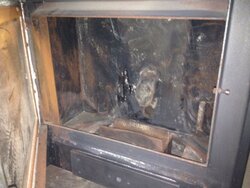
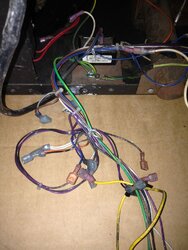
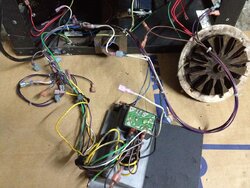
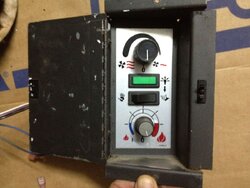
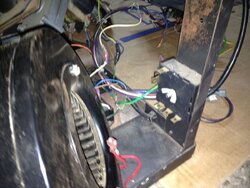
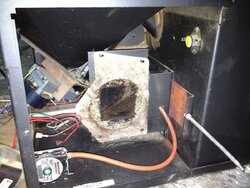
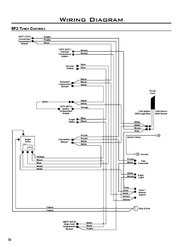
I've just bought a second hand Enviro EF2 that has all its wires disconected. Now, I'm totally ignorant regarding wire diagrams and although I tried I cannot make sense of it.
Can you please help me with some sugestions, pictures of your wire connections or just a translation of the wire diagram.

Thank you so much.

Cláudio
 

Attachments

  • Envirofire_0001.jpg
    Envirofire_0001.jpg
    110.8 KB · Views: 316
  • Envirofire_0005.jpg
    Envirofire_0005.jpg
    231.7 KB · Views: 340
  • Envirofire_0006.jpg
    Envirofire_0006.jpg
    161 KB · Views: 351
  • Envirofire_0007.jpg
    Envirofire_0007.jpg
    156 KB · Views: 315
  • Envirofire_0009.jpg
    Envirofire_0009.jpg
    195.1 KB · Views: 363
Hello

Welcome to the forum. The EF2 is a nice heater. I rebuilt one also! Does your stove have an ignitor?

Unfortunately I cannot help you as much since I do not have mine anymore but there are quite a few people here that still have one and hopefully they will chime in with what color wire goes where. The wire diagram should help. You just need to connect the wires to the blowers, auger motors and snap discs. Like a be jigsaw puzzle but the wire diagram should be the most help. Do you have a wire diagram?
 
Thank you for your answer.

Well I've looked trough several posts and found a few wire diagrams but I'm not sure which one is the right one.
I'm thinking that I could number the connectors in Photoshop so that it's easier for someone to help me.
Where are the diagrams that I've found.

Thanks
 

Attachments

  • EF2.jpg
    EF2.jpg
    45.8 KB · Views: 932
  • EF2_b.jpg
    EF2_b.jpg
    50.6 KB · Views: 420
Hi Melo

These stoves had a long production run of approx 10 years so they may have revised the wire diagram once or twice. Don't be too shy to call up Sherwood Ind directly and speak with their parts guy. They have a great crew. Tell them the serial # and date it was made and I am sure they will have the diagram for that stove.

The colors of the wires should match up to one of those diagrams and since this stove works on AC you do not have to worry about polarity. In other words if you see two wires going to the auger motor it does not matter which wire goes on which auger motor terminal.
 
I have an EF-2 Freestanding in storage in my basement.

If you want...When I get a chance I will open the sides and take some pictures of the wiring looms for you.

No much to them. Should be easy to nuke it out.

---Nailer---
 
I have an EF-2 Freestanding in storage in my basement.

If you want...When I get a chance I will open the sides and take some pictures of the wiring looms for you.

No much to them. Should be easy to nuke it out.

---Nailer---

Hi

Still got that nice EF-2. Any plans for it?
I would like to put a digital panel in it for experience. :)
 
Hi there,

Thank you Don for all your input.

Last night was productive and it seems that my neurons started doing their thing :) !!
I finally managed to understand the wire diagram, not to difficult after all, even for a electrical challenged dude!
On startup I noticed the auger didn´t move. I went trough the wiring once more and it seems ok. I started doing the suggested troubleshooting (I had already thoroughly cleaned the stove) and came to the point were the auger moved when I placed a jumper wire in the vacuum switch....
Now... I don´t have a magnehelic gauge to test the reading.
Do you have any suggestions??
By the way the exhaust blower is working and was cleaned.

I'll include pictures just in case you see any mistake in the wiring.

Thank you so much for your help.

Cláudio
 

Attachments

  • fotografia.JPG
    fotografia.JPG
    54.3 KB · Views: 318
Is the tubing between the vacuum switch and the stove clean of ash along with the barbs in particular the barb at the stove, just a little bit of ash there is a show stopper. Also the ends should be tight and no cracks in the tubing.

If you remove the end at the stove and gently suck on it you should hear the switch close and then open when you stop.
 
I've just tried cleaning any obstruction with a needle (and since English is not my first language, I'm assuming a barb is the plastic connector onto which the tubing is pluged, right?) and still no luck!
Can you see the connections on the vacuum switch from the picture? Do you think the empty connector has something to do with it?

Thanks SmokeyTheBear.
 
Found it!!!
The service manual had a side note! Pre 2008 vacuum switches should not use the middle connector!!
It's working !!
Now onto the next one... its seems the ignitor is not working. Is it normal to take more than 5 minutes (and counting) to light up?
 
Hi there,

Thank you Don for all your input.

Last night was productive and it seems that my neurons started doing their thing :) !!
I finally managed to understand the wire diagram, not to difficult after all, even for a electrical challenged dude!
On startup I noticed the auger didn´t move. I went trough the wiring once more and it seems ok. I started doing the suggested troubleshooting (I had already thoroughly cleaned the stove) and came to the point were the auger moved when I placed a jumper wire in the vacuum switch....
Now... I don´t have a magnehelic gauge to test the reading.
Do you have any suggestions??
By the way the exhaust blower is working and was cleaned.

I'll include pictures just in case you see any mistake in the wiring.

Thank you so much for your help.

Cláudio

I had the same problem rebuilding mine stove. These stoves can be overfired too easily with the manual knob controls. In my case the high limit switch tripped. If it has the small button just try to reset it. Otherwise you have to replace it.

It is normal for the ignitor to take up to 15 mins to light up. I had to replace mine it was bad.
 
Ok,

I'll start prepping the painting job while I wait to see if I have an Ignitor on my shopping list.
Thank you all for your help (thank you Nailer).
Even though its still 75º outside here in Portugal, its good to have all your help. Winter (when it finally arrives) can be very cold and humid near the sea where I live.
cheers
 
Glad you got the wiring "Nuked" out, lol

On the igniter, ensure when the burn pot is installed it presses tight up to the end of the igniter.
If it isn't touching you wont get heat transfer to light the pellets in the burn pot liner.
Not saying the igniter is not toast.

Also not a big deal to light the stove manually.
IIRC, Shut off room blower (convection fan) Not the "Dial a fire" knob the other one.
Turn Dial a fire to 3/4 position (about 2 oclock)
Place switch into manual.
Throw in a handful of pellets into burn pot liner
(BTW) the burn pot liner goes into burn pot with the higher side toward you)
Use a flame source to start the pellets. (I used a propane torch with push button starter for years but some folks use gel fire starter)
Once the pellets are burning enough to sustain the flames by themselves, shut the door.
In about 5 minutes....Watch the light on control panel. Mine turned green when stove was up to temp.
When light turns/flickers green, switch auto/man switch to auto.
Adjust your damper for optimum flame (as seen in manual)

Relax, enjoy the heat and a beverage of your choice.
---Nailer---
 
Hi Nailer,

The ignitor was disconnected after all. Very strange! Why on earth did the previous owner disconnected almost all the wires... :)
Anyhow, I've already sanded everything and have started painting with appropriate heat resistant black paint.
Here are some pictures for you to see the progress.
I couldn't resist trying to light up the stove, even though I had already removed its inside panels.
I can happily say that there was some fire starting within the first minute.:)
Do you have any suggestions on the install process? Even though there is no inspection mandatory to stove installs (go figure??!!) I would like to do it properly. I have a fireplace, and I'm going to insert the stove and run the vent trough it.
Should I use the flexible stainless steel vent (liner?)or a rigid one? Should I close the fireplace passage (not sure of the name but its the diagonal brick wall that narrows the passage of smoke at the inside of fireplace)?

Thank you for your feedback.
 

Attachments

  • ENVIRO_0012.jpg
    ENVIRO_0012.jpg
    74 KB · Views: 268
  • ENVIRO_0011.jpg
    ENVIRO_0011.jpg
    72.8 KB · Views: 235
  • ENVIRO_0010.jpg
    ENVIRO_0010.jpg
    59.5 KB · Views: 235
Claudio,
The fire brick/rear panel look good painted.
FYI, Be aware that the paint will not hold up to the heat.
It looks good for a while but wont last.

I'm not an install tech. So I hesitate to offer any suggestions that way.

Best advice I can give you is to follow your manual.
When in doubt call a professional.

BTW what geographic area are you in?

---Nailer---
 
Hi there,

Was away at work. Thanks for the info on the paint. :) At least it will look good for the inauguration!!
I'm based in Portugal, south of Europe.
I'll post images of the stove once I'm finished. I can tell you though that its working and apparently its enough to warm up the place...
 
Melo,
Glad you got it working.
And happy you have heat.
Have to admit I didn't think of Portugal as being in a cold climate.
Learn something new all the time. ==c

Continued good luck with the stove.
I liked mine a lot. I just needed a bigger stove to keep my place warm.
Very few problems with that stove.
Keep it clean, about every 50 bags (1 Ton) of pellets completely clean it.
That involves pulling everything (blowers, venting, etc.) out and cleaning them.
Compressed air works well (if you move the stove outside)
About the only thing that goes with time is the igniter and the brass auger bushings.

Glad you have it working, Good luck.
---Nailer---
 
Status
Not open for further replies.