The Install has begun

  • Active since 1995, Hearth.com is THE place on the internet for free information and advice about wood stoves, pellet stoves and other energy saving equipment.

    We strive to provide opinions, articles, discussions and history related to Hearth Products and in a more general sense, energy issues.

    We promote the EFFICIENT, RESPONSIBLE, CLEAN and SAFE use of all fuels, whether renewable or fossil.
Status
Not open for further replies.

trog04

New Member
Oct 29, 2012
28
Front Range Colorado
Ok, so I got the permit and today I started the install.

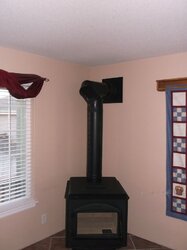
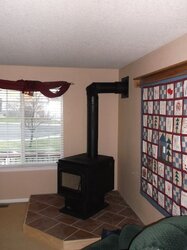
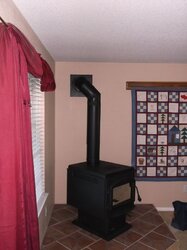
The details: Napoleon 1900P with DVL stove pipe, through the wall install to Dura Tech class A chimney.

I decided to go up from the stove with the DVL, 90* elbow with a 45* horizontal offset to go between two studs. It just made to most sense given what I have.

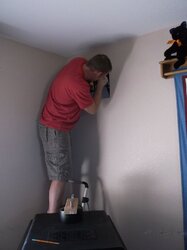
I figured out where I wanted the thimble to go, and marked the outline, lined up with a stud. The specs call for a 12.25" square opening. I made it a tad bigger, 12.5 square, just for a little breathing room. I made the cuts through the drywall with my trusty jig saw, as I knew there was no electrical behind the hole. Then I framed it out using the stud as one of the sides. That was a bit tricky, as I didn't want to destroy to much drywall, that I would have to repair later, so I essentially framed the box one side at a time within the hole. Took a little bit longer on the front end, but I'm sure I'll save it on the back end, without having to replace and repair drywall.

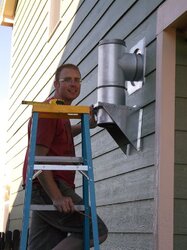
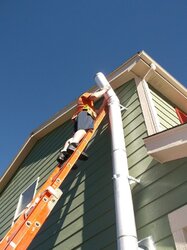
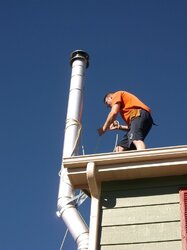
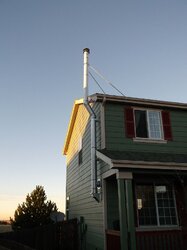
Next came the thimble and tee support bracket on the outside. It was a little bear getting in lined up and plumb/level. All in all it went together pretty well so far. Wasn't real happy with my caulking job, but that can be cleaned up later. I've got 3" clearance from the side of the house to the chimney, so I feel pretty good there.

Now I wait. I have a rough inspection from the county set up for tomorrow. Then it will be off to the races to get the rest done.

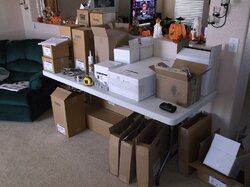
Pics below are of the initial set up and stuff, cutting and framing the hole, and the outside thimble and tee.
 

Attachments

  • 1.jpg
    1.jpg
    86 KB · Views: 168
  • 2.jpg
    2.jpg
    96 KB · Views: 165
  • 3.jpg
    3.jpg
    49.8 KB · Views: 181
  • 5.jpg
    5.jpg
    118 KB · Views: 159
  • Like
Reactions: Backwoods Savage
yep..you're doing it right the first time..smart man!
 
If it weren't for all of the Halloween decorations near your work table, I would say its looking a lot like Christmas! ;)

Cheers and good luck with the install!
 
Ok, for round two... I had the inspector come out this morning, and everything went great. The only thing he is making me add is the outside air combustion kit. I was going to see if I really needed it first, but might as well go ahead and get it ordered.

I started with the DVL up to the chimney tee. Was ready to make the connection and realized I didn't have the finishing collar for the adapter to fit into. I had a contractor come out to quote an install, so I got all the stuff he ordered, but I guess didn't get everything. On the phone and found it locally, but it took a while to arrange everything.

I moved onto the chimney while I waited. I have to say, it went together like a dream. It was really easy twisting the sections together, making them plumb, and securing the wall straps. I used a 15* offset to go around the soffit, which was pretty easy to figure out the right length between them. The chimney went vertical again and was about 7' above the roof line (10/2 rule). The extended roof bracket was added and the chimney was DONE .

As a firefighter, I had a ton of fun with the chimney throwing ladders and climbing. My house looked like a fire scene; I had 3 different ladders in different places to allow me to go from one area to another easily. I even taught my wife how to tie a bowline and hoisted sections of chimney up to the roof. Awesome.

I was able to get the finish collar, and finished up with the stovepipe and thimble. I planned to go up to a 90* then 45* horizontally, but with the sections of DVL I had, it didn't quite work. I flipped it around and went up to a 45*, the used the 90* with a short section of pipe to the thimble. Using the 45* first, I estimate my draft will improve 42-76%. (That's a validated statistic that I just made up)

I'm still waiting on the outside air kit, which I should get tomorrow.

Overall, I was very pleased at the ease that it all went together. I can't believe someone wanted $800 to do it. It really wasn't difficult work. I went slow, and test fit things, and then BAM!, I have a stove in my house.

On the aesthetic note, my chimney is a hideous monstrosity in our neighborhood. I'm sure my neighbors will let me know about it (In a kidding way though). We plan on building a chase around it, but it wasn't in the budget now. We're already quite a bit over, so there. We're also thinking of painting it black, just to help make it not quite so obvious. I'm not REAL concerned about the looks, as when energy prices necessarily skyrocket and my neighbors scream about their utility bill, I'll be walking around in shorts and t-shirt this winter, cozy and warm.

Thanks for all the help on here, and I hope I can return the favor someday.

Tom


Attachments

  • 8.jpg
    8.jpg
    94 KB · Views: 162
  • 11.jpg
    11.jpg
    62.6 KB · Views: 170
  • 13.jpg
    13.jpg
    67 KB · Views: 183
  • 14.jpg
    14.jpg
    57.2 KB · Views: 169
  • 15.jpg
    15.jpg
    90.2 KB · Views: 193
  • 16.jpg
    16.jpg
    76.6 KB · Views: 179
  • Like
Reactions: milleo
Nice work! Enjoy it, mine just went in today. :) House is warmer than it's been in weeks and the thermostat is OFF. I love it.
 
Just in time. Sunday is going to be frosty in your area. High of 34, low of 17.
 
Random thoughts . . .

I like the hearth . . . looks sharp.

Is the curtain and quilt outside of the clearances . . . hard to tell with the photos as sometimes things that are a lot further away look closer.

Nice legs . . . and yes . . . I am kidding.

Not a bad looking chimney . . . painting it or enclosing it in a chase is an option . . . or you may find that after awhile it kind of just fades into the background like a TV antenna, satellite dish, stink pipe, etc. In my own case I had planned to do a chase, but after a year of running with it I realized a) it didn't look all that bad on the side of my house and b) from the road and most viewpoints you really couldn't see much of the chimney . . . oh and then there is c) I am too cheap and too lazy to build a chase. ;)
 
Ok, I'm sorry you all had to see that. Hope you had sunglasses on when you saw my legs!! Jake, the curtain and quilt are outside the clearances, but just barely. We plan on moving the quilt to a better location. As for the curtain, I'm not sure what to do about that. I would like to have the option of closing them, but it's just a bit too close for my comfort. I wish I could get some nice looking Nomex curtains, I'm sure the wife would love them!! We'll figure it out somehow.

Thanks, Tom
 
Status
Not open for further replies.