Cord said:
... The moisture was measured at the cut end of the log. This meter did not have probes so we could not measure the split face.
So many mysteries here. Measuring moisture on the outside of the split will be inaccurate. I can't picture your meter with no probes, so I guess I won't know for sure what is going on with your wood moisture unless you can split a split, and I mean right now, now a year ago, and then measure the moisture content on the face of the freshly revealed surface. My moisture meter has probes so I take a split off the pile, split it in half again, lightly poke scribe holes with the meter probes, take an ice pick and make a goodly hole, then insert the moisture meter probes. That's accurate. I'm not sure what you are doing and without being there probably never will be. A picture is worth a thousand words and all that.
What is a "wax log"? Never heard of that term.
I'm talking about a Duraflame brand log or the generic store equivalent from Walmart, etc. They are made from parafin wax and sawdust mostly, and probably contains some strange chemicals. Thus, wax log. Sorry for the generic description.
We only use the paper to light the fire, then the fire burns for weeks. Is the newspaper what is really clogging that cat? I thought that maybe we let the fire box fill up with too much ash. This stove has a very small ash pan and the slots in the bottom are a bit too fine. You have to actually rake out the fire box or it will fill up with ash.
Could the the paper, might be the other ash, but I always leave an inch or more of ash covering the cast iron grate to protect it and I don't have any such ash problems. The newspaper creates more 'fly ash' that can easily become airborn and get sucked into the cat area. Wood (and wax log wafers) create less 'fly ash' and more dusty or powedery ash.
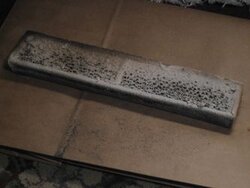
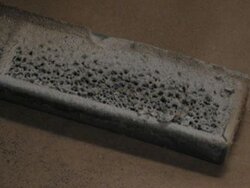
One of the things I don't like about the stovecombustors.com elements is the non-honeycomb design. My first thought when I saw one of them was, "Gee, looks like that thing will get clogged up quick." Elk and DavidV have used them with success, but they are both seasoned wood burners. I like the honeycomb design. That way, only fly ash will clog them. With non-honeycomb designs, any ash at all can clog them because any ash that gets onto one side stays on that side, it doesn't just blast on through like with the simpler see-through honeycomb design. This will likely fuel a debate I've been seeking to avoid, but there it is.
Cat engagement is no where near as long as you are recommending. Not even close.
That's a problem. Maybe your only problem. You should know soon enough if you try my above suggested firing technique. The initial light off is the most critical and the most difficult. Even watching my digital cat thermometer I've seen it take as long as an hour for things to reach a temperature that insures cat light off in less than a minute, which is my minimum goal. I can usually get my cat to light off in around 30 seconds, that's when I know it was truely hot enough and minimal fouling occurred. Once it lights off, it will clean itself up by burning off any creosote. But if you cover all the catalyst metals with creosote you might be lucky to get things hot enough to clean the cat via heat, and may need to remove and clean with vinegar.
Flue temps are being measured on the horizontal pipe apx. 12" away from the stove.
Again I ask, is it a surface (magnetic) thermometer or a probe (penetrates pipe) thermometer?
Are you suggesting the compressed air would damage the cat or the oil/water in the air would damage the cat?
Probably both. But I'm really just quoting what I've read from the cat manufacturers.
Your post reads that if I can clean the cat, that it is still usable.
Yes. It should be good as new once you get it clean somehow.
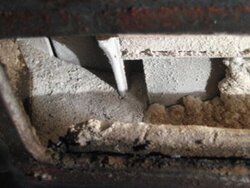
I don't recall seeing a tapped hole in the back. I take it the hole would be above the cat chamber. I know what you mean by having to drill cast iron.
I think on that stove the exhaust side of the cat is actually below the cat element, but I'm not sure. Maybe you can see it in the online manual at the VC website.
Can you guys recommend a cat thermometer? Anybody carry one in their store? If I have to drill the cat chamber, where should I locate the hole? This time, I'm going to make sure that dang thing is lit!
This thermometer was actually designed for your stove (and mine). I would be surprised if your back plate isn't pre-tapped for it, but I guess it depends on how old it is. I have one of these and love it, although I recommended one to Todd and he didn't seem to care that much for it. I also bought a cheap power supply with 9-volt adapter from Radio Shack. Otherwise it eats batteries nearly as fast as you can put them in there.
http://www.condar.com/9-85.shtml
")