Liner or NO Liner...THAT is the question

  • Active since 1995, Hearth.com is THE place on the internet for free information and advice about wood stoves, pellet stoves and other energy saving equipment.

    We strive to provide opinions, articles, discussions and history related to Hearth Products and in a more general sense, energy issues.

    We promote the EFFICIENT, RESPONSIBLE, CLEAN and SAFE use of all fuels, whether renewable or fossil.
Status
Not open for further replies.
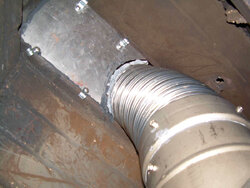
You can use an round to oval to get through the damper and then connect it to regular liner further up.

The thing is, you have to drop it from the top - of course - because one end won't go through the damper!

Or, you simply and carefully ovalize a couple feet on the bottom end and drop it down. If the chimney is tile lined and in good condition, insulation is probably optional - of course it improves the draft....but it can be difficult in a DIY - or even in many pro installs. For instance, it won't fit down many chimneys.

The cherry picker is a good idea - getting up and down is a big part of the job.
 
And watch those power lines coming into your house..... Cherry picker or not When you have a flex liner in hand and try to work it down the flue it tends to sway around a bit..... Especially if you do the ovalized bottom as you will have to pivot the liner around the flue to get it to poke through that damper correctly.
 
Hey, this is my first time posting, but I have just installed a Lopi insert into my existing fireplace. My damper plate assembly is almost exactly like yours, Jersey Joe. My good buddy is a master of inserts, and he had a hell of a time trying to get a 6" pipe through that damper opening. We ended up using a reciprocating saw to cut an arc into the back side of the damper assembly to fit the pipe. Yes, we destroyed the damper for fireplace use, but this house will never go without a stove again, so I was willing to do it. A block off plate is being designed as we speak, and all fits well.

As long as you plan to keep an insert in there, I say cut the damper.
 
GVA... I have underground utilities but thanks for the thought.

Fayman... If I have to I will cut the damper. I feel the same way about once the stove goes in...the stove is in!

I'd still like to hear what the experts say about the direct connect kit however.
 
Yeah, sounds good. Frankly, I'm brand new to this as well. I need to get a block off plate made to finish things up...Anyone have advice as to what gauge metal to use? Advice on exactly what material and insulation will work best is appreciated as well.

Good luck, JJ!
 
While you are getting ready for your reline job down load the installation instructions for the brand of liner you choose and read them, understand them and then follow them.

Next go get a permit and see what the inspector wants, have him come over before you install to check out the plan if he will, like elk they are here to keep you safe sound and answer questions.
 
Joe review these two threads this is from advice on actuall preforming what you planning. We ovalized the first 3' or 4'.. The way we did was to contlol the process
using common 1/6 pine boards we placed them both side of the liner say about 2' long We then used wood working bar clamps and compressed the liner gently till we achieved
enough ovalivation to fit thew thew damper We then hand streched it to bacsically back round to make to connection to the flue collar. One trick we cut a 2/4 and spun it around
inside the pipe to finalize making it round. Remember I detailed how to make a cone to make the liner insertion easier
Here are the two threads where Turner the burner, GVA, and I installed the liner.

https://www.hearth.com/econtent/index.php/forums/viewthread/4229/

https://www.hearth.com/econtent/index.php/forums/viewthread/4215/
 
I installed a liner in my chimbley when I put in my Jotul Oslo. Used a 4" grinder to open up the center of the damper front and back, and then fabricated a left and right side block off plate to go around each side of the SS liner. I've attached a picture, and there is a more detailed description of how I did it.

The first thing I did after putting the ladder against the chimney was secure the ladder to the chimney by threading the strap from a ratcheting band clamp through a rung, passing one end of the strap around the chimney, and securing it to the ratchet. That way you don't have to worry so much (still worry, though) about bouncing the ladder off of the chimney while futzing with the uncooperative ss liner.

Here's a picture of the block off plate.

JotulOslo
 

Attachments

  • BlockOff2.jpg
    BlockOff2.jpg
    19.7 KB · Views: 244
  • BlockOff1.jpg
    BlockOff1.jpg
    74 KB · Views: 247
JJ, Thanks for the link, it's exactly what I need. But, I think I can cut the pieces myself for much less than $76 and achieve the same thing. My bigger concern is using the correct gauge material. Are there any standards for a block off plate?

Thanks for everyone's help!
 
Niiiiiice! Thanks BB! Easy job indeed. I was told earlier tonight that I don't need a block off plate, but through some research here I've found that there are some huge advantages to doing so. Consider it done!
 
fayman said:
Niiiiiice! Thanks BB! Easy job indeed. I was told earlier tonight that I don't need a block off plate, but through some research here I've found that there are some huge advantages to doing so. Consider it done!

Happy now Elk?
 
Status
Not open for further replies.