
It is blowing over it, but where its sitting it doesn't get much of a breeze there. I figure the thing is only accurate to about 50F anyway and that's what I've seen comparing it to my IR gun. I situated it so it sits in front of the flue and the air is blown around that, and actually even with the blower going full bore I've not seen it get outside of 50F off. (Got worried one time when I was running ~700F according to it and the blower was on high... Never saw any glowing and IR said it was closer to 750F, didn't seem to bother it in the slightest.)
Secondary air modification complete, here's hoping I smoke less!
- Thread starter HaTaX
- Start date
-
Active since 1995, Hearth.com is THE place on the internet for free information and advice about wood stoves, pellet stoves and other energy saving equipment.
We strive to provide opinions, articles, discussions and history related to Hearth Products and in a more general sense, energy issues.
We promote the EFFICIENT, RESPONSIBLE, CLEAN and SAFE use of all fuels, whether renewable or fossil.
You are using an out of date browser. It may not display this or other websites correctly.
You should upgrade or use an alternative browser.
You should upgrade or use an alternative browser.
- Status
- Not open for further replies.
I'm surprised as well that it works as well as it does, and it sounds funny but the primary reason I did this was to reduce the smoke output from it. After cleaning the chimney out a few times and trying to keep it clean with hot burns, it seemed like no matter my burn habits on the stove I was ending up with a mess in the smoke chamber. Not having a liner and it being installed in a slammer fashion I thought it would be much more difficult to manage, and I will say that on a cold start I need to leave just the primaries open for quite a bit. I think most people start to damp down the air 20-30 minutes after getting the fire going, I have to wait about an hour from a dead cold start before the chimney has a healthy enough draw to maintain a lower burn. Once it's going it's no problem and I can chuck some logs in every so often and I don't have to fiddle with air settings or anything, if it has burned down pretty far I just open the air up for 10-20 minutes and all is good.
One other reason I did it is that I had read most people saw a reduction in stack temps after installing secondary air. I figured with a reduction in flue temps it would reduce the likely hood of a chimney fire, not eliminate cleanings but just that it would be a little bit safer. That's one of the reasons I tried to block access to the flue with my baffles and firebricks, I want to make sure that fire stays inside the box, flames leaping towards the damper isn't something I want to think about.")
I've noticed a fuel change only in how often I reload, I'm doing it far less now. I should keep better track, but truthfully I did the mod because of the reasons listed above and the lower wood usage is just a bonus at this point. It's not a huge difference, but the burn times have been extended by quite a bit so it must be having an effect.
An example of it's change though, last night I stuffed about 5 bricks and a log in there (about 1/3 of the capacity of the box) and brought the air down to 1/2 open at about 1am. I just put a few more bricks in there 30 minutes ago and the large log I put in at 1am was still mostly intact in there and well into the coaling process. Temps were 300 still and the added fuel took off in the amount of time it took for me to get a coffee.
I have never gotten burn times like this out of this stove, normally 6-8 hours was the max you could leave it if you didn't want to work to get it going again as you wouldn't have many coals left. Also it used to leave quite a few 2-3" coal chunks that didn't get burned entirely and now it's burning down to almost complete ash. I'm guessing the extra air from the secondary supply is helping the coals to burn down, it's just nice to see the coals burn themselves down at the end of the cycle.
One other reason I did it is that I had read most people saw a reduction in stack temps after installing secondary air. I figured with a reduction in flue temps it would reduce the likely hood of a chimney fire, not eliminate cleanings but just that it would be a little bit safer. That's one of the reasons I tried to block access to the flue with my baffles and firebricks, I want to make sure that fire stays inside the box, flames leaping towards the damper isn't something I want to think about.
I've noticed a fuel change only in how often I reload, I'm doing it far less now. I should keep better track, but truthfully I did the mod because of the reasons listed above and the lower wood usage is just a bonus at this point. It's not a huge difference, but the burn times have been extended by quite a bit so it must be having an effect.
An example of it's change though, last night I stuffed about 5 bricks and a log in there (about 1/3 of the capacity of the box) and brought the air down to 1/2 open at about 1am. I just put a few more bricks in there 30 minutes ago and the large log I put in at 1am was still mostly intact in there and well into the coaling process. Temps were 300 still and the added fuel took off in the amount of time it took for me to get a coffee.
I have never gotten burn times like this out of this stove, normally 6-8 hours was the max you could leave it if you didn't want to work to get it going again as you wouldn't have many coals left. Also it used to leave quite a few 2-3" coal chunks that didn't get burned entirely and now it's burning down to almost complete ash. I'm guessing the extra air from the secondary supply is helping the coals to burn down, it's just nice to see the coals burn themselves down at the end of the cycle.
I'm wondering your climate. What state are you in?I'm surprised as well that it works as well as it does, and it sounds funny but the primary reason I did this was to reduce the smoke output from it. After cleaning the chimney out a few times and trying to keep it clean with hot burns, it seemed like no matter my burn habits on the stove I was ending up with a mess in the smoke chamber. Not having a liner and it being installed in a slammer fashion I thought it would be much more difficult to manage, and I will say that on a cold start I need to leave just the primaries open for quite a bit. I think most people start to damp down the air 20-30 minutes after getting the fire going, I have to wait about an hour from a dead cold start before the chimney has a healthy enough draw to maintain a lower burn. Once it's going it's no problem and I can chuck some logs in every so often and I don't have to fiddle with air settings or anything, if it has burned down pretty far I just open the air up for 10-20 minutes and all is good.
One other reason I did it is that I had read most people saw a reduction in stack temps after installing secondary air. I figured with a reduction in flue temps it would reduce the likely hood of a chimney fire, not eliminate cleanings but just that it would be a little bit safer. That's one of the reasons I tried to block access to the flue with my baffles and firebricks, I want to make sure that fire stays inside the box, flames leaping towards the damper isn't something I want to think about.
I've noticed a fuel change only in how often I reload, I'm doing it far less now. I should keep better track, but truthfully I did the mod because of the reasons listed above and the lower wood usage is just a bonus at this point. It's not a huge difference, but the burn times have been extended by quite a bit so it must be having an effect.
An example of it's change though, last night I stuffed about 5 bricks and a log in there (about 1/3 of the capacity of the box) and brought the air down to 1/2 open at about 1am. I just put a few more bricks in there 30 minutes ago and the large log I put in at 1am was still mostly intact in there and well into the coaling process. Temps were 300 still and the added fuel took off in the amount of time it took for me to get a coffee.
I have never gotten burn times like this out of this stove, normally 6-8 hours was the max you could leave it if you didn't want to work to get it going again as you wouldn't have many coals left. Also it used to leave quite a few 2-3" coal chunks that didn't get burned entirely and now it's burning down to almost complete ash. I'm guessing the extra air from the secondary supply is helping the coals to burn down, it's just nice to see the coals burn themselves down at the end of the cycle.
I'm in Minnesota and lately the weather has been really mild, yesterday we touched the 40s for a few hours. Running in the shoulder season has always been tough for me, damp it down too far and the chimney is a complete mess after just a few weeks, otherwise with a cleaner burn the thing heats us out of the house. I'm hoping the liner will help out a bit with that, and I think I've figured out how to get a slow burn out of it now with the secondaries, so maybe this spring I'll be able to keep running it longer.
Really liking those bricks, about 80% of the fuel burned lately has been those and while they can be a pain if the stove gets cold, they burn completely and leave behind little ash. Before all this (secondaries), I was removing ash every other day or every day depending on how I was burning. I haven't removed any ash from it since I started it cold earlier this week, might be from the better burn during coaling, the bricks producing less ash, most likely a combination of the two.
Also, it hasn't ALL been daises and roses, now I need to be much more mindful of how I open the doors to keep smoke from rolling out and I never had to think about that before. There used to be a space in the back corners where smoke could go around the baffle plate, and that space was covered with fire bricks to force the smoke to travel to the front and then towards the flue in the back. The top baffle has a 8" or so space that's open in front between it and the glass, with that added baffle bringing the smoke shelf out an additional 6". Not a huge deal, but a few times when I wasn't thinking about it I released a cloud into the house.
The last two days here have been a bit more chilly and I've been able to open it up a little more, temps between 5-20F outside so it gave me a chance to run the stove around 650 yesterday without overheating the house. Upstairs stayed between 70-72, nothing but some ceiling fans and the blower to move the air around the house was needed. Sometimes I kick the low speed recirculating fan on the furnace on, but only when it's really cold outside, and there is an air return into the furnace in the same room as the stove about 2' down from the ceiling.
Another non-eventful 10 hour burn last night, loaded it up before 11PM and let it rip. This was a pretty full load as I knew I'd be sleeping as late as I could today, previously the longest I could let it go was about 8 hours if I wanted to start the next load off the coals. After 10 hours, the large oak split in the back still had its shape and was basically a huge coal. I think I put in about 6 of the bricks, 1 large split in back, and a few medium splits to fill in the gaps up front. It wasn't as packed as I could get it, but was much fuller then I have been loading it lately, everything with within the "firebrick" zone.
So I'm still amazed by the burn times I'm getting now, even if it is only 2-3 hours extra that's still 20% roughly and a great result for the time and $$ invested into the project. I also like that the coal burn down seems to be much better now, if I leave it alone I'm left with quarter sized hot coals underneath the ashes, before I would find about a half dozen larger coal pieces about half the size of a man's fist. (And those were not hot, just unburnt coals) A bonus that goes along with the more complete burns is that I'm not emptying ash nearly as often as I was, actually haven't emptied it at all this week and I've got about 1.5" of white ash in the bottom of the stove. Probably need to empty it this weekend, but it hasn't been causing any airflow issues so I've just left it as I know it does help the burning process.
Something I don't like, my glass gets much dirtier then before. Could be because I'm choking it down so far, making a lot more smoke than previously (to be burned of course), or just because the airflow dynamics in the box are considerably different now. The baffle plate that I added brings the smoke further forward in the box before heading towards the flue outlet, that probably doesn't help either. Stock air deflectors seemed like a poor attempt at an airwash anyway, they're just bent in a manner to encourage the air to move across the glass. (You can see them in my first post in this thread)
I've been thinking about making an airwash system for it now... Basically take the deflector plates off the primary draft and replace them with a steel box that can be fastened using the existing bolt that connects to the deflector plate. So this steel box would pick up the inlet air where it normally comes in, and I would channel it to the top front of the firebox to a square channel with holes pointed downward across the glass. I could use black pipe again, but I'm not sure that would be any easier then the square stock and I'll need to fabricate a pick up box anyway. Not completely sold on doing this as I think I've got something good going currently and I don't want to mess it up... The glass somewhat cleans itself in a really hot burn, but it's also far away from the fire most of the time so it's not getting the same intense heat, the top half of the glass is always pretty grimy after 2-3 burns.
Anyone added or modified an airwash system on their stove? Looking for some pointers and things to watch out for... This air channel would need to be considerably larger then the secondary supply, but as it is I never open the draft knobs more than 3 turns open and they will open up to 10+ turns if I wanted. (Never opened them that far for a length of time, I fear what I would end up with for temps with a full load in there...) Honestly the dirty glass doesn't bother me too much, but it would be nice to clean the glass once a week and still be able to see the entire fire. I just don't want to end up with a stubborn stove that has to be babied until it's going full bore.
I'll take some pictures of what a load up at night looks like and what I'm left with in the morning in the next few days, they always tell the story better than my TLDR posts.
Ditto on just about everything you observed! Funny I find myself saying 'yep - noticed that', 'yep saw that too', 'yep, me too' every time I read your posts after adding the air. On the glass I've noticed my old smoke dragon, the smoke would basically go right up the stack, while the new baffle/tubes almost seem to set up a 'rolling air current' where the smoke goes up, hits the baffle, gets burned, shoots forward, hits the glass, some goes up the stack, some goes down the glass and hits the base of the fire again. This doesn't happen all the time, but definitely see it on occasion. Sometimes I notice a bit of smoke on the glass from this, but nothing a hot burn won't take care of.
Adding an air wash is even easier than the secondaries, IMHO. You just need a bar above the glass to distribute air, and you can grab air right from the front of the stove. You actually want cool air so it sinks down and 'washes' the glass.
Adding an air wash is even easier than the secondaries, IMHO. You just need a bar above the glass to distribute air, and you can grab air right from the front of the stove. You actually want cool air so it sinks down and 'washes' the glass.
It's nice to hear some affirmation that I'm not alone in what I've experienced! Honestly I don't have much of a baseline as this is the first stove I've "owned", but have run many others over the years here and there and I only became a homeowner about 9 years ago and this one came with the place. At first I thought I was being optimistic about my results because I had put some time into it and I didn't want to see failure, now I'm feeling like I got the placebo and that I shouldn't be able to get such a change in burn behavior from a 30 year old stove.
I did end up moving the baffle plate in the front a little bit, basically I created a little tunnel in the middle and placed the metal baffle on top instead of being on the bottom. Here's two pictures that show a fairly cold start where you can see the 'tunnel'. There's 3 holes on the top of each secondary tube and one of those is centered to provide air to the tunnel.
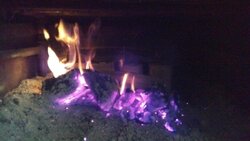
Originally I moved it around because I thought having the brick facing the intense portion of the fire was best, but in the end that tunnel ends up being far more functional then I had anticipated. As the fire gets going that is the first place I see secondary action, and as the flames get larger they eventually ignite the gases that are up in the very top of the firebox resting near the top plate. If I get down and look at the ceiling of the firebox it is covered in a blue ghost flame early on in the burn when there's a lot of smoke and the temps are getting hot enough for secondary ignition.
On the very front tube I tried to place them roughly in a ^ formation so that in the middle the air is pointing slightly forward and down and at the sides mostly pointing downward. This ends up creating a curtain of flames that roll around the end of the baffle and then back towards the flue. Not sure if the positioning of the holes is really that important, but I was trying to create an airflow that would encourage the smoke to be pulled back into the fire.
Hmmm, don't tell me that the airwash is easier or I'll be busting out the welder today! I'd reuse the draft controls on the box and could make it so I could go back to stock easily enough. Just need a "capture box" for the inside of the stove, and then channel it above the doors. It's nice that the firebox is big enough to make these mods without seriously restricting the size load I can fit in there.
Seriously debating replacing the stove now, one thing I really like is that this thing can throw massive amounts of heat if needed and that it sits out so far onto the hearth for no electric power heating situations. (Don't get them often, but it is important to me living in this state) We had -15 to -20F nights about a month ago and I was able to keep the upstairs around 68-70, entire heating area is about 2500sq ft with it equally split upstairs and downstairs. If I had pushed it harder it could probably get even warmer, but it uses quite a bit of fuel beyond 2 turns open on the primary air.
I did end up moving the baffle plate in the front a little bit, basically I created a little tunnel in the middle and placed the metal baffle on top instead of being on the bottom. Here's two pictures that show a fairly cold start where you can see the 'tunnel'. There's 3 holes on the top of each secondary tube and one of those is centered to provide air to the tunnel.
Originally I moved it around because I thought having the brick facing the intense portion of the fire was best, but in the end that tunnel ends up being far more functional then I had anticipated. As the fire gets going that is the first place I see secondary action, and as the flames get larger they eventually ignite the gases that are up in the very top of the firebox resting near the top plate. If I get down and look at the ceiling of the firebox it is covered in a blue ghost flame early on in the burn when there's a lot of smoke and the temps are getting hot enough for secondary ignition.
On the very front tube I tried to place them roughly in a ^ formation so that in the middle the air is pointing slightly forward and down and at the sides mostly pointing downward. This ends up creating a curtain of flames that roll around the end of the baffle and then back towards the flue. Not sure if the positioning of the holes is really that important, but I was trying to create an airflow that would encourage the smoke to be pulled back into the fire.
Hmmm, don't tell me that the airwash is easier or I'll be busting out the welder today!
I'd reuse the draft controls on the box and could make it so I could go back to stock easily enough. Just need a "capture box" for the inside of the stove, and then channel it above the doors. It's nice that the firebox is big enough to make these mods without seriously restricting the size load I can fit in there.Seriously debating replacing the stove now, one thing I really like is that this thing can throw massive amounts of heat if needed and that it sits out so far onto the hearth for no electric power heating situations. (Don't get them often, but it is important to me living in this state) We had -15 to -20F nights about a month ago and I was able to keep the upstairs around 68-70, entire heating area is about 2500sq ft with it equally split upstairs and downstairs. If I had pushed it harder it could probably get even warmer, but it uses quite a bit of fuel beyond 2 turns open on the primary air.
Attachments
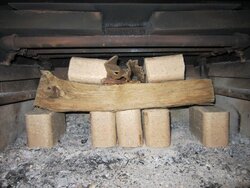
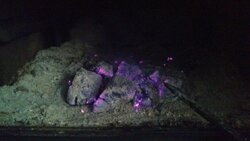
Okay, here's a few pictures of my loading at 12:30AM last night (followed by pumping about 6oz of ACS all over the firebox while avoiding the secondary tubes). Then what was left when I went to get it started a little after 10AM today, the patch of coals is about 8-10" in diameter and the stove top was about 250F.
1 or 2 small splits brings the heat back up quick and the secondaries come to life within 15-20 minutes after loading it in the AM. I'm noticing that the top of the stove doesn't get nearly as hot in the coaling phase, but the area where the burn actually happens is still very hot. (tubes read 524F when I opened the doors)
The load at 12:30AM wasn't huge, there were 8 or so bricks in there with one split in the front to aid in the take off. Temps last night were 5-10F so I had it opened a little more then the last few days. (3/4 turns open vs 1/2 on the primary drafts)
Not bad for a ~10 hour burn out of an old smoke dragon! Before the secondaries most I could scrape out of it was about 8 hours and many times I had cold coals in the box after a night burn. Now everything is white ash, and there is plenty of hot coals to make the restart easier.
Now that I'm getting used to how it runs, I find myself tending to it far less. I think I was just being OCD with how it worked and behaved, checking on it every hour or so...
Attachments

sesmith
Feeling the Heat
Nice job! You did a similar design to what I did a few years ago on my older stove. I can tell you that the black pipe will be fine. Neat to see the pics through the glass front as mine doesn't have any viewing to see the results. I had similar results as you do...less smoke, better performance, and less fuel use.
If you REALLY want to make the smoke go away...I later added an add-on cat converter box to the top of the stove with a steelcat in it. Works great. Between that and the secondaries, there really is no smoke. I can also dial it way down in the shoulder season weather and get 24 hr. burns out of it at a very low rate...cat working most of the burn.
We don't use our stove much anymore since we replaced our heating system with a GSHP, but it's nice to visit this forum now and then and see people improving these old stoves still.
Temps are supposed to be flirting with single digits tonight so I thought I'd fire it up for the weekend. I dumped a little more ACS powder down as well so I thought a good hot fire would be helpful as well.
I thought about building a block off plate for the top portion that could accept a cat, but it seemed like a lot of work to get a bypass in there and everything else. Unfortunately I don't have the space above it to really utilize a cat well other then using it to keep the flue clean... Get this, my neighbors actually have said they miss the wood smell as it's much harder to smell it now. (And when really rolling along the exhaust takes on a very odd 'vaporized' wood smell)
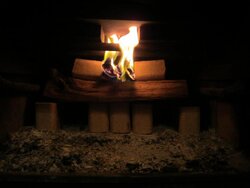
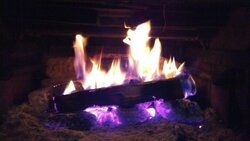
Took off nice and easy with the basement door cracked, went about 4 hours on the small load and then I loaded it up with the bricks. 45 minutes later temps are at 800F on the top and here's a picture of the fire at those temps. Totally worth the modification just for the hypnotizing flame show. :D
I thought about building a block off plate for the top portion that could accept a cat, but it seemed like a lot of work to get a bypass in there and everything else. Unfortunately I don't have the space above it to really utilize a cat well other then using it to keep the flue clean... Get this, my neighbors actually have said they miss the wood smell as it's much harder to smell it now. (And when really rolling along the exhaust takes on a very odd 'vaporized' wood smell)
Took off nice and easy with the basement door cracked, went about 4 hours on the small load and then I loaded it up with the bricks. 45 minutes later temps are at 800F on the top and here's a picture of the fire at those temps. Totally worth the modification just for the hypnotizing flame show. :D
Attachments
PapaDave
Minister of Fire
Yeah, that part was a little tricky as I decided early on I didn't want to mess around with having a bunch of unions on there, they'd add quite a bit of weight that may encourage sagging and also it would make it harder to get a plate to fit flush over the burn tubes.
I tightened one side's close nipple into the "T" as tightly as possible, then twisted the other side around until it was snugged down as far as it would go. Then I covered the threads of the not connected nipple in furnace cement and threaded it into the "T" by backing it out of the other one. I kept a strap between the two burner tubes while I backed it out of one set of threads and into the others to make sure it stayed as close & tight as possible. After that was all done I used some additional cement to seal both ends of threads on that particular nipple. For the furthest back burn tube (I'll call it #1 for now, #3 would be the front most tube) the left hand side nipple was cemented, the nipple between #2 & #3 is cemented on the right side.
If you look at the first page pictures "InsideLeft" & "InsideRight" you can see the cement fairly easily, it's somewhat of a hack job, but it's held up just fine so far. I'm not to worried about it leaking air as it should follow the path of least resistance, and there's holes no further then an inch or two away from that point.
PapaDave
Minister of Fire
So, the left and right side "manifolds" could be put together, then you put the cross over into one side, and as you loosened from the first side, it would thread into the other.
I think I got it. I was wracking my feeble brain. I've done gas line plenty of times but never like that.
I think I got it. I was wracking my feeble brain. I've done gas line plenty of times but never like that.
Basically I started at the 90 degree elbow where the rack starts in the back of the stove and assembled it rung by rung outward until I got to the 3rd and last rung using that "back out" method on two of the connections out of all of them in the entire thing.
On another note, I wanted to get a slab of ceramic board or blanket to go across the entire top of the ladder. Looking around online I found a few places that had the board for about $30-50 in various densities. While I was out at Menards today cleaning out the last of the Gren-Heat bricks I saw they had the 25lb pail of castable refractory cement on clearance for $17, so I picked it up. Looks like its good to 2400F and I should be able to make a little cardboard cast of what I need and make up a slab or two. The biggest problem I have is that there's an area where I've only got about 1/4" of an inch clearance between the original welded in smoke baffle and the flat plane on the secondary ladder. I'll probably cast two different sections if it ends up being too thin, but at least with the castable stuff I can work around that clearance. Hopefully that will help keep the secondary temps up and it shouldn't take more than an hour or so of my time.
Still waiting for the liner to show up... I'm holding off on burning so I've got enough fuel to test out the new liner (hopefully by the end of the month).
EDIT: Just a thought on the refractory... I've read that it should be reinforced using stainless steel needles, but those are a pain to get shipped in a small quantity with reasonable shipping. I was thinking of getting some small stainless nails in place of them, if they're small enough think they would serve the same or similar purpose as the needles? I would try to go with the thinnest nails possible as the needles look more like the shards left behind from drilling.
For my baffle, I found a guy on ebay selling the faux brick lining kits for gas fireplaces. These are a light weight insulating ceramic board about 7/16" thick which really keeps the heat in (as you can see in my [url=https://www.hearth.com/talk/threads/burnin-orange-tonight.106714/]Burning Orange[/URL] post. He was doing a closeout at about $15 per kit, I don't know if similar deals are still around.
For the refractory, if you want SS reinforcement, you might hit the kitchen aisle and get a couple of stainless steel Brillo pads. Unwind them and chop up with a decent pair of utility shears. Seems like that would almost be ready-made reinforcing fibers. The down side is, stainless steel will conduct heat, so it will reduce the insulating properties of the baffle. I was thinking almost the opposite...mix in some vermiculite to increase the insulating properties. Ideally, this is an insulating piece it doesn't need much structural strength.
For the refractory, if you want SS reinforcement, you might hit the kitchen aisle and get a couple of stainless steel Brillo pads. Unwind them and chop up with a decent pair of utility shears. Seems like that would almost be ready-made reinforcing fibers. The down side is, stainless steel will conduct heat, so it will reduce the insulating properties of the baffle. I was thinking almost the opposite...mix in some vermiculite to increase the insulating properties. Ideally, this is an insulating piece it doesn't need much structural strength.
I've got a 1984 NightWatch made by Minnesota Stove Works (Company is defunct now, was around over 120 years prior to '84), and it's an old smoke dragon style insert. The only saving grace it had was a smoke shelf over the flue where some nice secondary burn would occur occasionally. I think where the primary air came in, it traveled along the channels for the firebrick to the back and that's why I would see it now and then back there prior to the mod.
I started this about 2 weeks ago where I setup a ladder style air supply and originally had the secondary air coming through the primary draft opening. This was just to see how it did as a proof of concept, and it worked quite well except I didn't have good control over the burn overall. Starting from cold was a bit of a fight, and once it was going it was difficult to throttle back. Basically you had to somewhat babysit it and I'm going to assume it was because of how much the primary draft was affected by my modification. If you'd like to see some pictures of how the secondary air worked in my proof of concept setup, there are some pictures in this thread: https://www.hearth.com/talk/threads...ve-slammer-install-looking-for-advice.103780/
To finalize it, I drilled a 7/8" hole just above and to the side of the primary controls, and used 2 x 7/8" SAE washers to get the required thickness between the pipe fittings. The outside washer and elbow are sealed with furnace cement, and from there it goes into a 45 degree street elbow in the firebox.
During this process I realized the left and right side are not symmetrical and it makes sense to me now, many of these units were shipped with non-glass front doors and the air controls were on the doors in that case. You can see where one firebrick is removed from each side, and they just knocked a hole in there and welded a section of flat steel to hold the draft and air plate on. Heck, the air plates themselves are even very different from right to left side, makes me wonder if it was just spare parts to put it together or if they were going for a swirl effect or something.
Anyway, the rest of the pipe is 1/2" black pipe and the air holes are 3/32" and 5/32" depending on where they're at. I figure if I've got too many, I can just fill them with a little weld in there but I doubt I've got too few. Spacing of holes are 1" on center, and each section of ladder is 18.5" long, so there's about 54 holes total. I also drilled a few on the back side of the pipe that is facing upwards on the back 2 pipes, these are aimed at the existing smoke shelf to provide some direct air in that area.
Once the cement sets up I'll fire this beast up tomorrow and see how it does! I'm kind of anxious to see how it performs with a proper air flow and I'm hoping I'll be able to regulate the burn a little better now.
The second week of February I'll be installing a full chimney liner for this as well, currently it's a slammer install and I know that needs to be resolved ASAP. Hoping that I'll be able to get a little more heat from it after that is completed. Eventually this thing will be replaced with a Blaze King Princess Insert, most likely before the next winter season. We'll see how it does with it's new pipes before making a decision.
I like the idea!
I also did much the same to my wood furnace, by installing secondary burn tubes in it with black pipe. Mine comes in the front of the stove (1") and goes all the way to the back wall, up to the baffle I installed and back to the front, right down the center (just one for experimenting)
I usually heat the flue temp to 250 degrees, then shut off the primary air completely, which shows the secondary tubes burning like a gas flame coming out of them. The stack temps drops a few degrees, but the fire stays good and hot. I now have NO smoke, so no creosode to deal with. I get longer burn times and a lot less ash to cleanout.
My summer project will be to completely rebuild this unit, with all new metal where needed, now baffle with lava rock or fire brick on it to retain the heat (lava rock holds heat for a long time and works much the same as fire brick - cheaper too!) The I'm making the secondary intake out of 2" square tubing, entering in the back of the stove, up the back wall and along the sides, just under the baffle. I'm going to go with 3 tubes across to burn up the smoke, much like most EPA stoves I've seen. My fire box is lined with fire brick to hold the heat, and I should have a completely smoke free stove next season.
Being from Minnesota, there's been a several nights -0, and it's amazing how warm a small flame can heat the house so warm by just burning the smoke (which burns hotter than the fire below it) and no smoke coming out of the chimney at all! A hell of a lot cheaper than buying a new stove too! Spanky
- Status
- Not open for further replies.
Similar threads
- Replies
- 4
- Views
- 392
- Replies
- 9
- Views
- 969
- Replies
- 2
- Views
- 776