Getting ready to install a Jotul F 600 CB with chimney liner

  • Active since 1995, Hearth.com is THE place on the internet for free information and advice about wood stoves, pellet stoves and other energy saving equipment.

    We strive to provide opinions, articles, discussions and history related to Hearth Products and in a more general sense, energy issues.

    We promote the EFFICIENT, RESPONSIBLE, CLEAN and SAFE use of all fuels, whether renewable or fossil.
Status
Not open for further replies.

Nick Mystic

Minister of Fire
Feb 12, 2013
1,141
Western North Carolina
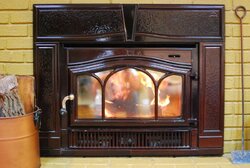
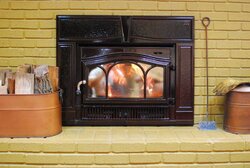
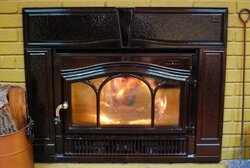
I've been heating with wood for the past 26 years ever since moving to Western North Carolina from Florida in 1987. The first 15 years I used an old Birmingham wood stove (Atlanta Stove Works Woodsman model). Then when my wife and I moved to a new home there was a Woodstock Classic in the lower level of the house and an old dragon breather insert installed slammer style in the main living room's large fireplace. Here is a photo of that insert:

IMG_0180.JPG

I recently decided to replace this insert and do a proper installation with a flexible ss liner inside the 13" x 18" tile flue liner. At first we were thinking of another insert and liked the Jotul C 550 Rockland CB. While doing online research I discovered hearth.com and after reading hundreds of posts I changed my mind and decided to go with a free standing stove set on the hearth extension in front of the fireplace. We decided to go with the Jotul F 600 CB since we have about 2400 sq. ft. of home to heat (1500 on the main level and 900 on the lower level where the Woodstock Classic is located).

I borrowed a friend's pickup truck and hauled my new stove home yesterday and with the help of a friend we managed to get it off the truck and onto a furniture dolly and then into the house. We had to slide the pallet and stove down a ramp off the truck and then up another ramp to climb two steps into our back screened room. Once inside that room we managed to get the stove off the pallet and onto the dolly with blocking to raise it up the nine inches I need to slide onto my raised hearth.

Once it was securely tied down to the dolly we moved it outside to a deck walkway over to the sliding glass doors of the living room. Along the way we had to again use a ramp to go up one step. Here is a photo of the stove and dolly finally sitting in my living room waiting for me to install it.

IMG_0177.JPG

As you can see, we chose the brown enamel finish, which should go very nicely with our brickwork on the chimney. I'll keep everyone posted on my installation, which is going to have to wait at least a few days for some good weather.
 
Yes, the Jotul F 600 configured with the rear flue opening requires about 30" opening and my fireplace opening is 33" tall. The only unknown for me is removing my chimney flue damper assembly and clearing enough space to run the 6" flex liner. I've looked down my chimney and it appears that my flue opening is a rectangle about 12" x 4". I can't see well enough up the flue opening in my present insert to determine how the flue damper is installed. I'm guessing I'll probably have to remove some brick if the assembly doesn't leave a large enough opening in the top of the fireplace. I'm waiting for a few days of nice dry weather to get up on the roof to clean my chimney and then I'll remove my old insert and see what things look like.
 
That is a nice stove! One of my favorites.
After you get the damper plate removed, use a sawzall or a cutting wheel on an angle grinder to cut the damper frame out. You will only need to cut enough out to fit the liner through. I usually end up cutting out the frame on the backside of the damper. After the liner is down, either make a block-off plate or stuff the damper frame with ceramic wool insulation to prevent heat loss up the flue.
 
Hi Nick, Your new stove really caught my eye, just today i went to Amish country looking for a new stove for my upstairs install and I seen the Alderlea T5 classic in majolica brown porcelain - sweet.
They even had it burning on display. The extra cost seems worth it to me, no fading, no re painting, easy to clean lifetime guarantee on finish, and like your install I have lots of browns in my living room.
I like how the first lair of cream color shows through the edges of the darker brown 2nd coat.
From the looks of your pic the Jotul is like that also. Sharp looking stove there Guy, and thats gonna look great on that off centered hearth. Do post some pics of this installed.

Todd 2
 
Hi webby 3650,
I've read a ton of posts here at the hearth site, so I am planning on the block-off plate where my liner comes through my fireplace opening. Regarding the insulation, I am thinking of using plain fiberglass batting in that area and also some at the very top of the chimney just below my top block-off plate. I read about the preferred Roxul insulation, but I would have to order it and the smallest quantity I can find would run me around $50. I already have a roll of fiberglass insulation left over from a building project and plan to remove the paper backing and use it. I've read about people doing this with success here at the site. The stove store where I bought my Jotul told me that's what they use to seal around the flex pipes and have never had a problem.
 
Todd 2,
My wife and I both really liked the look of the majolica brown enamel when we saw it on inserts and stoves. At first, the extra $400 or so seemed an extravagance, but since this is likely to be the last stove I ever buy (I'll be 62 in April) we figured we'd go for it. I also factored in the points you mentioned about it lasting the life of the stove with no repainting needed. In the past I've found that I needed to repaint my cast iron stoves every few years if I wanted to keep them looking good and then had to deal with the fumes for several fires afterward.
 
  • Like
Reactions: Todd 2
That 600 is a monster heater. Enjoy!
 
Spend the money on the Roxul. Fiberglass has a significantly lower melting point. Possibly you can split the bale with a neighbor/friend?
 
I've read about people doing this with success here at the site. The stove store where I bought my Jotul told me that's what they use to seal around the flex pipes and have never had a problem
Some do use it, but it's not recommended. The store that said they have never had any problems most likely would never know if they had a problem or not. If there was a problem it would be a chimney sweep that finds the mess years down the road and the store wouldn't even know about it.
 
Yes, I plan to leave the fireplace open. I was thinking along the lines of what you mentioned regarding painting it with the high temperature paint. In fact, I have a can of black stove paint sitting in my shop I thought I'd use if it is still good. First, when I pull the insert to clean the chimney, I'll scope the brick out and attempt to clean it. If it cleans up nice I might leave it natural, but if I just end up making a black mess of things then I'll do the paint option.
 
That's the exact stove I am planning on for the other end of my house, can't wait to play with it. Keep us posted and good luck!
 
Welcome Nick. Thanks for posting the before shots. It looks like a really nice setting for the F600. Keep us posted.
 
Congrats on the enamel F600CB it's a beauty! Welcome to the forum Nick and good luck on the install.. I look forward to the pics ;)

Ray
 
Jotul's porcelain enamel brown majolica doesn't seem to photograph well. In person it is gorgeous.
 
  • Like
Reactions: Todd 2
That is a beautiful stove! Good luck, and be sure to post pictures of the install. Wish I had room for a free stander, I have the insert in that color. Be careful, it does chip. Motivated me to take some pictures, can't quite appreciate the beautiful secondaries in still shots.
 

Attachments

  • DSC_1907.JPG
    DSC_1907.JPG
    81.1 KB · Views: 516
  • DSC_1908.JPG
    DSC_1908.JPG
    88.1 KB · Views: 557
  • DSC_1916.JPG
    DSC_1916.JPG
    76 KB · Views: 411
That is a beautiful stove! Good luck, and be sure to post pictures of the install. Wish I had room for a free stander, I have the insert in that color. Be careful, it does chip. Motivated me to take some pictures, can't quite appreciate the beautiful secondaries in still shots.
I'm more of a free stander fan but your majolica insert is sharp looking I must admit, the matching surround really sets it off nice.

Todd2
 
Status
Not open for further replies.