
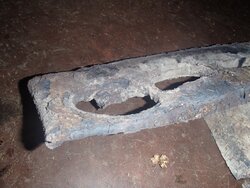
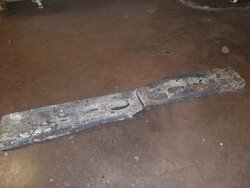
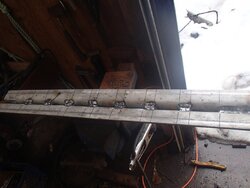
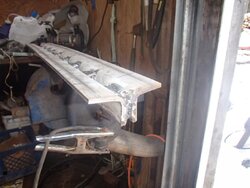
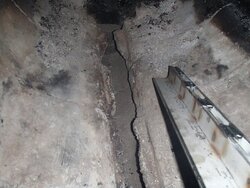
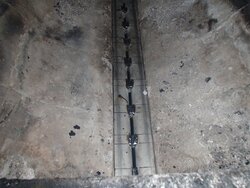
Last year I made some new nozzles from 4" X 1" steel flatbar and cut slots in them similar to the original refractory brick nozzles, after 1 year (10 cord ) of use they have deteriorated very badly, I have included some pics. Part of one of them has been eroded down to approx 1/4" and one of the nozzles originally 3/8" wide is now approx 1 1/2". and they are warped as well. I made a new one today from stainless. I used 2 pieces of 3" X 1/4" flat bar and bent it 90 degrees and welded 3/8" flatbar in between as spacers to form the nozzles, it is all one piece. Materials and labor (bending) was $90.00 and I did the welding. I will report back as to how they hold up. As you can see in one of the pictures my ledge on the main refractory is deteriorating a lot as well.
Woodgun nozzle experiments
- Thread starter mark123
- Start date
-
Active since 1995, Hearth.com is THE place on the internet for free information and advice about wood stoves, pellet stoves and other energy saving equipment.
We strive to provide opinions, articles, discussions and history related to Hearth Products and in a more general sense, energy issues.
We promote the EFFICIENT, RESPONSIBLE, CLEAN and SAFE use of all fuels, whether renewable or fossil.
You are using an out of date browser. It may not display this or other websites correctly.
You should upgrade or use an alternative browser.
You should upgrade or use an alternative browser.
- Status
- Not open for further replies.
711mhw
Feeling the Heat
Good to hear form you, I had wondered how you made out with your home made steel. Do you think the nozzle shelf deterioated due to the steel warping & wearing away? AHS now makes a steel nozzle, it "bridges" over the shelf and I think it was designed for this situation.
I would have to say that most of the shelves deterioration was from me throwing in heavy pieces of wood when I had the brick nozzles.Once the nozzle bricks cracked and I threw more wood in the impact was focused on very small areas of the shelf and then it broke, I feel the one I made now will help in this regard by spreading out any impact over a much larger area. Also I am much gentler now. If I lose any more shelf I will weld on wider edges to rest above the main refractory.
I have no idea, the problem for me would be the shipping cost to Canada, it would add 30 or 40 to the price I would guess plus mine are stainless steel. The labor literally took 20 minutes.
avc8130
Minister of Fire

muncybob
Minister of Fire
The SS one looks great! I would imagine there will be less expansion with the SS material? Those holes appear to have worn a lot more than the original WG nozzle I recently replaced after 15 cords. I think the standard AHS nozzle is around $100 for both pieces these days. Looking forward to seeing the results of the SS one.
CTFIRE
Burning Hunk
- Dec 8, 2012
- 175
I agree, just trying to do a comparison. I don't weld for one and I want to see if the home made one lasts as long as the others is allNothing wrong with a little DIY. Sometimes the satisfaction in knowing you did it yourself is worth more than the cost savings. Heck, that is probably why most of us burn wood.
ac
infinitymike
Minister of Fire
Great job. I guess you weren't able to get your hands on SS angle? Could have saved a little labor.
So the piece sit in flush with the refractory and on the ledge?
So the piece sit in flush with the refractory and on the ledge?
I could have bought 1.5" X 1.5" X 1/4" angle but with the 3/8" spacers my overall width would have only been 3-3/8" and I wanted the full 4" so they offset the bend a little bit, they did it at 1-9/16" on the inside of the bend, taking into acount the material thickness and radius of the bend it all worked out to exactly 4". The nozzle sits lower than the original, 1/4" above the ledge. I thought about installing it upside down as well and the the opening of the nozzles would be at original height and the space between it and the refractory would just fill with ashes.
CTFIRE
Burning Hunk
- Dec 8, 2012
- 175
Mark -
In looking at the pictures the nozzles rest on a ledge created by the ceramic block. It appears those are also worn. Has you ever replaced those brick and when does AHS recommend that be done. Just curious. Also curious for next years post and the pics of the SS ones you created.
thx
In looking at the pictures the nozzles rest on a ledge created by the ceramic block. It appears those are also worn. Has you ever replaced those brick and when does AHS recommend that be done. Just curious. Also curious for next years post and the pics of the SS ones you created.
thx
avc8130
Minister of Fire
Wow, your ledges are in rough shape. I wonder if you might have waited too long to replace those first steel nozzles?
ac
ac
Yeah they are in rough shape but as I recall they were pretty bad even before the heavy steel ones I made,like I siad I think I broke them throwing heavy 10" X 30" maple rounds in there, I didn't know the damage I was doing because I could not see them. I have no intention of changing those 8 refractory for a long time, it cost over $1000.00, when they are gone completely I will make the nozzle hang on the remaining refractory. I think the manual says they should last approx 10 years.
avc8130
Minister of Fire
Yeah they are in rough shape but as I recall they were pretty bad even before the heavy steel ones I made,like I siad I think I broke them throwing heavy 10" X 30" maple rounds in there, I didn't know the damage I was doing because I could not see them. I have no intention of changing those 8 refractory for a long time, it cost over $1000.00, when they are gone completely I will make the nozzle hang on the remaining refractory. I think the manual says they should last approx 10 years.
You and I are in the same mindset. I'm not replacing the refractory over the ledge. I will make wider nozzles that span the gap.
Well, I got about 1 year (I burn year round) from the stainless nozzles and they have also deteriorated very badly, Yesterday I made some new ones from 1/2" steel plate 7"X16" with 2 1.5" X 1/2" flatbars welded to the underside , these bridge the gap because my ledges are pretty much gone. These were free as I made them from scrap steel I happened upon. AHS now makes steel nozzles like this as well. Here are some pics of my stainless one and the one available from AHS similar to my new one I made.
![DSCF2904[1].JPG](https://www.hearth.com/talk/attachments/dscf2904-1-jpg.131845/ "DSCF2904[1].JPG")
![DSCF2904[1].JPG](https://www.hearth.com/talk/data/attachments/131/131846-3997394ada2a5f4702fc99a1b2d7838a.jpg "DSCF2904[1].JPG")
maple1
Minister of Fire
Dang - so stainless 1/4" only lasted a year also? That's sure pretty deteriorated looking. I want to come up with something for mine, I was thinking about doing a mockup out of thick cardboard & taking that to my welder buddy and asking him to make me that out of 1/4" stainless - but this isn't too encouraging. There sure seems to be some wide variations in steel type & quality - my turbs are made out of quite thin something, I think some kind of stainless, and they show no wear or degradation after 2 winters of use. Would like to get my hands on some of that stuff - not sure what it's called but it's likely something Swedish. I know nothing about metals, so would just likely ask my welder for stainless - but what kind/grade is best for this stuff of readily available kinds?
The turbulators are not exposed to the extreme heat and rampaging oxygen that the nozzle is exposed to. Things have cooled down quite a bit by the time the gasses get to the firetubes. Iron burns in air if you get it hot enough, even iron alloys.
I made some turbulators out of 1/16" thick 304 stainless but didn't get them installed until recently so they haven't been in service long.
I made some turbulators out of 1/16" thick 304 stainless but didn't get them installed until recently so they haven't been in service long.
Fred61
Minister of Fire
Burning is basically rapid oxidation. The fact that the atmosphere is oxygen rich in the nozzle area is probably the reason it burns away (oxidizes) quicker. It would be interesting if a similar piece were put in the target blocks where the oxygen has been mostly consumed for comparison of speed of deterioration.
Gasifier
Minister of Fire
My replacement nozzle bricks seem to be holding up better than the originals. I don't know if they changed the formula for them or not. Seems like one of my Wood Gun friends had made mention of that though. No difference in wood I am burning.
Willman
Minister of Fire
- Status
- Not open for further replies.
Similar threads
- Replies
- 18
- Views
- 2K
- Replies
- 41
- Views
- 4K
- Replies
- 8
- Views
- 483
- Replies
- 6
- Views
- 837