Stainless Steel liner questions

  • Active since 1995, Hearth.com is THE place on the internet for free information and advice about wood stoves, pellet stoves and other energy saving equipment.

    We strive to provide opinions, articles, discussions and history related to Hearth Products and in a more general sense, energy issues.

    We promote the EFFICIENT, RESPONSIBLE, CLEAN and SAFE use of all fuels, whether renewable or fossil.
Status
Not open for further replies.

Trickle

New Member
Jan 20, 2013
47
East Central Missouri
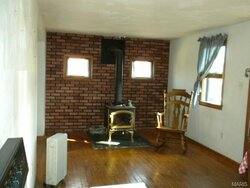
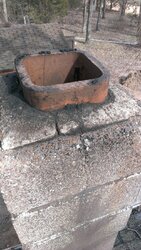
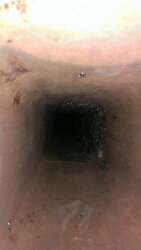
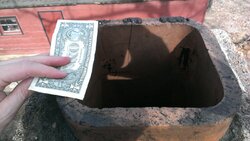
So it looks like I'll need to buy a stainless steel liner and "T" since my chimney is masonry with clay flues. I know there are a lot of kits out there, but anyone have a preference or know of a good one?

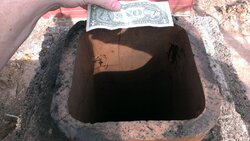
I'm guessing I need the smooth line instead of grooved to keep creosote from building up on the grooves. Also need the insulation.

Finally, if I install a T where the stove exhaust enters the masonry chimney, how do I clean out the bottom of the "T"? I'm picturing running the rods and brushes from the top of the chimney, and anything it knocks down would end up in the bottom of the "T". Do I then have to pull the stove exhaust and clean by hand through the thimble or is there an easier way?

Thanks,
Trickle
 
Don't worry about getting a smooth wall liner, it's not necessary. Theres not wrong with them, you just don't need to spend the extra money. I've cleaned lots of liners, and I see no difference in the way creosote builds up, it's very minimal in either one as long as it's insulated. So, make sure you get the insulation.

You will need to pull the stove pipe to get to the bottom of the Tee. It's no sweat, you need to pull the pipe off to clean it anyway.

Is there something wrong with your masonry flue?
 
Masonry is cracked in a few places, as is the clay flue. I'll post pictures in a few weeks as I can. The sweep that cleaned it out said he would do a SS liner if he was burning 24x7, and from what I've read the SS liner is preferred.
 
I bought mine from Rockford Chimney Supply and found them to be most helpful in the selection process and getting all the pieces I needed. Prices were competitive and outstanding customer service. They screwed up on the cap they sent. Called them and the told me to keep the one they sent and then sent me another one in 2 days.
 
Just don't be fooled by a super internet "deal", make sure that it comes with all the components that you will need.
 
The smooth wall liner in my opinion is worth it for wood. It will clean easier and give you better draft. But if you are tight on money and deciding on insulation or the smooth wall liner, definitely go with the insulation. The insulation is a must for any liner. But if you want the best draft and best setup, get a smooth wall liner and the insulation.
 
Regarding cleaning out the T - connector inside the fireplace behind your stove: The T - connectors come with a cap on the bottom of them a few inches below the horizontal pipe that connects to the flue collar on your stove. You attach the cap with a couple of sheet metal screws and then remove the cap when you clean your pipe. When I recently did my installation I positioned my end cap so that two of the three screw holes angled out at a 45 degree angle toward the front of my fireplace opening. I have about five inches on either side of my stove and my fireplace opening and I can reach the screws pretty easy by reaching in with a screw driver. I didn't put a screw in the hole in the back of the pipe since I wouldn't be able to reach it and two screws can hold the cap on securely. Some people remove the cap before they clean from above and attach a bag over the bottom of the T so all the creosote, ash, and soot go directly into the bag for easy cleanup. IMG_0179.JPG

You can't see the cap in this photo, but it about three inches below the bottom of the picture.
 
Regarding cleaning out the T - connector inside the fireplace behind your stove: The T - connectors come with a cap on the bottom of them a few inches below the horizontal pipe that connects to the flue collar on your stove. You attach the cap with a couple of sheet metal screws and then remove the cap when you clean your pipe. When I recently did my installation I positioned my end cap so that two of the three screw holes angled out at a 45 degree angle toward the front of my fireplace opening. I have about five inches on either side of my stove and my fireplace opening and I can reach the screws pretty easy by reaching in with a screw driver. I didn't put a screw in the hole in the back of the pipe since I wouldn't be able to reach it and two screws can hold the cap on securely. Some people remove the cap before they clean from above and attach a bag over the bottom of the T so all the creosote, ash, and soot go directly into the bag for easy cleanup.View attachment 96104

You can't see the cap in this photo, but it about three inches below the bottom of the picture.
Gotcha Nick, but my T would be inside of a masonry and clay flue with no access from the sides or below. You converted a fireplace so you can get underneath, the only way to access mine would be from inside the house through the thimble or from the chimney top.
 

Attachments

  • GetMedia (7).jpg
    GetMedia (7).jpg
    35.8 KB · Views: 270
  • GetMedia (3).jpg
    GetMedia (3).jpg
    80.4 KB · Views: 288
I'm with you now. I have a similar set up with my Woodstock Classic stove in the lower level of my house. When I clean my chimney for that stove I have to pull the pipe off the back of the stove and pull the other end out of the thimble. I take that three foot long pipe assembly outside to clean with a brush. Inside I use a cup to scoop out any creosote that fell through to the bottom of my T, which is actually just a continuation of the clay flue liner. It continues down inside the brickwork of the chimney (a huge 8' x 4' brick chimney) as far as I can reach my arm! I just scoop out down about a foot or so. Until recently I did not have any sort of cap on the flue at the top of the chimney and there would be leaves mixed in with the creosote, cinders, etc.
 
Maybe I missed it, but what is your clay flue ID and height? Smooth wall flex with a blanket wrap will provide maximum draft, and better safety in an old and questionable flue, if that is what you're looking for. As others stated, not often necessary, but I like doing things the best way every time.
 
I like my HomeSaver Heavy Duty Roundflex. When they say HD, they ain't kiddin'! MIL's sweep put it in her chimney a few years back, as well. There are cheaper liners out there, though...

 
I have a Dura-Vent Dura-liner system on my place and like it. Mine is the oval system and the flex piece at the bottom was simple to feed thru the smoke shelf...once I blasted enough of it out. Worth a look!
 
How tall is that chimney measuring from the bottom of the stove to the top cap?
Measured it today, just a few inches over 13 foot tall from floor to bottom of top cap.

Maybe I missed it, but what is your clay flue ID and height?
I'm not sure how to ID the flue, can you give me more info on what you are looking for? By height I hope you mean overall height as in the previous question?

Smooth wall flex with a blanket wrap will provide maximum draft, and better safety in an old and questionable flue, if that is what you're looking for
Affirmative, that is the objective.


As others stated, not often necessary, but I like doing things the best way every time
As do I, so when the sweep mentioned it was ok, but if burning 24/7 he'd do a liner I automatically go to I need a liner.
 
ID= Inside dimensions
Measure the inside of the flue to make sure you have enough room for the liner with insulation. If not, you would be best of taking out the existing flues.
 
Wow... if you only have 13 feet from the floor to the cap, then you indeed have a challenge. Best bet is to find a way to get a few more feet (even 2 - 3 feet will help) on top of that chimney. Short of that, smooth-wall stainless with a blanket wrap. No matter what you do, with a short flue, you may find yourself limited to burning only when outside temps fall below 40F. I have similar (but much less drastic) issues on the shorter of my two flues, although I have about 18 feet from the top of the stove to the cap.
 
Finally, if I install a T where the stove exhaust enters the masonry chimney, how do I clean out the bottom of the "T"? I'm picturing running the rods and brushes from the top of the chimney, and anything it knocks down would end up in the bottom of the "T". Do I then have to pull the stove exhaust and clean by hand through the thimble or is there an easier way?

Thanks,
Trickle

I beleive if the area from the T to the the bottom of your chimney/cleanout door is "sound" then most installers would not install a cap on the bottom of the T allowing for debris to fall down to the cleanout door/area.
 
Manual says "This product was designed for and tested on a 6"chimney, 14-16'."
Might get away with it with a smooth-wall liner and insulation, I don't know...
 
Masonry chimneys that run up the side of the house suck. They are always affected by the cold. If the chimney is in rough shape tear that baby down and put an insulated class a chimney with a support box(dura-tech or similar brand) in directly above the stove. This will give you the best performance out of your stove and you will never have to worry about the chimney deteriorating in the future.
 
  • Like
Reactions: jeff_t
O yeah then you wont have to worry about a T section. When you sweep it everything will fall on top of the baffles in the stove. Just make sure you clean it off the baffles.
 
Manual sez "designed for and tested on a 6" chimney, 14-16'." Might get away with it with an insulated, smooth-wall liner. I wonder if two 45* elbows to get into the masonry chimney would help (or even be possible with the thimble?) Or would more rise help before the stove pipe enters the chimney (entering the chimney higher?)
 
Finally got up on the roof the other weekend to take care of some other projects and wouldn't you know it I forgot my measuring tape. I happened to have a dollar in my wallet though, so here are some pics to estimate the ID of the clay flue. Best guess maybe 7" or just over?
 

Attachments

  • c1.jpg
    c1.jpg
    361.9 KB · Views: 259
  • c3.jpg
    c3.jpg
    83.7 KB · Views: 212
  • c2.jpg
    c2.jpg
    193.2 KB · Views: 255
  • c4.jpg
    c4.jpg
    219.7 KB · Views: 268
[quote
Finally, if I install a T where the stove exhaust enters the masonry chimney, how do I clean out the bottom of the "T"? I'm picturing running the rods and brushes from the top of the chimney, and anything it knocks down would end up in the bottom of the "T". Do I then have to pull the stove exhaust and clean by hand through the thimble or is there an easier way?

Thanks,
Trickle

I beleive if the area from the T to the the bottom of your chimney/cleanout door is "sound" then most installers would not install a cap on the bottom of the T allowing for debris to fall down to the cleanout door/area.

Not a real good idea to leave the bottom cap off the T. Enough on here have learned how that sucks cool air up through the bottom end of the T effecting both draft( causing poor draft from the stove), which also allows for a crapload of creo to build up in the stack.
 
Finally got up on the roof the other weekend to take care of some other projects and wouldn't you know it I forgot my measuring tape. I happened to have a dollar in my wallet though, so here are some pics to estimate the ID of the clay flue. Best guess maybe 7" or just over?

That's gonna be tough to work with. Unless the mortar joints are perfect, it will be a struggle. Busting out the tiles will help.

Figure in two 90s, coupled with the already short flue, and I agree that going with a new class A would work the best. It just might not be aesthetically pleasing.
 
Status
Not open for further replies.