Encore 2550 rebuild... start to finish

  • Active since 1995, Hearth.com is THE place on the internet for free information and advice about wood stoves, pellet stoves and other energy saving equipment.

    We strive to provide opinions, articles, discussions and history related to Hearth Products and in a more general sense, energy issues.

    We promote the EFFICIENT, RESPONSIBLE, CLEAN and SAFE use of all fuels, whether renewable or fossil.
Status
Not open for further replies.
Its a 2550 but the original owner NEVER took care of it, so it only seems like 30 years old...... The flue collar is gasket rope or? And it still looks like it will be tough even that direction. Maybe Ill just put up with cold mornings and rough it out till I get a new stove :/
I'll take your 2550;) and give you a Vigilant
 
Found my own answer..... How do you guys out up with all these gaskets and moving parts in this thing? Its enough to drive a man CRAZY!
5/16 Med Density Fiberglass Gasket Doors, Damper, Flue Collar, Cat Access
 
Call me crazy, I'm having fun working on it !!!

Defiant, you should change the thread title to "encore 2550 overhaul" its gotten bigger than a minor project :)
 
Gotcha. The flue collar is gasketed. I agree it looks tough but suposedly is doable to get the damper that way.

If you do it the way I am you do have to half gut the stove, and if anything is warped or a bolt breaks it might get expensive. You can use the instructions for the fire back kit as a guide. Probably not worth it if you are set on replacing it in a year or so, I'm hoping to get at least 3-5 more from mine.

https://www.google.com/url?sa=t&rct=j&q=encore fireback kit&source=web&cd=1&cad=rja&ved=0CCsQFjAA&url=http://www.increa.com/reverse/defiant-encore-stove-catalytic-replacement/encore2550-fireback.pdf&ei=YjQNUqnoFMTfyQHM1YGoBA&usg=AFQjCNFX_bM9Kl4ohro7CxK1PVwVCuj5SA&bvm=bv.50768961,d.aWc

I did the fireback, doors and griddle gaskets and replaced the cat last year and just pulled the fireback back off to do the secondary probe and check my gasket work..... This thing is super high maintenance.

I'll take your 2550;) and give you a Vigilant

I never want another VC again that's for sure!
 
You should see the '79 Resolute I grew up with. My Dad still uses it to this day. Bet your 2550 is in great shape by comparison....
 
You should see the '79 Resolute I grew up with. My Dad still uses it to this day. Bet your 2550 is in great shape by comparison....
You would be surprised what a man with no clue what he was doing can do to a stove in 20 years +/-..... just to give you an idea this stove is sitting in a fireplace with the 3' oval stack into a 3' wide chimney and you know what he used as a block off plate??? Standard insulation. Im surprised this house is still standing <>
 
Defiant, you should change the thread title to "encore 2550 overhaul" its gotten bigger than a minor project :)
Not quite sure how to use my newly gained powers:cool: This will keep going, sorry I will be distracted for awhile, tuna season!!!!!!!!
 
Seems to me like your doing alot of work on this stove for no reason. If your getting excessive creosote in your chimney it just means the stove is not burning efficiently and your getting bi-product up the chimney. This is most likely from the cat no functioning properly and the only thing you can do to remedy that is by changing out the cat. The refractoy in that stove looked okay and you could probably pin up the cat so it is in the proper position in the refractory. I don't see why you would want to drop the lower fireback as that is a major job on the 2550, so I do agree with one of the previous posters that you should replace the refractory since you've gotten that far. Those upper firebacks are miserable to put back in by yourself. The only other thing that would cause soot in the chimney would be wet wood, which is also the reason you see glazing on the inside of the firebox. You don't need a cat probe or anything like that a simple magnetic thermometer on the griddle is fine. If you burn the stove at 500-650 degrees on the griddle temp the cat will be burning about 1300 degrees and function properly.
 
  • Like
Reactions: Defiant
Seems to me like your doing alot of work on this stove for no reason. If your getting excessive creosote in your chimney it just means the stove is not burning efficiently and your getting bi-product up the chimney. This is most likely from the cat no functioning properly and the only thing you can do to remedy that is by changing out the cat.

Being new, you probably haven't seen my previous threads. I was struggling all last winter - getting this buildup even though my cat temps where usually over 1000F. BrowningBAR had similar problems an a similarly rebuilt Encore. I see nothing but brown ash in the immediate cat exit area, then black stuff further up the pipe which makes me think smoke is leaking past the cat somewhere.

The refractoy in that stove looked okay and you could probably pin up the cat so it is in the proper position in the refractory. I don't see why you would want to drop the lower fireback as that is a major job on the 2550, so I do agree with one of the previous posters that you should replace the refractory since you've gotten that far.

The lower back is easy, its the upper that's a pain. The damper gasket needed doing if nothing else, and looked to be even more of a pain to pull the entire stove out from the hearth and take off the flue collar then try to work in the cramped space behind it. So I figured why not keep going since I did this much.

Those upper firebacks are miserable to put back in by yourself. The only other thing that would cause soot in the chimney would be wet wood, which is also the reason you see glazing on the inside of the firebox.

Wet wood has been eliminated. Im burning stuff that I cut and split myself 2-3 years stacked. Moisture meter confirmed to be mostly under 18% - on a fresh resplit. Note that Blaze King guys also get buildup in the firebox before the cat - there is no way to avoid it when burning a catalytic stove low. They smoulder by design, and use the cat to clean up the mess.

You don't need a cat probe or anything like that a simple magnetic thermometer on the griddle is fine. If you burn the stove at 500-650 degrees on the griddle temp the cat will be burning about 1300 degrees and function properly.

Not in my experience. Before I got the cat probe I saw glowing iron with the griddle temp BELOW 550. After getting the probe and could see whats giong on I often had cat temps hitting 1600 even 1700 with the griddle as low as 500. Other VC owners on this forum have reported similar findings.
 
  • Like
Reactions: ScotO
Not in my experience. Before I got the cat probe I saw glowing iron with the griddle temp BELOW 550. After getting the probe and could see whats giong on I often had cat temps hitting 1600 even 1700 with the griddle as low as 500. Other VC owners on this forum have reported similar findings.[/quote]


Just ordered the Condar cat probe. When I pop the metal cap off, does that head right into the refractory assembly? Do you just push it through and leave it with no sealant?

Thanks.
 
Just ordered the Condar cat probe. When I pop the metal cap off, does that head right into the refractory assembly? Do you just push it through and leave it with no sealant?

Thanks.

Use a 1/4 drill bit and twist it by hand through that access to make a hole in the refractory (same procedure as replacing secondary). Then just slide the probe in.
 
Not in my experience. Before I got the cat probe I saw glowing iron with the griddle temp BELOW 550. After getting the probe and could see whats giong on I often had cat temps hitting 1600 even 1700 with the griddle as low as 500. Other VC owners on this forum have reported similar findings.


Just ordered the Condar cat probe. When I pop the metal cap off, does that head right into the refractory assembly? Do you just push it through and leave it with no sealant?

Thanks.

That's the way the secondary is in there, once in I pushed the refractory around the probe to seal up the slight gap (Im not sure if this is the correct way).

Now that my frustration levels have subsided I've decided to keep the VC and move it to the basement once I get my new insert :) This thread in a way has inspired me and will be pinned so I can do a complete rebuild next year once the stove is moved to an open area (working in a fireplace is not fun). Thanks guys!!
 
  • Like
Reactions: jharkin
Now that my frustration levels have subsided I've decided to keep the VC and move it to the basement once I get my new insert :) This thread in a way has inspired me and will be pinned so I can do a complete rebuild next year once the stove is moved to an open area (working in a fireplace is not fun). Thanks guys!!

Glad we could be of help. These stoves are temperamental when perfect, and it only makes things worse if they have been abused. Mine is not as bad a shape as yours sounds but I dont think it was babied either. Previous owners of this house I think had a lot of good intentions not always matched by skill (I spend a lot of time fixing sloppy renovation work) and I believe that included the stove. When I got it the original cat was shot and the refractory access panel was in upside down - with the lip completely blocking the secondary air. Our new friend CT is right that Im probably doing more than is strictly necessary - but partly its because I dont know how well it was put together previously and want to be sure its done right.
 
  • Like
Reactions: ZP_VC2550
Hey guys keep going, I am headed offshore tuna fishing and won't be back till next Wed eve:cool:
 
  • Like
Reactions: ScotO
Jharkin,
A couple more questions.
I'm regasketing the stove doors and I am wondering if the line in the middle where the doors meet needs to have some sort of material, or just metal on metal. My old fisher didn't need it but that's a WAY different stove...

Also, I noticed how the catalyst is held in by a shelf, which means part of it is blocked on the bottom. Is that the way it's supposed to be? Seems like it would cut the efficiency of the cat.
Thanks!
 
Hey guys keep going, I am headed offshore tuna fishing and won't be back till next Wed eve:cool:


Have fun. When you get back can you check for me what size gaskets the inner side panels get? It looks like it might be the big stuff (3/8) from the size of the channels but there is no mention in the manual.
 
Jharkin,
A couple more questions.
I'm regasketing the stove doors and I am wondering if the line in the middle where the doors meet needs to have some sort of material, or just metal on metal. My old fisher didn't need it but that's a WAY different stove...

The center seam absolutely needs a gasket. On the left hand door, the gasket makes a continuous loop completely around the door. It should run on the channel to the inside of the door on the top/bottom and outside edge, then wrap around to the groove on the outside of the door on the inner edge where it mates with the right hand door.

Also, I noticed how the catalyst is held in by a shelf, which means part of it is blocked on the bottom. Is that the way it's supposed to be? Seems like it would cut the efficiency of the cat.
Thanks!

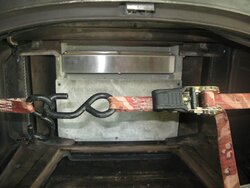
the cat doesn't sit on that shelf in the main chamber. It should actually fit snugly where the access panel fits, leaving it suspended about a half inch or so above the shelf. The access panel has a small lip on the lower inside edge that hold the cat in place.
 
the cat goes like this.
 

Attachments

  • IMG_0134.JPG
    IMG_0134.JPG
    186.4 KB · Views: 985
  • Like
Reactions: jharkin
Wow that's a clean looking encore... Your refractory looks kind of grey... Did they change the material or is it just the photo?
 
Looks like a new refractory to me
 
Thats during an complete rebuild hence the ratchet strap on the stove. That refractory is brand new right out of the box.

Intersting. When I first got this stove I replaced the refractory acess panel - and the new one from the shop was bright white... must just be the lighting in the photo....
 
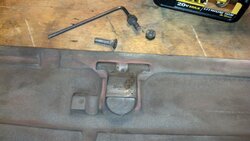
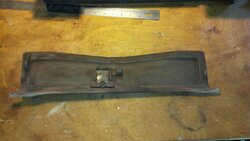
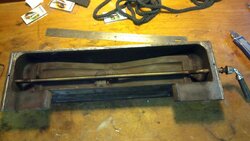
OK, so had a couple hours today and made more progress. Upper housing is ready to re-gasket now so first I cleaned up the damper. I took the adjuster mechanism apart so I could reset it. Ideally I want the new gasket to be tight with the adjuster bottomed out so I have room to adjust in future.

To break that phillips head loose I used my electric impact driver. Pops it loose effortlessly without stripping the head. Use lots of anti-seize putting it all back together.

2013-08-17 15.14.28.jpg 2013-08-17 15.19.24.jpg
 
And now I got the new gasket glued in to the damper, but after clamping for an hour to set up I am not happy. I had to tighten the adjuster quite a bit and the dollar bill is still a bit looser along the top edge than I would like (but very tight on the bottom).

I probably stretched the gasket too much putting it in. I dont want to ever have to redo this again until its due for the next major rebuild in ~ 10 years so I just might rip it out and try again now. Gasket is cheap.

2013-08-17 15.30.10.jpg
 
Status
Not open for further replies.