Reckless
Feeling the Heat
If anyone is rebuilding a VC and needs extra hardware I'll send you some for the price of a stamp!
Ill take some of those glass bolts
") Window gaskets are next for me.
Window gaskets are next for me.If anyone is rebuilding a VC and needs extra hardware I'll send you some for the price of a stamp!
Window gaskets are next for me.Sorry guys, another off shore fishing trip coming up, I'll take some screws. I have plenty of gasket I could send in return. I have about 300 ft of 5/16ths, 500 ft of 3/8ths and about 200 ft of 3/16ths that I use for glass.So instead I will but them from Amazon Supply a.k.a smallparts.com. I have to buy in lots of 100, but 100 screws are $6, with free 2 day shipping to prime members. I'm getting new glass screws and new 1/4 bolts for the sides and fireback. All in plain steel black oxide. If anyone is rebuilding a VC and needs extra hardware I'll send you some for the price of a stamp!
Sorry guys, another off shore fishing trip coming up, I'll take some screws. I have plenty of gasket I could send in return. I have about 300 ft of 5/16ths, 500 ft of 3/8ths and about 200 ft of 3/16ths that I use for glass.
Sorry for my absence the season (fishing) will end too soon.
You'll want to use a flat bottom tap instead of a taper tap for those screws.


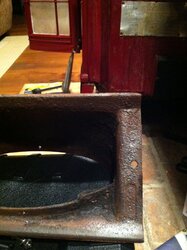
Flue collar supposed to look like this or should I wire wheel more?
Can you back up the camera and take a picture showing the entire part? Hard to tell what Im looking at...
Sure I see a lot of rust scale there, but it shouldn't be a problem as long as its not a mating surface where it fits against another part or gasket.

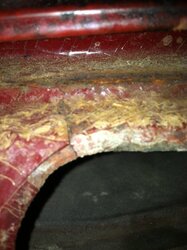
It mates against nothing but dry side gasket. I also noticed a crack on the back of the stove where the flue collar attaches. I guess when I go to rebuild this I will be spending some cash
The cracked back casting is definitely a problem, sorry to hear that. If you can find a good welding shop that knows how to weld cast iron it might be fixable, but then your enamel needs work too. Might be easier to just replace it?
For the flue collar i'd try to grind that rust scale down as smooth as you can without digging into clean metal too much and then try it. The gasket probably will deform to the texture and seal ok.
What year is your stove? The nameplate on mine and the installers report the previous owners left says 1997. Seeing the rust on yours and some other big rebuilds Ive seen posted in the past mine look a lot better than average wear wise. The old owners must not have used it that much. Interesting thing is when we bought the place they told me they "burned 5 cords a year" but in this tiny house and considering how small their woodshed was I think they were confused and talking face cords.
You think it will be ok for this season? The gasket and flue collar covers almost most all the crack .... I know I probably shouldn't

") ) that for $5 i d just buy the right screws.. If I had known..........
) that for $5 i d just buy the right screws.. If I had known..........I also noticed a crack on the back of the stove where the flue collar attaches.
Interesting. I ran into a similar issue w/ my non-cat Encore earlier this summer, which prompted me to decide to ditch the stove and go w/ a Jotul F55 instead. See my thread at https://www.hearth.com/talk/threads/defiant-encore-1450-non-cat-repair.110926
Near as I can tell, my refractory started to disintegrate -- especially on the left side of the stove (as you face the doors) which exposed the rear cast iron directly to combustion flame. Since it was covered by a heat-shield I never saw it getting excessively hot in that particular corner -- as far as I know the stove was never overfired, but I inherited it.
Now my 1450 sits in pieces and I may expend money at some point to rebuild it on my own time, but with the refractory replacement costing $300 and the rear casting likely costing $300, I think it'll be a while before I dump any significant cash into it.
Anyway, sorry for the thread hijack, was wondering if the source of your crack was likewise a disintegrating refractory.
When I replaced the catalyst, I noticed one of the refractory side walls where it sits was a bit unstable. I don't think it's going to affect the stove function because of where it is, but I'll keep an eye on it. I was surprised the front of the refractory was held in by what seemed like drywall screws (!). Anyway, I'm excited to fire it up in a month or so.
I'm new to this stove and never burned with a catalyst. Do you find it functions better with smaller splits? Or larger logs/pieces?
Also, when I open the ash door, it doesn't open how I would expect. Kind of flops down and out, but when I close it after lifting it and adjusting, it's solid against the gasket and tight. Normal?
That's kind of how my ash door is too, I have to push up on the ash pan a little to clear the lip to close.
I'm new to this stove and never burned with a catalyst. Do you find it functions better with smaller splits? Or larger logs/pieces?
This stove will run on anything you throw at it as long as it has low moisture content, but the thing I found is that the longer the splits the better burn times you will get (stove can take up to 20" length).
, filling it to the roof with kindling size pieces or 2x4s will overwhelm the cat with too much off-gassing and overfire.Another question on the flue collar. I am in the process of sanding and painting my chimney pipe and I think I need to replace it. Will this one work? http://www.amazon.com/Heat-fab-Stovepipe-Straight-Vermont-Castings/dp/B002VFEB7K
I measure 10.25 x 5.25 on my collar opening..... anyone one know of a better oval to round pipe?
The pipe goes up the open chimney about 3' no liner.... that's the way I inherited it and the way it will stay till next year when I replace the stove. Im just looking for an oval to round adaptor for cheap so I don't have to waste $80-90.Are you running 8 inch pipe all the way to the cap? If the main chimney were 6 inch you can get an alternate iron flue collar to connect directly without the oval to round adapter. That is how my stove is setup.
http://www.woodmanspartsplus.com/170580/products/Vermont-Castings-Flue-Collar.html