Stove pipe conundrum...

  • Active since 1995, Hearth.com is THE place on the internet for free information and advice about wood stoves, pellet stoves and other energy saving equipment.

    We strive to provide opinions, articles, discussions and history related to Hearth Products and in a more general sense, energy issues.

    We promote the EFFICIENT, RESPONSIBLE, CLEAN and SAFE use of all fuels, whether renewable or fossil.
Status
Not open for further replies.

Mr. Kelly

Feeling the Heat
Hi all,

Happy almost burning season to you!

A month ago, I disassembled the short stove pipe leading from my PE Summit to my wall piece to clean it out. I've done this once before, and I was able to get it reassembled (although it was a pain). This time, I've encountered snags. It's about 5' of pipe that has a couple of 45 degree turns and meets the pass through that is mounted though a wall.

First, if I was to line everything up the way the original installer did it, there are places where the pipes don't come together perfectly. For instance, where the pipe meets the pass through piece at the wall doesn't sit perfectly flush and flat on the fitting, leaving a hair-line opening at the joint that reveals the metal insert liner that runs through the connection. This makes me anxious.

It's possible, that smoke will not, and has not, exited through this small gap, given that there is a liner in there, but I would much rather have the pipes fit perfectly together.

It is my guess that the installer wrenched the pipes a bit out of alignment in order to reach the positioning of the stove.

Is this something that would bother you or cause you concern?

It's very likely, that these pipes have operated just fine in this very way for the last several years, with no appreciable ill affects.


Also, I have a devil of a time getting the pipes back together, since they are very hard to twist together, and to reposition. Does anyone know of a trick that the pros use to maneuver pipes around? Is there a tool that they use?

I had made an appointment with the local wood stove place to have an installer come over and just do the thing right, so I could take the thing apart to clean it again not have the same problem. But, they screwed up the appointment, and don't seem hugely psyched to come out and clean up someone else's mess. I'm sure there's minimal profit in there for them. I'm now thinking again about trying to reassemble the thing myself, perhaps just leaving the small gap there, and saving the coin.

So… Any thoughts as to how to bail myself out of this? Any help would be greatly appreciated!
 
pics?? Hard to understand your dilemma without them.
 
If the gap is under 1/8" just fill it with a little furnace cement. Next time is it possible for you to take the entire connector out as one unit and not disassemble it down to each piece? I would leave it all screwed together and try that if possible.
 
Thanks guys... I do have a pic, but not sure it will really "tell" you much more than my words already have...

I need a bit of adrenaline to get myself to try again tomorrow to do a reassembly.

I did think about trying to get the whole thing off in one piece, but had difficulty pulling in the telescopic pipe to shorten it, which is why I wondered if installers use some sort of tool to hold the pipes, or to be able to twist or turn them into place.

I had also thought about using some sort of filler to fill the gap, but thought that might just make it harder to get the thing apart the next time. How hard does furnace cement dry? Would it be easy to remove in a year, or two, or would I have to expect a difficult removal process?

Any other thoughts would be really appreciated!
 
Furnace cement falls out easily when removing the pipe. It isn't an adhesive. However, it is not a substitute for a good solid mechanical connection.
 
Understood.

The connection is solid, in terms of its unlikelihood of falling apart. The only problem seems to be that little gap, with the insert showing through just a tiny bit. It's just a little more than a hair.

Interestingly, there's another insert in a 45 degree piece. But, in both cases, the insert can be removed, and is only seemingly inserted about 4" into either piece. I'm not entirely sure what the purpose of these inserts would be, if there ends up being a part of the pipe where there is no insert, as well.

How true would it be to assume if smoke is traveling at a pretty good speed through the pipe, and at a good pressure, that there would be less likelihood that some would spew out pf any minor leaks? If I consider that I drilled a hole for my thermometer, and that hole is not perfectly air tight, and no smoke seems to be leaking out of that hole, perhaps my worry of my "little gap under the insert" may be unfounded? Again, it's possible that the problem has existed unnoticed as it is for the past number of years.

Do installers just muscle these pipes into place, or do they have a trick/tool to help torque them? I thought about trying some sort of non-flammable lubricant to help them slip a little bit better into place. No?
 
How true would it be to assume if smoke is traveling at a pretty good speed through the pipe, and at a good pressure, that there would be less likelihood that some would spew out pf any minor leaks? If I consider that I drilled a hole for my thermometer, and that hole is not perfectly air tight, and no smoke seems to be leaking out of that hole, perhaps my worry of my "little gap under the insert" may be unfounded? Again, it's possible that the problem has existed unnoticed as it is for the past number of years.
Smoke doesn't spew out of leaks; air gets sucked in. Use something like incense outside of the pipe to visually check for suckage.
 
Ok, then... that makes sense. What, then, would the disadvantage of having a bit of air sucked in? Would it somehow mess with the draft of the system? My system does have a hard time drafting well (presumably), because of its less-than-ideal configuration, and takes a bit of patience and labor to get the thing started from a cold start.
 
as mentioned above a leak will be leaking air "in" and not out - as in smoke - if you have it going properly the flue/chimney system is sucking up. The only problem with a leak is the potential for cool air to be sucked into the system cooling the draft air and causing less draft(cold flue) and build up of creo(again, caused by a cold flu/chim)

I would scratch the incense and just use a lighter to determine leaks around stove openings and stove pipes. I hate the smell so that is my only reason - both work equally well.

There are different stove pipe cements and some hold better than others. If it is just a little more than a hair line gap a little smear of any should do the job and come apart rather easy after a season of burning. Here is a place where "less is best" so go easy. Just fill the tiny crack and try to limit the surface area covered with the goo to limit the bond if you want them to come apart again later.
 
I think I have some gasket cement from when I reattached the door gasket. I suspect, it might be the same kind of stuff. Whaddaya think?
 
So... is the general consensus... from all who have seen this thus far...:

If I attach the pipes firmly, put a tiny bit of cement (or not) in the hairline cracks/holes, check for appreciable leaks, I should be safe? It' really safety I'm concerned about (obviously!)

No likelihood of measurable CO finding its way into the room?
 
Correct. Unless you have negative draft or a plugged flue you should be fine. There should be 3 screws per pipe joint. Post some pictures if you want some eyeball verification on the connector.
 
In my experience the only time small leaks like what you describe allow smoke to enter the house is during a start up when you don't get a strong fire going right away. If you light off your kindling, or have poor quality kindling (some wet sticks from the yard for instance) and you end up with a smokey fire some of that smoke can leak out the tiny cracks in your pipes/connections since there isn't enough draft to pull the smoke up the chimney. It doesn't take much smoke to really provide a lot of smell in the house! If this happens you can crack your door if you at least have some flame burning, as opposed to just some smoldering going on. If it's smoldering you might have to bite the bullet and open the door long enough to get something burning.
 
In a mild climate this may be more prevalent due to weaker draft at milder temps. It will be especially noticeable is the chimney is short or the stove is installed in an area of negative pressure. The main downside of small gaps is that it allows cooler air to be introduced into the flue gases. This cools the gases down and can result in reduced draft + increased creosote accumulation.
 
Thanks a billion, guys.

Here's where I'm at. I've spent the last hour + attempting to do another assembly/install. I ended up being able to get the pipes (with help from my less-than-enthusiastic helper wife) realigned with the original screw holes, and refitted into the spot where they likely were to begin with. This in itself is more progress than I had on my previous 2x attempts!

I ended up having to pull the entire stove over about an inch and a half to get the bottom fitting to sit flush with the top of the stove (and it's still not 100 percent flat on the stove), and the stove is now closer to the wall on one side than it was previously. Not crazy about that, but never noticed the walls getting overly hot sitting next to my Summit. Although, the stove is likely an inch and a half closer to the wall than code permits (It's still at 6 inches to a window sill, 8 inches to the skirt).

I have to say... I'm not convinced it was a very solid professional install by the company that sold me the system in the first place. However, perhaps they knew that an imperfect fitting of the pipes was not a deal breaker, or a reasonably safety concern... who knows.


So, at this point, I will wait for tonight (have to leave now), get a good hefty fire burning, and use the match trick to test for leaks. Let me see if I get this straight...

- am I putting a lit flame up to the areas of possible leak, to see if the flame is drawn toward the cracks, or do I let a match burn out and watch for the match smoke to be drawn toward the pipe? Does it make a difference? I suppose smoke would be lighter, and easier to move than a flame.

- will my gasket cement double as a leak stopper cement?


Thanks again, eh?
 
I'd be much more concerned about clearance issues than small problems with the pipe. Why the stove move if there is a telescoping pipe in between? FWIW, ideally, the first fire of the season should be a small one to dry out the firebrick.
 
I'd be much more concerned about clearance issues than small problems with the pipe. Why the stove move if there is a telescoping pipe in between? FWIW, ideally, the first fire of the season should be a small one to dry out the firebrick.

Thanks B,

The telescopic piece helps with the up/down orientation, but I needed to go side to side to get things settled. Not sure what other options there are, given the pipes I have. Does 6" of clearance from the back corner of a Summit (which has a deflector around much of it) give you the willies? What do you think?

The local installers wanted $150.00 for a visit to come over to reassemble the thing. Given that nothing seems to line up exactly, I was expecting that they'd tell me that the pipe choices weren't the best ones, and then I'd end up spending at least that for a new set of about 4 pieces to get the thing lined up exactly as it should be.

However, you're concern is mostly with clearance, so I'll await your opinion on that topic (as well as piping!).
 
Pics would help.
 
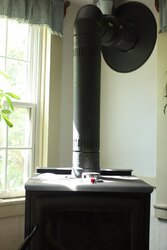
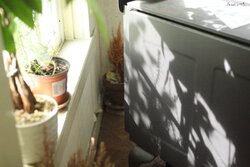
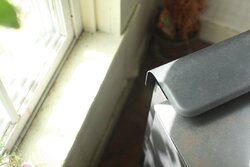
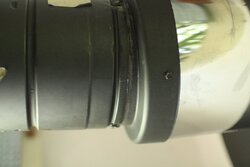
Okay, here are some not-so-great photos, but the best I can come up with.

- The stove appears closer to the wall than it is. It's about 6" to the nearest wood. That's only about an inch closer than the inspector signed off on (and he barely even glanced at the install).

- I couldn't get my camera in on the side with the fitting that doesn't line up well at the wall, so this picture is of the opposite side but you can see that it's not at all flush with the wall mount. The other side has the small crack, at which you can see the metal insert.


Overview.JPG IMG_6038.JPG IMG_6043.JPG wall fitting.JPG
 
Last edited:
I can see your dilemma much better now. It looks like you have it buttoned up well. And now I see you have a corner installation. That helps. Clearances increase right away from the back corner. I think the Summit requires 4" from the back corner. It looks like you may have 5", is that correct?
 
One trick we use when re-inststalling or even new installations is to "wipe" the matching ends with "high temp" silicone. Not enough to seal the joint or lock it together but enough to lube it and make it much easier to put together and position/adjust the pipe. And yes, minor adjustments in the stove sometimes are necessary.
Oh, and a pair of strong hands/wrists/forearms are VERY helpful.
 
yes - to answer the question about your gasket cement. If just to fill a small crack/seam it should be fine.
 
Thanks for the interest in helping my "hands on" debacle!

I have at least 6" from the back corner to the wood protruding from the window casement. I haven't looked at the clearance specs in the last 5 years, since the stove has sat in the exact same spot since the installer set it there.

Soon, I'll get a fire going. Maybe tonight, but I'm behind on other things...

There's still part of me that wants to call an installer and have it installed pitch perfect, even if it takes several hundred dollars to do it. Then, each year it will come off easily with none of this uncertainty!

Thanks again for the encouragement.
 
If you have 6" corner clearance you should be fine. If there is a general uphill pitch toward the chimney through the elbows I'd say screw it (literally) and you are good to go.
 
Status
Not open for further replies.