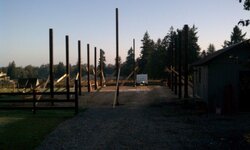
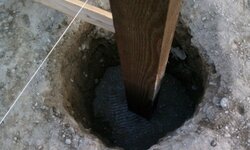
Any pole barn builders here?

  • Active since 1995, Hearth.com is THE place on the internet for free information and advice about wood stoves, pellet stoves and other energy saving equipment.

    We strive to provide opinions, articles, discussions and history related to Hearth Products and in a more general sense, energy issues.

    We promote the EFFICIENT, RESPONSIBLE, CLEAN and SAFE use of all fuels, whether renewable or fossil.
Status
Not open for further replies.
This is good advice. In the couple I've done you lay out the XPS, then put down the vapor barrier, then lay out your rebar and tie it. You can do VB then XPS too.

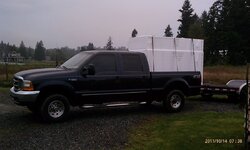
You can certainly use EPS too. It's only a truckload. EPS is rated for underslab and I picked up this 25 psi stuff at the factory. 6" of concrete only weighs 0.5 psi and the ground underneath is almost always weaker than standard home depot 15 psi EPS. No reason I've ever found to spend double on XPS under the slab. Now on the sides of the slab I did use XPS since it is more resistant to physical abuse.
 

Attachments

  • truckfoam.jpg
    truckfoam.jpg
    117.8 KB · Views: 592
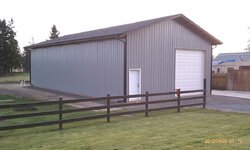
Thanks for the pictures Highbeam. I was going to ask if you can frame a service door of the corner post or not. I wasnt sure if you had to have X amount of space between the edge of the building and the door for trim or what not.
 
You can certainly use EPS too. It's only a truckload. EPS is rated for underslab and I picked up this 25 psi stuff at the factory. 6" of concrete only weighs 0.5 psi and the ground underneath is almost always weaker than standard home depot 15 psi EPS. No reason I've ever found to spend double on XPS under the slab. Now on the sides of the slab I did use XPS since it is more resistant to physical abuse.

Good point on EPS. We bought a truckload of XPS used for next to nothing, so that's what we used on everything. I think it worked out to a buck a sheet for 1/2" and $2 for 1.5".
 
Good point on EPS. We bought a truckload of XPS used for next to nothing, so that's what we used on everything. I think it worked out to a buck a sheet for 1/2" and $2 for 1.5".


Awesome deal. XPS is good stuff but retail price is double EPS and I have yet to find a good reason to spend so much more.
 
Thanks for the pictures Highbeam. I was going to ask if you can frame a service door of the corner post or not. I wasnt sure if you had to have X amount of space between the edge of the building and the door for trim or what not.

In my case, the posts were true 6x8 plus you have the outer girt at 1.5" plus the jack and king studs for 3" more. Left me over 12" between doorway and wall which was plenty to fit the corner trim and a sliver of siding.

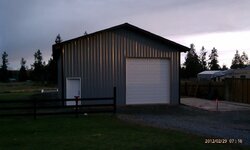
Sorry for all the pics, you can ignore them if you'd like.
 

Attachments

  • IMAG0295.jpg
    IMAG0295.jpg
    81.5 KB · Views: 676
  • IMAG0324.jpg
    IMAG0324.jpg
    122.7 KB · Views: 1,551
Not to dissuade you from doing a post building, but if I had it to do over, I'd just stick build the darn thing.
I ended up framing between posts so I could use batt insulation.
I don't think I saved anything by doing it this way.
 
Key the board for the garage door openings and insert rerod in case you ever want to pour an approach. Gary

I get what your saying, I just have no idea how/what that means.

Not to dissuade you from doing a post building, but if I had it to do over, I'd just stick build the darn thing. I ended up framing between posts so I could use batt insulation. I don't think I saved anything by doing it this way.

I think the only thing that stopped me from stick building the whole this is the footing and block work. I would have to hire that out were with a pole barn i am going to try to do everything myself. Im a diesel mechanic and have very limited construction skills unfortunately.

Wich brings me to my next question... I just got done putting the concrete in the holes and by tomorrow they will be ready to have the posts set down on them. What is the best way to go about squaring the building up? Do i set the corner posts first and then run a string line down the sides and square/plum everything as i attach the bottom girt board?
If someone can kinda of give me a step by step on how to frame this thing i would greatly appreciate it.
 
Pole vs. stick debate will go on forever. I too sticked out the walls of my pole building so I didn't save any lumber but I did get a roof thrown up fast and was able to build out the inside at my pace. With a stick built, you need to build and pay for it all at once. There are other benefits and drawbacks but both styles work well if done properly.

Wich brings me to my next question... I just got done putting the concrete in the holes and by tomorrow they will be ready to have the posts set down on them. What is the best way to go about squaring the building up? Do i set the corner posts first and then run a string line down the sides and square/plum everything as i attach the bottom girt board? If someone can kinda of give me a step by step on how to frame this thing i would greatly appreciate it.

First set up your batter boards and string lines so that you have a perfectly square building "built" from string about 6" bigger than the outside of the proposed building. You should have done this before you dug your holes since you need 6" of mud between the wood and the dirt and your holes usually end up needing some extra digging.

Corner posts first and then the rest. Measure the spacing, 8-10-12 whatever, from the corner each time and not between each pole.

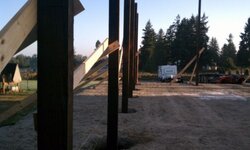
Set your corner posts in the hole. Plumb them and bonk them into the location. You will have lots of long 2x6s in a pile since you will need them for your girts. You will also need/want a bunch of cocrete stakes, those solid metal spikes with nail holes in them. Drive the stakes first and then while holding the pole plumb, have your buddy nail the bottom of the girt to the stake and then the girt to the pole. This is a good place for duplex nails. Two braces on each pole. Leave those braces there until the trusses are set. It will be a while. Once the poles are in the holes they will begin drying and bending so the faster you work from this point forward the better to prevent a wonky building from bent poles.

After all poles are braced you can again check each for plumb, location, and diaganol. Then backfill with concrete. I stuck two vertical rebar into the backfill that were later bent down and embedded in the slab.
 

Attachments

  • IMAG0146.jpg
    IMAG0146.jpg
    38.1 KB · Views: 478
  • IMAG0143.jpg
    IMAG0143.jpg
    31.1 KB · Views: 612
  • IMAG0145.jpg
    IMAG0145.jpg
    44.7 KB · Views: 3,111
Not to dissuade you from doing a post building, but if I had it to do over, I'd just stick build the darn thing.
I ended up framing between posts so I could use batt insulation.
I don't think I saved anything by doing it this way.

The last one I build we just tacked on some small cut-offs to each post, then ran 2x6's horizontally between the posts 16" OC. When you screw your metal on the outside it takes the sag out of them. That sets you up to run batts horizontally.
 
Last edited:
The last one I build we just tacked on some small cut-offs to each post, then ran 6x6's horizontally between the posts 16" OC. When you screw your metal on the outside it takes the sag out of them. That sets you up to run batts horizontally.


I think something is funny with your numbers. Do you mean you ran 2x6s horizontally? Some folks run interior girts just like your typical exterior girt to hang insulation and sheeting on the interior. Other folks use those goofy bookshelf girts between the poles to allow the metal on the outside and the sheeting on the inside to be attached to the same girt.

Lumber is cheap. Time is the big expense plus the flow of cash to build can be so much slower on a pole structure. Building the building becomes a hobby all itself.

Uhhh...yeah...2x6...not 6x6. Bookshelf girts.
 
First set up your batter boards and string lines so that you have a perfectly square building "built" from string about 6" bigger than the outside of the proposed building. You should have done this before you dug your holes since you need 6" of mud between the wood and the dirt and your holes usually end up needing some extra digging.

Ok, ya I did that in the beginning to mark where my holes need to be then i took down the strings and drilled my holes. Im not sure what you mean when you say 6'' bigger than the outside of the building. I had mine setup so that posts will go right up against the strings.

Set your corner posts in the hole. Plumb them and bonk them into the location. You will have lots of long 2x6s in a pile since you will need them for your girts. You will also need/want a bunch of cocrete stakes, those solid metal spikes with nail holes in them. Drive the stakes first and then while holding the pole plumb, have your buddy nail the bottom of the girt to the stake and then the girt to the pole. This is a good place for duplex nails. Two braces on each pole. Leave those braces there until the trusses are set. It will be a while. Once the poles are in the holes they will begin drying and bending so the faster you work from this point forward the better to prevent a wonky building from bent poles.

Once I have all my posts in and square/plum do you start with the bottom treated mud skirt board? And I wont be pouring concrete around the posts, just fill dirt. After the poles are square/plum should I start to fill the holes in or wait till the bottom mud girt board is on?

Sorry for all the questions but you two guys seem to know alot about building so I figure I should get as much info from you as i can.
Thanks
 
Seems like everyone around my area has told me to use sand under the slab. I think I will use up the sand i have here already to bring it up to level with the rest of the surrounding ground and then maybe 6-12" of gravel on top. I have the 6 mil poly sheeting and since the building wont be heated except for the radiant heat loos from my boiler I wont be putting pex in the concrete or the foam. What do you recommend on the saw cut for my 16x20? Should I cut it into four sections or more?
Our slab is on compacted gravel, then 2" sand with a 6mil poly topper. The slab was poured in Oct. and cured nicely. No insulation in the floor or the garage section. The small shop section is well insulated and has an insulated flooring on top.
 
Ok, ya I did that in the beginning to mark where my holes need to be then i took down the strings and drilled my holes. Im not sure what you mean when you say 6'' bigger than the outside of the building. I had mine setup so that posts will go right up against the strings.

I like my string lines 6" off from the actual building since if you touch the string with posts, even just one, the string line is no longer straight. Setting up your string without an offset requires perfection in construction that just isn't possible.

Once I have all my posts in and square/plum do you start with the bottom treated mud skirt board? And I wont be pouring concrete around the posts, just fill dirt. After the poles are square/plum should I start to fill the holes in or wait till the bottom mud girt board is on?

Fill the holes and then install the mud girt. You're using dirt eh, I wouldn't do that. Dirt will compact and settle. If you must use dirt then be sure to compact like crazy with small lifts and even add water to be sure that you get compaction. I would rather used crushed rock than dirt for ease of compaction. I needed concrete for lateral strength, in other words, to resist the poles falling over. I use concrete on fenceposts too.

Installing the mud girt is a very important step since this determines your floor elevation and your ceiling height. It determines if your poles are long enough. It determines the grading around your building, it determines how much of your poles are underground. It also determines the levelness of your girts and your slab. Get the mud girt right. Think about it for awhile.

If your girt spacing is 24" like mine was, then cut a chunk of 2x6 18.5" long to use as a spacer. Set these chunks on top of the mudgirt and tack it to the pole. Set the next higher girt on that. Repeat a zillion times. You will be climbing the girts like a ladder to lift upper rows of girts into place.

Remember to load your gun with galvanized framing nails when attaching stuff to the treated posts. Supposedly the treatment chemical eats regular nails and it would be bad to lose this bond.
 
Fill the holes and then install the mud girt. You're using dirt eh, I wouldn't do that. Dirt will compact and settle. If you must use dirt then be sure to compact like crazy with small lifts and even add water to be sure that you get compaction. I would rather used crushed rock than dirt for ease of compaction. I needed concrete for lateral strength, in other words, to resist the poles falling over. I use concrete on fenceposts too. Installing the mud girt is a very important step since this determines your floor elevation and your ceiling height. It determines if your poles are long enough. It determines the grading around your building, it determines how much of your poles are underground. It also determines the levelness of your girts and your slab. Get the mud girt right. Think about it for awhile. If your girt spacing is 24" like mine was, then cut a chunk of 2x6 18.5" long to use as a spacer. Set these chunks on top of the mudgirt and tack it to the pole. Set the next higher girt on that. Repeat a zillion times. You will be climbing the girts like a ladder to lift upper rows of girts into place. Remember to load your gun with galvanized framing nails when attaching stuff to the treated posts. Supposedly the treatment chemical eats regular nails and it would be bad to lose this bond.

Ok thanks, I will look into the crushed rock around the poles. And I will be sure to get the bottom girt done right, I cant afford to screw this building up and have any major setbacks eventhough its only 14x20. I want to do it right the first time around.

like my string lines 6" off from the actual building since if you touch the string with posts, even just one, the string line is no longer straight. Setting up your string without an offset requires perfection in construction that just isn't possible.

That makes alot of sense, I will adjust my strings to make that possible.
 
That makes alot of sense, I will adjust my strings to make that possible.

The next time you will need that string is when setting trusses to make sure that the tails are all perfectly aligned and your fascia/gutter will be nuts straight.

A lot of the things I do are overkill because I want to make it right at the expense of extra time.
 
And I will be sure to get the bottom girt done right,

A chalk line and a good (long) level are going to be you best friend on getting that done right. Start in the corner that is highest relative to the grade (present and future) and lay everything out from that point. If that point is too high you might have to do some digging.
 
I have another question, since i am buidling this with 4x6's they guy at the lumber yard to put them like you would when building a 2x6 wall with 4'' part facing the outside and inside and the 6'' part facing the next pole.
 
I have another question, since i am buidling this with 4x6's they guy at the lumber yard to put them like you would when building a 2x6 wall with 4'' part facing the outside and inside and the 6'' part facing the next pole.

Yes. The girts will link posts to strengthen the posts in the skinny direction, this to resist the gable end winds. The thicker dimension will resist side wind loads.

Are 4x6s that much cheaper than the regular 6x6s?
 
How far up do you start the steel for the walls on the mud girt. From what I have read online you don't start the steel at the bottom of the mud girt but 3.5" up from the bottom. Does that sound right?
 
How far up do you start the steel for the walls on the mud girt. From what I have read online you don't start the steel at the bottom of the mud girt but 3.5" up from the bottom. Does that sound right?

I used a 2x8 for my mud girt and came down about 2.5". The purpose was so that the bottom screws could be about one inch from the bottom edge of the metal and so that I was into the "meat" of the mud girt with those bottom screws. I also put housewrap between the metal and the girts and have been very happy with that small investment. Again, it is important to get your mud girt level so that you always have something to screw into.

Don't bury the metal for several reasons. Be certain that you have at least a couple of inches of exposed mud girt between the metal and the soil. Just like a house you need a way for drainage to occur at the bottom of the siding from the inside. Plus you need to be sure that mice have access to the bottom of the siding ribs!
 
Status
Not open for further replies.