Glacier Bay MCC

  • Active since 1995, Hearth.com is THE place on the internet for free information and advice about wood stoves, pellet stoves and other energy saving equipment.

    We strive to provide opinions, articles, discussions and history related to Hearth Products and in a more general sense, energy issues.

    We promote the EFFICIENT, RESPONSIBLE, CLEAN and SAFE use of all fuels, whether renewable or fossil.
Status
Not open for further replies.

bobmwsc

Member
Feb 4, 2013
36
central Mass
I joined the forums a few days ago with a pellet stove question and decided I could post here too! I bought a used pellet stove insert for my main floor (3 bedroom ranch) and we were using that as the sole source of heat in the house. I noticed that the basement was staying very cold - about 45 F on a good day. This made for some ice cold hardwood and tile floors. When the furnace is running it keeps the basement 10-15 degrees warmer due to the forced hot air heating and the un-insulated duct work.

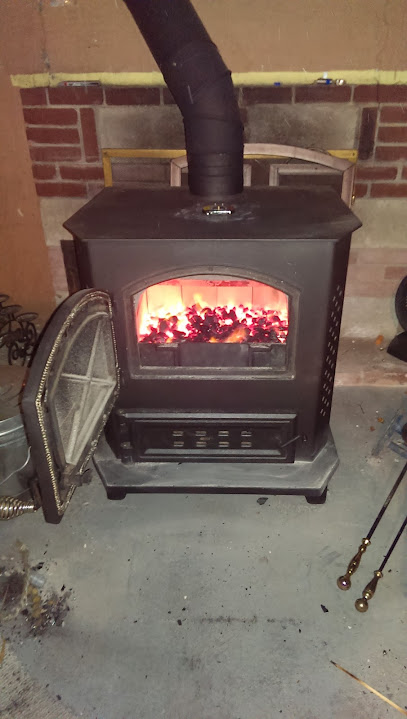
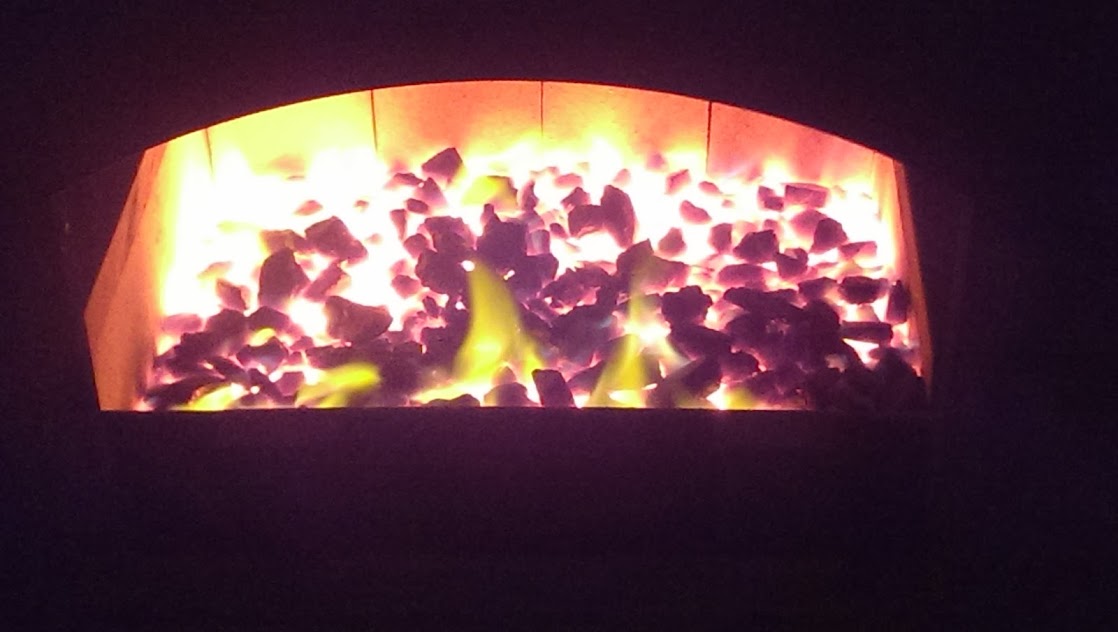
I decided I'd look for a way to keep it a little warmer down there and found a great deal on an older coal/wood stove. By great deal I mean it cost me $0.00. (can't beat that!) It's a 1981 model that I got it from the original owner who had been using it in her home up until this season. It seems like a solid stove - bigger than I expected. She gave me all the owner's manuals that go with it. The only thing it's lacking is the blower which she stated broke about 10 years ago but they never bothered replacing because it kept the house warm enough without it. Here are some poor quality photos taken with a phone's camera in a poorly lit garage. For some reason it makes the stove look much dirtier than it really is. I'll post up some better photos when I get them.

IMG_0283.jpg IMG_0277.jpg IMG_0278.jpg

The stove itself is about 28 W x 26 D x 32 H. It came with everything necessary for coal operation as well and she stated this is what they used it for primarily. A couple of the firebrick, not installed in the photos, are broken but that's a small expense.

I'm going to do my best to clean it, maybe a fresh coat of paint, and hopefully get it installed this season.

Now the big question - does anybody have any experience with these stoves? A search of the forums, and the internet in general, yield nearly 0 results. Is this a fairly rare stove? Even a search for the Gibralter (who I guess bought out Glacier Bay) doesn't come up with very much.
 
Some Glacier Bay stoves were more coal then wood burners. Yours looks to be in decent shape, but set up for coal. Is there any upper air supply or is the front bottom supply all there is?
 
The front bottom supply is the only air supply. The manual states doesn't state that there are any changes necessary for the use of wood as opposed to the use of coal except that the coal banking bar is not required. Any other changes when burning wood?
 
I have heated with a MCC Gibraltar and still have it with paperwork. The secondary air to ignite coal gas above the fire is supplied through holes directly behind the stove front. There is a small shelf at the bottom of door opening where the coal banking plate rests. The plate sits in a groove, and the holes should be just forward of the plate allowing an air wash to go up the glass , over the banking plate and ignite gasses.

The grate system used is one of the best, most heavy duty grate systems made.
Blowers are available at Woodman's.
You do not have to use a blower, and the top will not get hot enough to cook on with a blower running. The top surface gets hot enough to evaporate water in a kettle for humidification, but that's about it. It is a great space heater from the air coming out the vent holes, where you get the most heat from.

You "can" burn wood in any coal stove, but the design is primarily for coal. Wood will burn fast on a grate that allows too much air up through it.

If you Goggle search "Gibraltar coal stove" you will find info on nepacrossroads, primarily a coal burning forum and parts suppliers. As with any coal stove, emptying the ash daily keeps the level below the grates. The incoming air coming up through the grates keeps them cool, and when the ash is allowed to build up to them, they overheat, warp and sag. This can happen to any coal stove, even locomotives and ships. Use Chestnut hard coal, and only shake until red coals start to fall. You should have a barometric damper in connector pipe to control draft. Mine heated 2000 sf nicely, but this is a "stoked" stove, meaning you open front door to load it once a day, shake at least twice. It will stay going all season until you let it go out. The only reason I changed stoves was due to going to a Hitzer with gravity hopper and thermostat. now that coal has doubled in price since I burned it, and I have plenty of acreage for wood, I burn wood only that is also cooking and hot water.
 
Does your manual mention Old Erie Stoves LTD ?
From 1981 to 1987 that was the mfg.;
http://www.trademarkia.com/glacier-bay-73225179.html

From 1983 to 1991 it was mfg. by; (my newer manual)
Gibraltar Energy Products
c/o JAB Heating Co., LTD. 2000 Erie Blvd. East, Syracuse NY. 13224
http://www.trademarkia.com/gibraltar-73444221.html

Perhaps the same address in East Syracuse since the new co. is on Erie Blvd ? There could have been a zip code change or addition.
My manual covers MCC, SCC, CFS, CFI All stoves are double wall with air chamber for blower except CFS.
 
Thanks for all the info coaly!

The rear of the manual states that the stove was manufactured by

GLACIER BAY, LTD.
7000 Fly Road
Syracuse, NY 13057

and

GLACIER BAY, INC.
14920 N.E. 95th Street
Redmond, WA 98052

No mention of Old Erie Stoves in the manual and my manual covers the same stoves you listed. The rear of my stove shows the model listed as an MCC81 - matches up with what the owner stated (she bought it in 81) and some of the paperwork she gave me had that date on it as well.

The blower on my stove is missing but she stated that they ran it for years without the blower. I took a quick measurement of the hole and it was about 18" W by almost 5" H and I'm wondering if I could fit the Englander Large Room Air Blower in the space and if it would function properly.

The only part of the stove that shows real wear is the top - there's some scratches and a little surface rust and a very small area, top center, that bows down a little (less than 1/4"). Is that a result of over-firing at some point or just a sign of it's age (30 years of fires?)

Right now the stove is at my parents house in their garage. I'm waiting to get it cleaned and painted there before hauling it into my basement but I did remove the door. I'll get that cleaned and painted at my house and post some photos when it's done (hopefully this weekend).
 
Steel plate stoves when overheated can warp the plate which is probably what happened.
Leaving the air intake wide open, with no fan could do this, but if a barometric damper is installed, it should help slow the fire down when the stack is too hot. Leaving the ash door open to kick up an almost dead fire will definately cause it. That is bad practice, and if you have to open it to get it going, it should not be left unattended. You will get to learn on warmer days to use finer small pieces of coal. Normally called "fines" around the edges of coal bin and on the bottom. The BTU available per pound is the same, the larger the coal, the more airspace between pieces and the faster it will burn. Smaller pieces get less air and burn slower. Same amount of heat, just longer duration. Overnight use the big stuff, days use the finer scraps. My stack temp only ran 150* with a normal fire. No where near the temps required for wood.

I lift the grates out and remove the banking plate and doors for moving it.

My blower is a Fasco fan mounted on what I call a "snail shell" over a square hole in the back outer wall. About 5 inches square. It also has a steel electric box mounted on the rear right back corner with a fan switch to control blower. I plugged it into a variable speed controller since most fans are noisey running full speed. 1/2 speed was about right for normal output. I used it as my main heat source in NE PA with a Fisher Goldilocks in the kitchen for fall and spring overnight wood fires. All winter, that was the only heat source needed.
The only reason I haven't sold it, is because it has a solid brass upper and lower door with etched glass resembling a wreath of wheat. The stove is like new.
 
Would wiring a single outlet to a dimmer switch for the fan accomplish the same thing as your variable speed controller? Set the fan to high and adjust it with a wall mount ceiling fan dimmer switch?
 
As long as the rheostat (dimmer) is for motors and not incandescant lamp only.
 
Here's the stove with solid brass doors; Never had a need to get pics of it until today since a neighbor is interested in it. Sharp stove with the brass.
Gibraltar 1.JPG Gibraltar 2.JPG
 
Only burned coal in it for years. The last time it was burned I dumped the fire by shaking all the way until empty. Didn't touch them or do anything to clean them. That's how they should look when burned out and dumped at end of season.

I'll try to explain shaking, with practice everyone acquires their own touch that works best for them. Normal shaking is a rapid approx.1/8 to 1/4 throw motion with shaker handle to 'rootch' it. (That might be a PA dutch word) You learn when the coal burns down to a large ash pile with a little glowing on top, it's very light, and it rocks back and forth very easy. With a lot of ash to dump, you want to rock the handle slowly, with longer strokes and the ash falls through larger holes quickly, but you don't want to "go too far", like moving the handle over half way, so as the coals on top drop through the grates. Unburned coal can get stuck between them if moved too far too. Moving the handle over half stroke is more dumping the fire than shaking it. When a piece gets stuck, you can't shake it clean until it burns what's stuck out between grates. This pretty much is the same with any coal shaker grate. Moving the handle too much (over shaking) allows too many hot coals through, not moving it enough takes quite a while to get it clean. When you get good at it, you use the play in the linkage or teeth between grates as the place to rock the handle back and forth "where it makes noise", so the wasted motion gives the grates a bump in each direction. It's easier to think of it as moving large grates in a locomotive that are like heavy flat plates. Slowly moving the handle doesn't move them much at all, then suddenly they tilt and dump fire through. Slow motion won't knock the ash off them. You have to violently move the handle where the play is to use the weight of handle and linkage to give them a jolt, not really moving them enough to dump fire through. Just like a locomotive that opens the grates wide open to dump the fire, you can move the handle so far you can dump the fire right through. Try to keep the fire out of the ash pan. That heats grates and warps pan.
Before dumping ash, I always make sure there is room in the pan and shake a little to get good air flow up through grates. With a normal fire, open the ash door and pull the pan. This way any very fine fly ash is pulled into the stove. This is the #1 cause of people thinking coal is dirty. They remove the pan cold before the stove is going in the morning and allow dust to settle in the house! The only thing with shaking just before pulling pan is if there are many hot coals, you're removing a lot of heat from the building by taking it outside into a metal can. I set the ash pan on hearth next to stove until I feel very little heat radiating off the ash. That can be a half hour or more. It's amazing how much heat you waste taking it outside too soon. May not be able to do this with kids or animals around. My kids and grandkids grew up around stoves, boilers, and steam. So they know what to touch and what to stay away from.

Gibraltar Inside.JPG
 
Day 1 of refurb not going as planned - hoped that I could just remove the cast "window" from the door so everything could be painted separately and all the gasket could be replaced.. Well I managed to break the heads off of two screws and strip the heads of 5 more. Who would have thought that 30 years of being subjected to high temperatures would cause a screw to become brittle? :rolleyes: I'll see if I can take a trip to harbor freight tomorrow to pick up an extractor set for the screws.

DSC02247.JPG DSC02252.JPG

Below is one of the (few) screws that came off intact. Is there a certain type of screw that should be used in a stove? (heat resistance?)

DSC02254.JPG
 
a little more research shows that the screw appears to be a "Slotted Hex Washer Head Machine Screw Type F." They're 1/2" long - I just need to measure the diameter.​
Is it the Steel/Black Oxide screws that I need?​
 
Little late now, but here's a few tricks; You may have to drill and tap no matter how careful.......

When I know I'm taking something apart, I keep it wet with PB Blaster for days, spraying them a few times a day. Time corrodes things together, so it takes time to soak in and get them apart. The longer the better. Before trying to turn them, smack each one a few times with hammer, driving it in. This usually loosens them right up. If they don't move easily, use heat on the door keeping fastener cool. If you get the fastener and part hot, a cold wet socket on extension will cool and shrink the fastener and normally comes right out. Putting the socket in cold water a few times cooling the head makes a huge difference. Even sitting the door on a hot stove and chilling the hardware like that works. If you need to expand the hardware such as a nut on a stud, put the correct size socket for nut in hot water on an extension. Let it heat in almost boiling water, and put the hot socket on the nut. As you turn towards loosen, the contact between hot socket and nut heats the nut just right without torch or flame, allowing the threads to stay cool. It's amazing that the heat from a socket out of hot water expands the nut as much as it does. Secret is that the heat is only in contact with nut, and not heating threads like a torch. It's all about temperature differential. On stoves with nuts and studs around door glass retainers, I use brass nuts. End of problem.
I ALWAYS put everything together with silver anti-seize. You may be the next one taking it apart. If you have to use zinc plated hardware, it prevents galvanic corrosion in the hole.
Probably not going to find anything special in a self tapper, black hardened ones would be nice. (dashboard screws from old trucks are perfect) Nuts and bolts, I try to use grade 5 instead of mild steel that twists right off.
 
I had some quiet time at the house today - wife was out with my daughter and my son was taking his nap so it was sort of spur of the moment.

The metal on the old screws was just so soft I think it was unavoidable. The ones that snapped used almost no effort when turning the socket when they broke off. If you look at the photo of the screw above you can see that it's pretty well rusted right under the head. I was able to drill out one of the broken screws pretty easily. Five of the screws rounded right off when I tried to turn them - again - no effort involved... then when I tried to use the slot with a screw driver they top pretty much crumbled. I'll probably have to end up grinding the top of the screw down, removing the bracket then drilling out those screws as well. It started out so well with the 4 on the bottom. They came right off. The screws on each side are the ones that rounded as well as one on the top.

The pellet stove that I refinished this fall used all brass nuts on the studs and I had zero issues removing them.

I'll take a trip to the hardware store to see if I can find some matching screws - everything that I've found online are sold in quantities of 10,000.
 
I figured I might post a little update. As the heating season is upon us I figured I should get in gear and get this stove finished. If it was at my house it would have been done months ago but it's been taking ups space in my parents garage. I got 90% of the stove complete. I cleaned the entire stove inside and out. The old paint, rust, and grime was stripped and sanded off. All new paint - I used Stove Bright metallic black to match the pellet stove upstairs that I refinished last year. I ended up bringing the door to a machine shop to remove 4 of the snapped off screws. He cleaned out the holes, opened them up a size and re-tapped them. I have to pick up a tap for 3 holes that I had drilled out and carefully clean them out. My biggest fear is snapping off a tap in one of the holes.

IMAG0332.jpg IMAG0342.jpg IMAG0343.jpg IMAG0345.jpg

I just have to paint the door frame and install some new gaskets and new firebrick then I can cure that paint.
 
Be sure you use a flat-bottomed tap and not a tapered one.
 
I was able to get the holes tapped. I ended up using a tapered tap because that's all they had at the hardware store I went to. The holes are deeper than the screws anyways so it shouldn't be an issue. What I'm thinking about now though is to replace the screws with threaded studs and cement them in and use some brass nuts. This is how my pellet stove is set up (also like coaly described) and this way if I do have to take the door apart in the future I won't run into this issue again.
 
So I went to Home Depot last night and bought some threaded rod to make the nuts, some stainless lock washers and some brass nuts. I started cutting the studs this morning - it seems to be going OK with the dremel. The rod they had was zinc plated steel. After reading up about the "galvanic corrosion" that coaly mentioned I researched how to remove the zinc. It seems to be as easy as soaking it in vinegar for a few hours. I was thinking of using some gasket cement to hold the studs in - do you guys think this is necessary?
 
I finished cutting the studs. FYI - the vinegar was a great way to remove that zinc coating. I could literally see it bubbling off (at least that's what I hope it was!) I test fitted all the studs and after the door is together I'll just have to grind them down the rest of the way. My only concern is the nuts on the sides - I have a feeling they may be to thick for the door to shut flush. If I have to I guess I can grind them down a bit too.

IMAG0346.jpg

I still have to rip out that gasket and repaint this final piece.

I am having trouble locating hinge pins. Does anybody know of a modern stove that would use 3/8 x 2 1/4 hinge pins? Every time I call a stove place they want to look it up by model and apparently nobody seems to stove parts for a 30+ year old stove made by a now defunct company....

would clevis pins work temporarily at lease for the ash door? or will they not hold up to the heat?
 
Hi Bob, interesting narrative. I've been looking to replace my woodstove, found a glacier bay up the street, checked with hearth.com and saw your project. I'm now wondering how your stove is burning? I need a big stove that throws a lot of heat for a 3000 sf house with high ceilings.
Thank you in advance for your advice.

Robb
 
The stove is working well for me. I have a much smaller house than you though. My home is a ranch - about 1200 sq ft living area. However, I run the stove in my basement and it produces enough heat to warm up the basement and the upstairs. The basement itself is uninsulated so from what I've read I'm losing probably about 1/3 of the heat into the concrete foundation. The woman I bought the stove from (original owner from 1981) had the stove installed in the living area of a home twice the size of mine and stated that she would have to open the windows during the winter because it would get so warm. Above coaly states that he heated 2000 sq ft with his.

I have been using with coal which provides a nice, steady heat. I had found the coal on craigslist in the fall - some nut and some stove. Stove coal = faster burn/more heat at once. Nut coal = slower burn/less heat at once. Both output the same BTU/lb. I know that the stove could be even more efficient if I had a barometric damper and/or if I had a 6" liner up the masonry chimney (right now it dumps into an approximately 7x11 masonry flue). The maintenance routine is fairly simple: fill it one a day and shake it down twice. This is my first season using coal so it did take a little while to get the hang of it - I either had trouble starting it or I would wait too long to shake it down and it would go out.

I am also looking to get a blower for the rear of the unit. I had tried putting a regular vornado type fan back there but I don't think it was doing the stove justice. There's a 5"x18" opening for a blower in the rear of the stove so I just need to retrofit a new blower to it.

Just beware - the stove is heavy! According to the manual the MCC weighs in at 600 lbs.

Here's a pic of the stove installed - it's a little cleaner around the stove now.

IMAG0961.jpg
IMAG0963.jpg
 
Last edited:
Nice stove, I have the same one, but after speaking with Coaly, whom I met by chance, I am looking to use it coal instead of wood, that I do now. I need a few parts for coal though that are missing from the stove.
 
Status
Not open for further replies.