My new blaze king princess insert install

  • Active since 1995, Hearth.com is THE place on the internet for free information and advice about wood stoves, pellet stoves and other energy saving equipment.

    We strive to provide opinions, articles, discussions and history related to Hearth Products and in a more general sense, energy issues.

    We promote the EFFICIENT, RESPONSIBLE, CLEAN and SAFE use of all fuels, whether renewable or fossil.
Status
Not open for further replies.

Archer39

Feeling the Heat
Sep 23, 2009
288
Pottstown PA
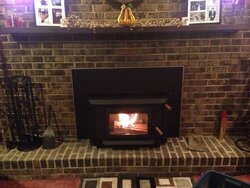
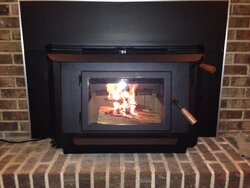
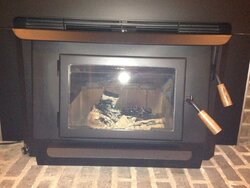
I just purchased a 2200sq ft bi-level house and installed a blaze king princess insert into the existing fireplace.

I wanted to say thanks to all the members that answered my install questions and I wanted to share some pictures. I still have to install tile in front of the hearth. I am having a hard time finding tile I like.


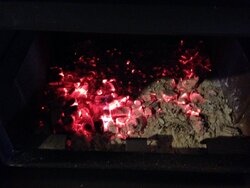
I have been very impressed with the burn times and the controllability of the stove. I had an englander nc30 in my last house so that is what I have to compare blaze king princess insert too. I have only been burning tulip poplar and am seeing anywhere from 12-16 hr burn time depending on the thermo setting. Compared to the englander this thing has such a consistent heat output. This is what I was hoping for. The englander would throw a ton of heat but only would go for 10 hrs.

I need to get some good wood in the stove to see what it will do as far as heat output. With the poplar the stove top temps like to sit around 350-450 and this is not enough heat to keep the house in the 70's like I would like. This is also due to not having the air circulating correctly yet. I have to install to floor vent in the stove room. I hope this helps.

I do have one major problem... Most of my wood is cut 20". I have about 10 cords to cut shorter.

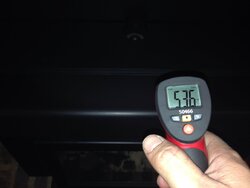
We'll anyway... Here are Few pictures .
 

Attachments

  • image.jpg
    image.jpg
    238.8 KB · Views: 2,299
  • image.jpg
    image.jpg
    195.8 KB · Views: 4,161
  • image.jpg
    image.jpg
    233.6 KB · Views: 1,145
  • image.jpg
    image.jpg
    162.1 KB · Views: 870
  • image.jpg
    image.jpg
    63 KB · Views: 798
Last edited:
  • Like
Reactions: wireedm
Damn, brand new insert, and you bent the fins on the top vent already. tisk tisk.
LOL, looks good man, keep us posted on how it puts for heat in the cold weather.
 
Yea. I bent the fins taking it on and off 10 times trying to get the top and side pieces of the surround to line up perfect. I keep on forgetting to straighten them once it gets hot and bends easy.
 
My convection deck came brand new with bent louvers. NIB. It would be tought to weld such small pieces of metal without some heat distortion. Also easy to bend them back though.
 
I can fit 21" logs on the second and third layers of wood, try that... The logs will be close to the glass but will not touch it.
 
I can fit 21" logs on the second and third layers of wood, try that... The logs will be close to the glass but will not touch it.

That's what I have been doing but I am already running out of short ones for the bottom already. The other problem I have is a lot of my splits are large. The Englander loved the big splits. With them being large they don't fit height wise on the second layer.
 
That's what I have been doing but I am already running out of short ones for the bottom already. The other problem I have is a lot of my splits are large. The Englander loved the big splits. With them being large they don't fit height wise on the second layer.
I had the same problem my first year, I make a box to cut some splits down but did what you guys did, first layer 16 inch, second and third layer the longer ones.
How's it heating your house overall the last couple of cold nights?
 
I had the same problem my first year, I make a box to cut some splits down but did what you guys did, first layer 16 inch, second and third layer the longer ones.
How's it heating your house overall the last couple of cold nights?


Not the greatest to be honest but it is not the stoves fault. I need to work on getting the air upstairs better. I have plaster ceilings and an area right in front of the stove the plaster has cracked and is sagging. I am going to put vents in the ceiling right where it is cracked. So something that should be as easy as cutting two holes and putting in vents is going to require ripping down a 4'x12' area of plaster and repairing and then put the vents in.

Another issue that i have is that this is a bi-level house with a 1.5 car garage so i have 1/3 of the downstairs not heated an not insulated. The bedrooms are right above the garage and these rooms are the coldest. I can feel the cold on the floor in this area of the house. How much would it help to put in 6" of fiberglass insulation in the ceiling of the garage? Do you think i would be better served to get someone in to spray insulate this area?
 
I have somewhat the same thing. My master is above our garage. But it is insulated well. If you are a do it yourself, i would rip out all the sheetrock or plaster(major pain in the ass) and you can buy your own spray foam. Wouldnt recommend it now in the winter especially if you do it yourself. Make sure your garage doors are sealed good as most older doors have huge air leakage between joints.
 
there is no plaster or sheetrock on the ceiling in the garage. Just exposed 2x6 studs. What would provide me a better r-value and draft protection spray foam or 6" of insulation?
 
Spray foam. Make sure you get a good reputable contractor.
If they do it wrong, and the foam separates from the joists, it will suffer loss again.
 
there is no plaster or sheetrock on the ceiling in the garage. Just exposed 2x6 studs. What would provide me a better r-value and draft protection spray foam or 6" of insulation?

I would great stuff all the bays against the floor above and any hole you can find, insulate with r-19 and that should make a big differance! Lot cheaper then spray foam. Maybe even that denium insulation they have now! Top it with some 1/2" super tuff r dow board then sheetrock down the road.
 
I agree with the hogman, one of my fiends did a whole house with foam, it's really tight, heats 2500 sf with a summit from his unfinished basement. You'll have to experiment with fans or hopefully your vents work out in distributing the heat, most of us have that problem, I still have one cold room but I get pretty even heat in the rest of the house. Bi-levels are usually tricky to spread the heat.
 
Spray foam for sure and its pretty easy to do it yourself, just read the directions carefully.. Their are kits online you can get. Or you can pay someome. But if it was me id rather install reg insulation then pay someone to spray insualtion. Spray can get really expensive.
 
Archer, congratulations on the new insert. Have you been able to stretch it's legs a little with better wood? Also, what are the firebox measurements of the Princess insert. The Brochure says 2.54 cf firebox. Is it tapered? Thanks. I'm pretty interested in those units. I am super impressed with the consistent heat output. It's insane the burn times Blaze Kings produce.
 
Im curious to know what times you getting leaving it on full blast?
 
Archer, congratulations on the new insert. Have you been able to stretch it's legs a little with better wood? Also, what are the firebox measurements of the Princess insert. The Brochure says 2.54 cf firebox. Is it tapered? Thanks. I'm pretty interested in those units. I am super impressed with the consistent heat output. It's insane the burn times Blaze Kings produce.

Yea, i have been burning some red oak and hard maple in it on a few cold nights. I certainly puts out good heat when you open up the thermostat more. When it was in the low 20's i was running with the thermostat half open i was able to keep the house in the 70's close to the stove and mid 60's in the far bed rooms (2000sq ft bi-level). With it at this setting i was going 10 hrs before reloading. There was plenty of coals but just not enough heat. When running the stove like this it ran a lot like a none cat stove with the heat fluctuations and temp swings. But then again it is a wood stove... I have some heat loss issues i have to address with the house and it will really help maintaining my house temps.

This stove is certainly a lot less work compared to the englander in my old house. There is always enough coals to reload even when you have to extend your normal loading patterns. I can easily go an extra 2-3 hrs and not think twice about it. The englander would be cold where this thing you just rake out the ashes and then... wahlaa there are tons of hot coals. then throw on the wood.

The glass is tapered from bottom to top. they have a deep fire box where you can put a layer of wood below the fire bricks (these splits must be 16" or they will not fit). Then once you get above the front fire bricks you can put a layer of 19" spits (right up the glass). Then i can fit another layer of small splits on top of that but they must be around 16" again because of the glass taper. Overall the fire box is 16"x16" with some extra room on the second layer for longer splits.
 
Im curious to know what times you getting leaving it on full blast?

I never leave it wide open the stove top temps would get to hot. It will get well above 700 if left wide open for longer than 15 mins.
 
Last edited:
Status
Not open for further replies.