Door Gasket Replacement Technique

  • Active since 1995, Hearth.com is THE place on the internet for free information and advice about wood stoves, pellet stoves and other energy saving equipment.

    We strive to provide opinions, articles, discussions and history related to Hearth Products and in a more general sense, energy issues.

    We promote the EFFICIENT, RESPONSIBLE, CLEAN and SAFE use of all fuels, whether renewable or fossil.
Status
Not open for further replies.
Oct 25, 2012
93
Eastern Tennessee
Are there any tricks to replacing a door gasket? My husband replaced the gasket on the right door but it doesn't seal quite right. It's the right size gasket for the channel. He knew that it would have to set for a day before using the insert. Should it set on the insert, in place, or lying flat?

Thanks for your help, as always.
 
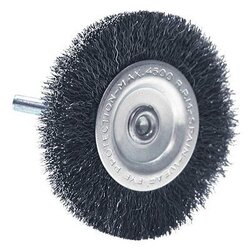
Charlene, replacing that gasket should be very easy. Perhaps one mistake that many make is to not get out all the old gasket and cement. One of the handiest tools is one of these that fits into a drill and it cleans out the channel really well.

Brush for drill.jpg
 
It's much easier to do this with the door off the stove and laying flat. If the new gasket is nicely glued in place there may be another issue with that door. Check its alignment and flatness with a straight edge.
 
Backwoods: I believe he has one of those wheels. He said he cleaned the channel out, but I'll ask if he used that wheel brush. Begreen: My question is rather once the glued gasket is in place on the door (which has been removed from the unit) whether the glue should be allowed to set on a flat surface gasket side up or returned to the unit to set. We can check the allignment.
 
Backwoods: I believe he has one of those wheels. He said he cleaned the channel out, but I'll ask if he used that wheel brush. Begreen: My question is rather once the glued gasket is in place on the door (which has been removed from the unit) whether the glue should be allowed to set on a flat surface gasket side up or returned to the unit to set. We can check the allignment.

Char,

The best thing to do with the door after the gasket is installed is to put it back on the stove. Get newspaper and put a sheet between the door gasket and the stove, close the door and lock or latch the handle. That will evenly compress the gasket to the face of the stove and give equal pressure completely around the gasket as the glue dries.

Craig
 
Charlene, replacing that gasket should be very easy. Perhaps one mistake that many make is to not get out all the old gasket and cement. One of the handiest tools is one of these that fits into a drill and it cleans out the channel really well.

View attachment 122033

+1 on that! I'll add that it is a good idea to get down to bare metal. After wire brushing, clean the channel with some brake clean or even rubbing alcohol. These small, easy projects are just like anything else, preparation is key. Anyone can squeeze an adhesive tube and push a gasket in place. Whether or not the gasket stay's in place all depends on the preparation.

I see no need to remove a door, unless there is an alignment issue. Why make more work for yourself?
 
I always install them a bit puffy so the gasket is a bit thick. If you stretch it out flat it might not be fat enough to make the seal. I learned that the hard way and had to do a door twice.
 
On a door like the 2200 (mine) there's almost 8' of heavy 7/8" gasket and many bends to accommodate the bay door shape. Taking the door off was very easy and made the gasket change go really smooth. Trying to hang that rope with door in place was certainly possible but i found the door laying flat was less stressful. 60 seconds to sit the door back on the hinge pins, closed and set overnight. My first gasket change on this unit, so i wanted to stack the odds in my favor. This may not be a big deal on your door, could be an easier install than mine, but something to consider...
 
Status
Not open for further replies.