The other thread on this sharpener started a few years ago (https://www.hearth.com/talk/threads...arpner-review-now-with-pics.80497/#post-80497), with the orange version, and it's become lengthy. Also, info on the newer version, with red plastic, starts appearing only toward the end. So I thought I'd start a new thread on this to show what I did to address a problem on mine and ask for opinions on the problem and for other solutions.
I picked up the tool in December. I first learned of it from that other thread, then went over it again before ordering it one night. I found a 25% coupon in the AARP newspaper just hours later, called HF the next day, and they accepted the coupon number over the phone and knocked the price down to the $30 everyone has been talking about, plus $7 to ship it. I don't do an awful lot of cutting in a year, but I hate finding that my four chains all are in need of sharpening. At six bucks a chain, six chains will just about pay for the tool, and I save having to drop off chains and go back a week or so later to retrieve them. Two down, four to go. You get what you pay for, but it doesn't seem too shoddy, and I'm not risking much. I haven't run the saw with either of the two I've done so far. I've included four pictures to help understand what I've written below.
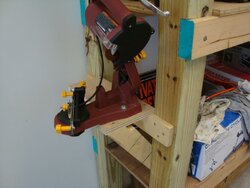
The first pic shows the version I'm talking about, mounted on the little platform I attached to the end of a beefy storage rack in the shop. This makes the thing available when I want, without tying up bench space. One difference from the orange earlier version is the change in the way the chain is held in place while sharpening one tooth. The orange version had what seemed (from pictures) to be a lever at the middle of the "Vise Base" (the bright metal bar that holds the chain); throw the lever and the chain would be locked into place. The red version has a "Vise Handle" mounted on the main handle up on the motor; this is like a handbrake lever on a bicycle. From that, a black cable runs down to the middle of the Vise Base, through a hole in it, to a small movable section of the outer bar of the Vise Base. A yellow adjustment knob terminates this assembly. There also is a screwed adjustment at the upper handle end of the cable, used to limit the amount of handle movement required for the lower end to grip the chain.

First, my tool came with the lower end of the cable not attached to the Vise Base. The "Assembly/Mounting" instructions say nothing about where this cable goes. I figured that out by looking at the pictures in the little instruction pamphlet and at the tool itself. That wasn't hard; the purpose of the cable was obvious.
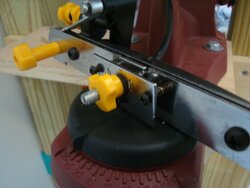
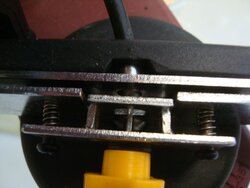
The second and third pics show closeups of this movable section of the Vise Base and how the cable is attached. As is seen, the outer bar of that movable section rides on two pins with springs. The shorter inner section of that assembly is what gets pressed against the drive links of the chain riding in the Vise Base when the handle is squeezed.
In setting up the tool to do my first chain, I noticed that when the handle is squeezed the outer bar of the movable assembly does not stay parallel to the rest of the Vise Base. It's really riding on those two springs. Contact is made first with the drive links on the chain itself, and as the handle is squeezed further that movable assembly rotates a bit in the vertical plane, lifting that segment of the chain ever so slightly. At least it did so on mine, and I had to look closely to see it (without the motor running, of course). I think part of the problem is that the cable is fairly stiff, and it doesn't enter the movable assembly straight on, but at an angle. The third pic shows this well.


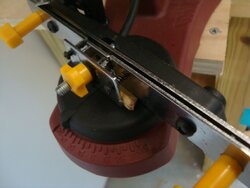
Here's what I did to address this rotation and lifting. I found that with the cable adjusted so that the inner bar of the movable assembly was in line with the outer guide bar of the Vise Base, a 1/4" drill bit just fit the gap between the outer bar of the movable assembly and the fixed bar. So I cut off a couple of pieces of wood that size and stuck them in both sides of that gap, as seen in the last pic. This way, the bottom edge of the movable assembly is held in place, while the rest of it actually rotates downward ever so slightly as the handle is squeezed. This rotation then works for me instead of against me, or so I figure.

This "field adjustment" seems to have worked OK as I did those two chains. But I'd really like to have other thoughts on this from others who have used this tool.
I picked up the tool in December. I first learned of it from that other thread, then went over it again before ordering it one night. I found a 25% coupon in the AARP newspaper just hours later, called HF the next day, and they accepted the coupon number over the phone and knocked the price down to the $30 everyone has been talking about, plus $7 to ship it. I don't do an awful lot of cutting in a year, but I hate finding that my four chains all are in need of sharpening. At six bucks a chain, six chains will just about pay for the tool, and I save having to drop off chains and go back a week or so later to retrieve them. Two down, four to go. You get what you pay for, but it doesn't seem too shoddy, and I'm not risking much. I haven't run the saw with either of the two I've done so far. I've included four pictures to help understand what I've written below.
The first pic shows the version I'm talking about, mounted on the little platform I attached to the end of a beefy storage rack in the shop. This makes the thing available when I want, without tying up bench space. One difference from the orange earlier version is the change in the way the chain is held in place while sharpening one tooth. The orange version had what seemed (from pictures) to be a lever at the middle of the "Vise Base" (the bright metal bar that holds the chain); throw the lever and the chain would be locked into place. The red version has a "Vise Handle" mounted on the main handle up on the motor; this is like a handbrake lever on a bicycle. From that, a black cable runs down to the middle of the Vise Base, through a hole in it, to a small movable section of the outer bar of the Vise Base. A yellow adjustment knob terminates this assembly. There also is a screwed adjustment at the upper handle end of the cable, used to limit the amount of handle movement required for the lower end to grip the chain.

First, my tool came with the lower end of the cable not attached to the Vise Base. The "Assembly/Mounting" instructions say nothing about where this cable goes. I figured that out by looking at the pictures in the little instruction pamphlet and at the tool itself. That wasn't hard; the purpose of the cable was obvious.
The second and third pics show closeups of this movable section of the Vise Base and how the cable is attached. As is seen, the outer bar of that movable section rides on two pins with springs. The shorter inner section of that assembly is what gets pressed against the drive links of the chain riding in the Vise Base when the handle is squeezed.
In setting up the tool to do my first chain, I noticed that when the handle is squeezed the outer bar of the movable assembly does not stay parallel to the rest of the Vise Base. It's really riding on those two springs. Contact is made first with the drive links on the chain itself, and as the handle is squeezed further that movable assembly rotates a bit in the vertical plane, lifting that segment of the chain ever so slightly. At least it did so on mine, and I had to look closely to see it (without the motor running, of course). I think part of the problem is that the cable is fairly stiff, and it doesn't enter the movable assembly straight on, but at an angle. The third pic shows this well.


Here's what I did to address this rotation and lifting. I found that with the cable adjusted so that the inner bar of the movable assembly was in line with the outer guide bar of the Vise Base, a 1/4" drill bit just fit the gap between the outer bar of the movable assembly and the fixed bar. So I cut off a couple of pieces of wood that size and stuck them in both sides of that gap, as seen in the last pic. This way, the bottom edge of the movable assembly is held in place, while the rest of it actually rotates downward ever so slightly as the handle is squeezed. This rotation then works for me instead of against me, or so I figure.

This "field adjustment" seems to have worked OK as I did those two chains. But I'd really like to have other thoughts on this from others who have used this tool.
Last edited:

