My pallets rot out quickly

  • Active since 1995, Hearth.com is THE place on the internet for free information and advice about wood stoves, pellet stoves and other energy saving equipment.

    We strive to provide opinions, articles, discussions and history related to Hearth Products and in a more general sense, energy issues.

    We promote the EFFICIENT, RESPONSIBLE, CLEAN and SAFE use of all fuels, whether renewable or fossil.
Status
Not open for further replies.

wahoowad

Minister of Fire
Dec 19, 2005
1,669
Virginia
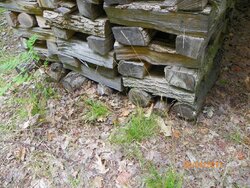
I got a few years ahead and have been burning my way through stacks that are several years old. I'm finding most of my pallets rotted out so I'm back to scrounging replacements. That is time consuming and at times frustrating as I rarely find pallets of the same size or height.

I'm some cases I attribute the rot to leaks I had in my tarps. I'll be fixing that with an actual roof system which should keep the stacks dry year round. The other cause could be simply the contact with the ground. My stacks
were placed on the edge of the woods so the pallets were placed on top of a heavy base of fallen leaves. I'm sure there was some moisture from the ground at play.

I'm trying to avoid the cost of building a floor system. And yes, I could lay down some system of timbers or boards to keep the pallets off the ground. But I'm curious how others have dealt with keeping your pallets dry and making them last?

Some old timers have used old motor oil to "paint" the wood to keep it from rotting. I may or may not have done this in the past to keep wooden things from rotting. It may or may not have worked really well. It may or may not be a really good way to use up old motor oil.
 
  • Like
Reactions: Soundchasm
I have the same problem for the same reason. It also stinks when your foot falls through the rotten decking. If you let them rot then dont forget about all the nails.

They make plastic pallets too but those wont be free.
 
Some old timers have used old motor oil to "paint" the wood to keep it from rotting. I may or may not have done this in the past to keep wooden things from rotting. It may or may not have worked really well. It may or may not be a really good way to use up old motor oil.
I must be an old timer.
 
Some old timers have used old motor oil to "paint" the wood to keep it from rotting. I may or may not have done this in the past to keep wooden things from rotting. It may or may not have worked really well. It may or may not be a really good way to use up old motor oil.
I must be an old timer.
I may or may not be too.
 
I must be an old timer.

I would take that as a compliment. Most people my age or younger don't know how to re-use things effectively.
 
I had this same problem and have switched to using "stickers" to stack on. These are 3" x 3" x 42" long solid wood sticks that are used to put under plywood. Less rot and easier to handle and you won't be falling through the rotten pallet getting to the wood on the back.
 
I would take that as a compliment. Most people my age or younger don't know how to re-use things effectively.
Ever recycled used oil using the wick method? I've tried this and it does work. Slow and wouldn't recommend using it in a no need situation but if you had to...
CLEANING USED ENGINE OIL
In hard times in the past, many people have cleaned their own engine oil so their internal combustion engines would not wear out from the use of old, dirty oil. Because it is a simple process to do, and may be necessary in the future, I will give you that information now. Once implanted in your mind you will never forget this process. If you ever need to do this, remember me.
Engine oil does not wear out. It becomes contaminated with grit and combustion residue, and the additives for detergent action and anti-foaming dissipate. Cleaned oil will also lack those additives, but if used at a ratio of 3 quarts of cleaned oil and one quart of new oil, sufficient additives will be present to work while also stretching your supply of new engine oil.
The concept of cleaning used engine oil is based on the capillary action of natural fibers and siphoning which is gravity assisted. A clean natural fiber rope (cotton, hemp, sisal, etc) contains hollow fibers. When oil passes through the cell walls of the fibers the contaminants are trapped in the cells, while the oil passes through readily. A half-inch thick cotton rope about 3 1/2 feet long is best: anything else will work, but slows the process considerably. The trick is to get the oil to go through the rope all by itself, and that is where we use both the capillary action of the fibers and gravity to our advantage.
The typical system is to use two 1-gallon glass containers, like used wine jugs (A visit to your local "waste disposal" or recycling site, a little pilfering, and a trip to confession usually does the trick.) One of the bottles holds the used oil -- the other one will receive the cleaned oil.
Now that you have the bottles you will know how tall they are, so a rack must be built. One side of the rack will have a shelf high enough so that the bottom of one bottle is at the same height as the top of the other one. Just about anything strong enough to hold the bottles securely will work, so this is not a complicated procedure.
Then the bottle full of used oil is put on the top shelf, the empty one on the lower shelf, side by side, and the ends of the rope placed down to the bottom of each bottle. The rope must form a nice hoop from one bottle to the other, not touching the top of either bottle. If necessary, straight pins may be used to hold the rope in the middle of the bottle openings, but the rope must not be pinched. (It is less messy to get the length of rope and the exact placement of the bottles set before filling one with oil.)
The oil will climb up the rope by capillary action, through the loop, then start down toward the empty bottle. As the oil level passes the bottom of the upper bottle, gravity will begin to take effect and the oil will start flowing faster -- still slow, but faster. After a couple of weeks almost all of the oil will be in the lower bottle -- and clean!


That's awesome info. Thanks for posting that! I love tips and tricks like this.
 
No matter what you use to stack on, if it's wood it'll rot eventually. Using lumber under your pallets will save the pallets but the lumber will rot too. I'm still using pallets that are a couple years old but they're sitting in hard dirt, not leaves so that May have something to do with it


Maybe throw down a plastic ground tarp or drop cloth under the pallets
 
We simply cut saplings or limbs inthe woods and lay those down to stack wood on. Don't have to worry about breaking through with these. If you use pallets, I'd think putting something similar to this under the pallets would work nicely.

Ends-3.JPG
 
We simply cut saplings or limbs inthe woods and lay those down to stack wood on. Don't have to worry about breaking through with these. If you use pallets, I'd think putting something similar to this under the pallets would work nicely.

View attachment 128770


BS, I have heard you talking about this several times. I like your stacks and love the idea of doing this way, but I just have a hard time thinking that I would be able to find enough straight limbs and would be able to stack on them without having my stacks tip over all of the time. How do you get them to be so stable?
 
  • Like
Reactions: Backwoods Savage
Thanks Sinngetreu.

No problem. We mostly cut young saplings for stacking on. Mostly keep them so that the ends of the splits are on each sapling. Other than that, it is just being careful when stacking rather than just throwing the wood, although I do at times do that but usually have to straighten them up. We do not stack really tight so that we get air through the stacks. If we did stack tight, they would look better but that is not what we are aiming for.
 
I'm wondering if me splitting with a maul is going to make a difference with uniformity in the cribbed ends. I like what you have going on and I will be looking for saplings now. I do have to trim my spruce branches, they might work.
 
You can split rectangles with a maul the same as you can with hydraulics. Those really work out nicely for ends and for stacking in the stove.
 
Any wood in contact with the ground will rot eventually, so putting a roof over will help but not get rid of the problem. I have heard some people using blocks to put the wood on, and of course Dennis' method works well. I use pallets and saplings, not sure which I prefer yet.
 
In the past I have used landscaping timbers and other reusable things from the yard to go under the pallets. This was done both to keep the pallet out of direct contact with the ground as well as level the pallet for better stacking on my sloped lot. I can see the pallets fail over time from the sheer weight of the firewood with the main structural component of the pallet flexing or breaking. So either they break from being placed on top of supporting timbers or the rot...for me...hopefully my new wood shed will help out.
 
I would agree with your thinking that moisture from the ground has something to do with it. Elevating the pallets will allow them to last a lot longer. I found some metal stringers that work real well. Look for warehouse pallet rack shelving parts. I also think that you will benefit by having drier wood if you elevate, as the bottoms of your stacks are not getting as dry as possible if the pallet immediately under it is rotting out. There obviously is moisture down there that isn't getting out.
 
I use 4x16 " solid concrete blocks laid flat, leveled and spaced every four feet. Put good quality landscaping timbers on them. Although there is some cost this set up has worked well.
 
I was talking to my boss about using pallets, he said to go to Menards (or wherever you get lumber) and ask if you can get a deal on their twisted lumber. Get the treated stuff and it should last a long time. As you pile on the wood, it'll straighten out the boards. He said he never had pallets last longer then a year and found this to work better.
 
In my wood shed, I have many pallets. Before I built it several years ago, I laid down some plastic sheeting, I think 4 mil black sheeting. Those pallets look as good today as when I put them down. No rot from ground moisture!
 
The floor of my wood shed is a few hundred thousand dollars worth of CSU/DSU telcom units from a bankrupt dot com. Aluminum don't rot.
 
We simply cut saplings or limbs inthe woods and lay those down to stack wood on.
I've got a lot of small, straight, dead Sassafras out there and they are pretty straight. It'll be interesting to see how many years the fairly rot-resistant Sass will last.
My preferred method, although more labor-intensive, is using a stash of concrete half thickness blocks I've got and stacking pallets on those. If you can get Oak pallets, they will last many (upwards of ten) years.
 
Status
Not open for further replies.