Hi guys . I am looking for a little help. I am hopeing to do a DIY radiant job .
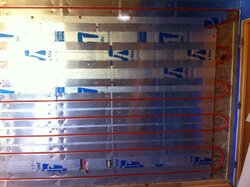
What I am planning is a staple up under floor radiant heating to my down stairs under my bathroom , kitchen , dining , computer area and foyer , roughly about 15 X 32 feet with 2 by 10 floor stringers 16" on center , all of which have inlaid floor covering . Its all open in the basement and the floor is very chilly all the time so I thought this would be a great application and use for my tax return. I have baseboard heat now but could use that in addition to the radiant floor heat if it doesnt keep up . I already have a supply and return plumbed down there with shut offs so I need to continue from there.
I think I have enough skills to do the project but I need to be made smart on how to do it , as to do it right the first time . Is there any sites with some great education and know how ? Or maybe there is some suppliers that do planning help . I think I was kinda planning on getting most parts at menards but if there are supply houses on line that could do better with shipping that would be an option . Also I need to figure a rough cost estimate as an idea not to get to excited and find that its way over my budget . Maybe you guys have great ideas to how and whats best . I have never worked with pex so this would be a new challange .
Thanks in advance .