
Now that I have this thing in and burning I want to post up my experiences so that all may benefit. Thanks to everyone who helped with my sometimes silly questions and concerns. Excuse the darkness of some images, I didn't have the time to lighten themup but certainly am willing to if it would halp anyone. Actually, please let me know if I can offer any clarification on this install. It was permitted and inspected.
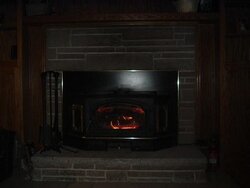
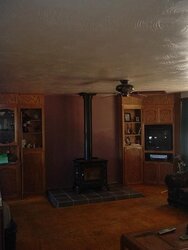
This last Xmas I moved into a house built in 1963 with a masonry fireplace containing a Lopi Freedom Bay insert. Nice sandstone hearth with a short chimney that I had lined with a Homesaver liner right away as a safety item which was a waste of money since I tore it down the following Spring. The masonry was cracked in the rear among other things. The Lopi was certified but about 15 years old and was sold to a new home. Photoa1
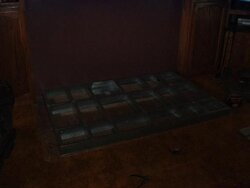
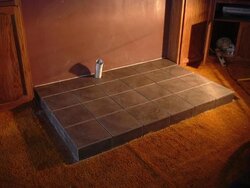
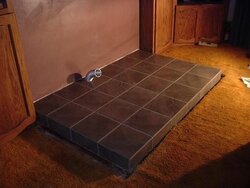
The removed fireplace left a big hole in the floor, the wall, and the ceiling. I framed and the floor in with substantial extra support and several layers of plywood to make up the 2 inch floor thickness. Tongue and groove subfloor. Two extra 4x6 beams under there too. Once I was at grade in the house I built the wall and sheetrocked the holes. I then tried to find micore. Nope not going to happen. So I went with the steel studs and built a platform for the stove. I placed the studwork very close together for strength since this platform would support about 300 lbs of durock, a 500 lb stove, tile, mud, firewood, and the guys installing the stove. The studs feel flimsy but as in teh end the platform worked fine. I used slf tapping scers to attach the studs together and cut them with my steel cutting 14" chopsaw. You've got to size the platform right if you plan to use tile and you don't want to cut it. Biggest mental challenge was that. When putting tile on the top front and sides of the platform everything has to be just right. Even consider how far the tile will squish down into the thinset. Steel studs for platform, photo 1. Last dark photo.
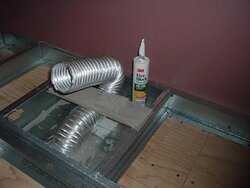
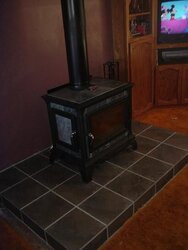
The outside air is REQUIRED to be hooked up by my building inspector. The Hearthstone manual calls out a 3" duct which may be flexible almuminum. The old chimney foundation prevented me from dropping the duct vertically into the crawlspace so I utilized the space within the platform to route my duct. This one platform void is less protected than the others so I lined it with sheet steel. Don't crush the duct it cant' be replaced. Seal the penetration with fireblock.Photo2
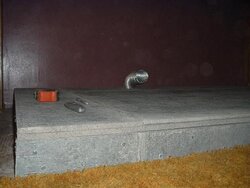
2 layers of durock on top of the studs and one on the side. Each layer is seam sealed with the proper mesh tape and mudded with thinset. Also the layers of durock are glued together with a full layer of thinset. I measured and transfered the stud locations to the durock surface to be sure that all of the screws hit the platform studs. The second durock layer was screwed with no attention paid to the studs or the first set of screws. I cut durock with a circular saw easily. Don't crush the duct! Photo3
This last Xmas I moved into a house built in 1963 with a masonry fireplace containing a Lopi Freedom Bay insert. Nice sandstone hearth with a short chimney that I had lined with a Homesaver liner right away as a safety item which was a waste of money since I tore it down the following Spring. The masonry was cracked in the rear among other things. The Lopi was certified but about 15 years old and was sold to a new home. Photoa1
The removed fireplace left a big hole in the floor, the wall, and the ceiling. I framed and the floor in with substantial extra support and several layers of plywood to make up the 2 inch floor thickness. Tongue and groove subfloor. Two extra 4x6 beams under there too. Once I was at grade in the house I built the wall and sheetrocked the holes. I then tried to find micore. Nope not going to happen. So I went with the steel studs and built a platform for the stove. I placed the studwork very close together for strength since this platform would support about 300 lbs of durock, a 500 lb stove, tile, mud, firewood, and the guys installing the stove. The studs feel flimsy but as in teh end the platform worked fine. I used slf tapping scers to attach the studs together and cut them with my steel cutting 14" chopsaw. You've got to size the platform right if you plan to use tile and you don't want to cut it. Biggest mental challenge was that. When putting tile on the top front and sides of the platform everything has to be just right. Even consider how far the tile will squish down into the thinset. Steel studs for platform, photo 1. Last dark photo.
The outside air is REQUIRED to be hooked up by my building inspector. The Hearthstone manual calls out a 3" duct which may be flexible almuminum. The old chimney foundation prevented me from dropping the duct vertically into the crawlspace so I utilized the space within the platform to route my duct. This one platform void is less protected than the others so I lined it with sheet steel. Don't crush the duct it cant' be replaced. Seal the penetration with fireblock.Photo2
2 layers of durock on top of the studs and one on the side. Each layer is seam sealed with the proper mesh tape and mudded with thinset. Also the layers of durock are glued together with a full layer of thinset. I measured and transfered the stud locations to the durock surface to be sure that all of the screws hit the platform studs. The second durock layer was screwed with no attention paid to the studs or the first set of screws. I cut durock with a circular saw easily. Don't crush the duct! Photo3
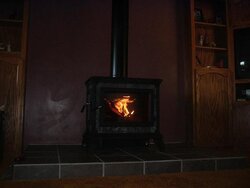
 Congratulations, I'm sure you will get a lot of heat and enjoyment out of that setup.